Salesforce Passkey Workaround
About This Cheat Sheet
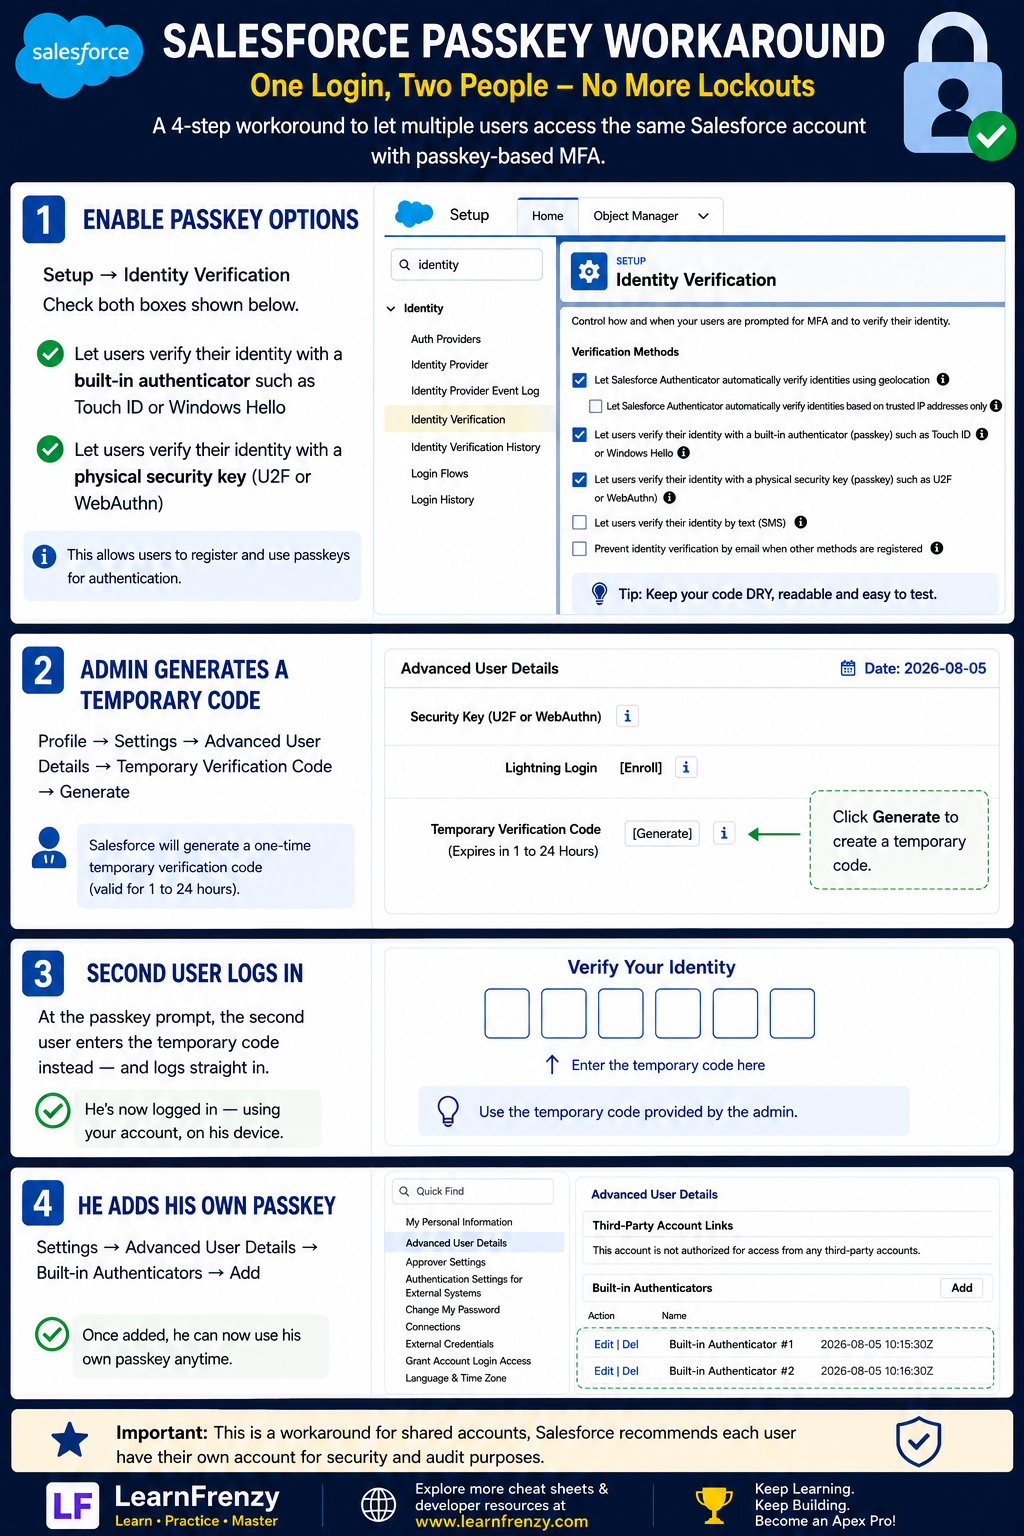
Hey there! Welcome to your quick reference guide for Salesforce Passkey Workaround. This cheat sheet covers enabling passkey authentication, generating a temporary verification code, signing in from another device, registering a new passkey, and security best practices. Save it for quick reference when working with shared Salesforce accounts. Note: Salesforce recommends one account per user for security and audit purposes.
🔑 Enable Passkey Authentication
- Step 1: Log in to Salesforce
- Step 2: Go to Setup
- Step 3: Search for "Passkey"
- Step 4: Click on "Passkey Authentication"
- Step 5: Toggle "Enable Passkey Authentication"
- Step 6: Click "Save"
- Step 7: Wait for changes to propagate
- Step 8: Test the configuration
📱 Generate Temporary Verification Code
- Step 1: Open Salesforce login page
- Step 2: Enter username
- Step 3: Click "Use Passkey"
- Step 4: Select "Generate Verification Code"
- Step 5: Copy the 6-digit code
- Step 6: Enter code on target device
- Step 7: Complete authentication
- Step 8: Code expires in 5 minutes
🔄 Sign in from Another Device
- Step 1: On primary device, open Salesforce
- Step 2: Navigate to "Passkey Management"
- Step 3: Click "Sign in from Another Device"
- Step 4: Enter the target device's code
- Step 5: Approve the sign-in request
- Step 6: Target device gets access
- Step 7: Session remains active
- Step 8: Can be revoked anytime
🆕 Register a New Passkey
- Step 1: Go to Setup
- Step 2: Search "Passkey Management"
- Step 3: Click "Register New Passkey"
- Step 4: Choose device (phone/computer)
- Step 5: Follow device-specific prompts
- Step 6: Use biometric or PIN
- Step 7: Confirm registration
- Step 8: Test the new passkey
🛡️ Security Best Practices
- One Account Per User - Salesforce recommendation
- Audit Trail - Maintain proper tracking
- Logging - Enable detailed logging
- Revoke Access - Remove unused passkeys
- Biometric Lock - Enable device security
- Session Timeout - Set appropriate timeout
- Monitor Activity - Review login history
- Password Rotation - Regular password updates
⚠️ Important Notes
- Security Risk - Shared accounts reduce security
- Audit Compliance - Affects audit trails
- Best Practice - Use only when necessary
- Temporary Workaround - Not a permanent solution
- Code Expiry - Verification codes expire in 5 minutes
- Device Limit - Limited passkeys per account
- Browser Support - Check browser compatibility
- Backup Options - Always have backup access
🔑 Passkey
Passwordless Login
Biometric/PIN📱 5 Minutes
Verification Code
Limited time🔄 Multi-Device
Sign in from anywhere
Cross-device access🛡️ Security
One User Per Account
Audit compliance🔑 Enable Passkey Authentication — Step-by-Step
📌 Step 1-3
- Step 1: Log in to Salesforce with your credentials
- Step 2: Click the gear icon in the top right corner
- Step 3: Select Setup from the dropdown menu
- 💡 My Tip: Use Quick Find to speed up navigation
📌 Step 4-6
- Step 4: In Quick Find box, type "Passkey"
- Step 5: Click on "Passkey Authentication"
- Step 6: Toggle the switch to Enable Passkey Authentication
- 💡 My Tip: Ensure browser supports WebAuthn
📌 Step 7-8
- Step 7: Click Save to apply changes
- Step 8: Wait for changes to propagate (1-2 minutes)
- Step 9: Log out and test the new configuration
- 💡 My Tip: Test with a test account first
📱 Generate Temporary Verification Code
📌 Step 1-4
- Step 1: Open Salesforce login page on your browser
- Step 2: Enter your username and click "Next"
- Step 3: Click on "Use Passkey" option
- Step 4: Select "Generate Verification Code" from the menu
- 💡 My Tip: Keep the code visible while switching devices
📌 Step 5-6
- Step 5: A 6-digit verification code will appear
- Step 6: Copy or note down the code
- Step 7: On the target device, enter the code
- 💡 My Tip: Code is case-sensitive — enter exactly as shown
📌 Step 7-8
- Step 8: Click Verify to complete authentication
- Step 9: You're now signed in on the target device
- Note: Code expires in 5 minutes
- 💡 My Tip: If code expires, generate a new one
🔄 Sign in from Another Device
📌 Step 1-3
- Step 1: On your primary device, open Salesforce
- Step 2: Navigate to Passkey Management
- Step 3: Look for "Sign in from Another Device" option
- 💡 My Tip: Both devices need to be online
📌 Step 4-6
- Step 4: On the target device, go to login page
- Step 5: Select "Sign in with Code"
- Step 6: Enter the code shown on primary device
- 💡 My Tip: Code refreshes every 30 seconds
📌 Step 7-8
- Step 7: Approve the sign-in request on primary device
- Step 8: Target device gets temporary access
- Tip: Session can be revoked anytime
- 💡 My Tip: Revoke access when done
🆕 Register a New Passkey
📌 Step 1-4
- Step 1: Log in to Salesforce with existing passkey
- Step 2: Go to Setup → "Passkey Management"
- Step 3: Click "Register New Passkey" button
- Step 4: Choose device type (phone, laptop, tablet)
- 💡 My Tip: Name your passkey clearly
📌 Step 5-6
- Step 5: Follow device-specific prompts
- Step 6: Use biometric (Face ID/Fingerprint) or PIN
- Step 7: Complete the registration process
- 💡 My Tip: Use a strong PIN
📌 Step 7-8
- Step 8: Confirm registration is successful
- Step 9: Log out and test the new passkey
- Step 10: Manage all passkeys in "Passkey Management"
- 💡 My Tip: Remove unused passkeys regularly
🛡️ Security Best Practices
🔐 Access Control
- One Account Per User — Salesforce recommendation for security and audit
- Unique Passkeys — Each user should have their own passkey
- Device Authorization — Only authorize trusted devices
- 💡 My Tip: Revoke passkeys for lost/stolen devices immediately
📊 Monitoring & Logging
- Enable Login History — Track all authentication attempts
- Enable Session Logging — Monitor active sessions
- Audit Trail — Maintain proper audit records
- 💡 My Tip: Set up alerts for suspicious logins
⚙️ Device Security
- Biometric Lock — Enable Face ID or Fingerprint
- Screen Lock — Set short auto-lock timeout
- Encryption — Ensure device encryption is enabled
- 💡 My Tip: Keep devices updated with latest security patches
⚠️ Important Notes
🚫 Security & Compliance
- Account Security: Salesforce recommends one account per user for security and audit purposes
- Audit Compliance: Using shared accounts can impact audit trails
- Best Practice: Use this workaround only when absolutely necessary
- Risk: Shared accounts reduce accountability and increase security risks
📋 Technical Notes
- Code Expiry: Verification codes expire in 5 minutes
- Device Limit: Limited passkeys per account
- Browser Support: Check browser compatibility for WebAuthn
- Backup Options: Always have backup access method
- Session Timeout: Configure appropriate session timeout for security
🔧 Troubleshooting Common Issues
❌ Issue
- Passkey not showing
- Code not working
- Device not supported
- Passkey registration fails
- Session not persisting
⚠️ Possible Cause
- Browser doesn't support WebAuthn
- Code expired or entered incorrectly
- Device doesn't have biometric/PIN
- Network connectivity issues
- Session timeout or cookie issues
✅ Solution
- Use Chrome/Edge or update browser
- Generate new verification code
- Use a device with biometric support
- Check network connection and retry
- Clear cookies or use incognito mode
🎯 Salesforce Passkey Workaround Quick Reference
The Golden Rule: Use passkey workaround only as a temporary solution. Salesforce strongly recommends one account per user for security, audit, and compliance purposes.
Quick Reference Steps:
- 📌 Enable: Setup → Passkey Authentication → Enable
- 📌 Generate Code: Login → Use Passkey → Generate Verification Code
- 📌 Sign in from Another Device: Primary device → Passkey Management → Sign in from Another Device
- 📌 Register New Passkey: Setup → Passkey Management → Register New Passkey
- 📌 Security: One user per account, enable biometrics, monitor activity
Important Security Checklist:
- ✅ Only use when absolutely necessary
- ✅ Always have backup access method
- ✅ Revoke access immediately after use
- ✅ Monitor login history regularly
- ✅ Enable device biometric security
- ✅ Set appropriate session timeout
- ✅ Keep devices updated
- ✅ Use strong device PIN/password
💡 Pro Tips for Salesforce Passkey Workaround
✅ Use as Temporary Solution
This workaround is designed for temporary access only. Don't rely on it as a permanent solution.
✅ Enable Login History
Always enable login history to track all authentication attempts and monitor for suspicious activity.
✅ Revoke Access Promptly
After the work is done, revoke access immediately to maintain security and audit compliance.
✅ Keep Code Secure
Verification codes are sensitive. Never share them with anyone and keep them private.
✅ Use Biometrics
Enable Face ID or fingerprint on your device for an additional layer of security.
✅ Test Before Deploying
Always test the passkey workaround in a sandbox environment before using in production.
📋 Quick Reference: Passkey Workaround Steps
🔑 Enable
- Setup → "Passkey"
- Passkey Authentication
- Enable → Save
- Wait 1-2 minutes
- Test configuration
📱 Code
- Login page
- Enter username
- "Use Passkey"
- Generate Code
- Copy 6-digit code
🔄 Multi-Device
- Primary device
- Passkey Management
- "Sign in from Another Device"
- Enter code
- Approve sign-in
🆕 Register
- Setup
- Passkey Management
- "Register New Passkey"
- Follow prompts
- Use biometric/PIN
Download Cheat Sheet
Click the button below to download this high-resolution PNG cheat sheet.
Download PNG (1.5 MB)Preview
Still have questions?
We're here to help! Reach out to our support team for any queries.