Five Figure Series
Practice and master this topic with our carefully crafted questions.
Each of the following questions consists of five figures marked A, B, C, D and E called the Problem Figures followed by four other figures marked 1, 2, 3 and 4 called the Answer Figures. Select a figure from amongst the Answer Figures which will continue the same series as established by the five Problem Figures.
Select a figure from amongst the Answer Figures which will continue the same series as established by the five Problem Figures.
| Problem Figures | Answer Figures |
|---|---|

|
|
Pattern Identified: Alternate Rotation of the Bent Hook
🔍 Analysis
The central eight-spoke figure remains unchanged throughout the series. Only the small bent hook attached to one of the spokes changes its position.
Observe the movement of the hook:
- Figure A → Hook at upper-right
- Figure B → Hook at lower-right
- Figure C → Hook at bottom
- Figure D → Hook at upper-left
- Figure E → Hook at top
The hook does not move by a fixed number of spokes. Instead, it rotates alternately through different angular intervals around the star.
Following the same rotational pattern from Figure E places the hook on the lower-right side of the figure.
Among the answer figures, only Option (4) shows the hook in the correct next position.
Correct Answer: Option (D)
⚡ Quick Exam Shortcut
Ignore the central star and focus only on the small bent hook.
Track its position from one figure to the next. The hook rotates around the star in a repeating angular pattern.
After the top position in Figure E, the next position is the lower-right spoke, which matches Option (4).
Shortcut Answer: Follow the hook rotation → Answer Figures Option (4).
Select a figure from amongst the Answer Figures which will continue the same series as established by the five Problem Figures.
| Problem Figures | Answer Figures |
|---|---|

|
|
Pattern Identified: Progressive Addition of Petals in a Fixed Direction
🔍 Analysis
The figure gradually develops into a flower by adding one petal in each successive step.
| Figure | Number of Petals |
|---|---|
| A | 1 |
| B | 2 |
| C | 3 |
| D | 4 |
| E | 5 |
Observe the direction in which the petals are added. Each new petal appears at the next vacant position around the flower, gradually building a complete floral pattern.
Figure E contains five petals. The missing sixth petal must be added at the remaining vacant position to continue the established sequence.
Among the answer figures, Option (1) places the new petal exactly where the pattern requires and completes the flower correctly.
Correct Answer: Option (A)
⚡ Quick Exam Shortcut
Do not just count the petals because all answer figures contain six petals.
Instead, identify the position of the newly added petal in each step and locate the next vacant position in the sequence.
The next petal must appear at the remaining vacant location, which is shown in Option (1).
Shortcut Answer: Follow the petal-growth direction → Option (1).
Select a figure from amongst the Answer Figures which will continue the same series as established by the five Problem Figures.
| Problem Figures | Answer Figures |
|---|---|

|
|
Pattern Identified: Progressive Addition of Line Segments Inside the Circle
🔍 Analysis
The figure is constructed gradually by adding one new component in each successive step.
- Figure A contains a vertical line and a curved arc.
- Figure B adds another arc and a horizontal line.
- Figure C completes most of the circular boundary.
- Figure D completes the inner circle and its division.
- Figure E introduces an outer circular ring and an additional horizontal segment in the upper-right portion.
Observe that each figure adds only one new element while preserving all previous elements.
After Figure E, the next logical step is to add the next missing horizontal segment inside the upper-left portion of the circle while keeping all existing components unchanged.
Among the answer figures, Option (1) shows exactly one additional segment added to the structure and therefore continues the construction pattern correctly.
Correct Answer: Option (A)
⚡ Quick Exam Shortcut
Ignore the entire figure and focus only on what is newly added in each step.
From A → E, one new component is added at a time. Therefore, the answer must contain all parts of Figure E plus exactly one additional segment.
Option (1) is the only figure that follows this rule without altering the existing structure.
Shortcut Answer: Add the next missing segment → Option (1).
Select a figure from amongst the Answer Figures which will continue the same series as established by the five Problem Figures.
| Problem Figures | Answer Figures |
|---|---|

|
|
Pattern Identified: Corresponding Movement of the Outer Arrow and Inner Line
🔍 Analysis
Each figure contains:
- An arrow outside the square.
- A line connected to the central circle inside the square.
Observe the inner line first:
| Figure | Direction of Inner Line |
|---|---|
| A | Right |
| B | Bottom-right |
| C | Bottom-left |
| D | Left |
| E | Up |
The inner line moves progressively around the square. After the upward position in Figure E, the next position is the upper-right diagonal.
Now observe the outer arrow:
- A → Down
- B → Right
- C → Upper-right
- D → Upper-left
- E → Left
Continuing the same movement places the next arrow in the downward direction.
Among the answer figures, only Option (3) shows:
- Inner line directed towards the upper-right corner.
- Outer arrow pointing downward.
Therefore, Option (3) correctly continues the series.
Correct Answer: Option (C)
⚡ Quick Exam Shortcut
Ignore the square and track only the inner line:
→ → ↘ → ↙ → ← → ↑ → ?
The next position is ↗ (upper-right diagonal).
Now check the options having an inner line towards the upper-right corner. Among them, only Option (3) has the correct corresponding outer arrow.
Shortcut Answer: Follow the inner line movement → Option (3).
Select a figure from amongst the Answer Figures which will continue the same series as established by the five Problem Figures.
| Problem Figures | Answer Figures |
|---|---|

|
|
Pattern Identified: Repeating Rotation Cycle of the Complete Figure
🔍 Analysis
Each figure consists of:
- A black-and-white divided shape.
- An outer angular frame.
- A fixed diagonal division inside the figure.
Observe Figures A to E carefully. The entire figure rotates step by step while preserving the relative positions of the shaded and unshaded regions.
Notice that Figures A and E are related through the rotational sequence, indicating the completion of one cycle.
After Figure E, the figure returns to the same orientation pattern as Figure A, but with the next rotational advancement in the sequence.
When the transformation is continued, the black region occupies the upper-left portion while the angular frame appears at the lower side, producing the arrangement shown in Option (3).
Among all answer figures, only Option (3) preserves the correct relationship between:
- The black triangular region
- The white triangular region
- The outer angular frame
Correct Answer: Option (C)
⚡ Quick Exam Shortcut
Ignore the outer frame initially and focus on the black triangular region.
Track its position from one figure to the next. The shaded region follows a cyclic rotational pattern and reaches the position shown in Option (3).
Then verify the position of the outer angular frame. Only Option (3) satisfies both conditions.
Shortcut Answer: Follow the shaded region + frame together → Option (3).
Select a figure from amongst the Answer Figures which will continue the same series as established by the five Problem Figures.
| Problem Figures | Answer Figures |
|---|---|

|
|
Pattern Identified: Progressive Reversal of Arrowheads from Left to Right
🔍 Analysis
Each figure contains two vertical columns of three arrowheads each.
Observe the direction of the arrowheads:
- In Figure A, all six arrowheads point to the right (>).
- In Figure B, the top-left arrowhead changes direction and points left (<).
- In Figure C, the middle-left arrowhead also changes direction.
- In Figure D, the bottom-left arrowhead changes direction.
- In Figure E, the top-right arrowhead changes direction.
Thus, one arrowhead changes from > to < in each successive figure, moving systematically:
Top-Left → Middle-Left → Bottom-Left → Top-Right → Middle-Right → Bottom-Right
By Figure E, four arrowheads have already changed direction. Therefore, in the next figure, the middle-right arrowhead must also change direction.
This results in:
- All three arrowheads in the left column pointing left.
- The top and middle arrowheads in the right column pointing left.
- Only the bottom-right arrowhead still pointing right.
Among the answer figures, this arrangement is shown in Option (2).
Correct Answer: Option (B)
⚡ Quick Exam Shortcut
Count how many arrowheads have changed from > to <.
Exactly one additional arrowhead changes direction in each step.
The changes proceed in order:
Left Column (Top → Middle → Bottom)
↓
Right Column (Top → Middle → Bottom)
The next change occurs at the middle-right position, giving Option (2).
Shortcut Answer: Track the next arrowhead to reverse → Option (2).
Select a figure from amongst the Answer Figures which will continue the same series as established by the five Problem Figures.
| Problem Figures | Answer Figures |
|---|---|

|
|
Pattern Identified: Symmetric Expansion of Symbols
🔍 Analysis
Observe how the symbols are added in each successive figure:
| Figure | Arrangement |
|---|---|
| A | / |
| B | / \ |
| C | / X |
| D | / X \ |
| E | / X X |
Notice that after Figure C, the pattern starts building a balanced arrangement around the centre.
Figure D contains:
/ X \
Figure E replaces the right-side slash with another X:
/ X X
The next logical step is to complete the symmetric pattern by adding a \ at the extreme right while retaining the existing symbols.
This gives:
\ X X \
Among the answer figures, this arrangement is shown in Option (4).
Correct Answer: Option (D)
⚡ Quick Exam Shortcut
Do not focus only on the number of symbols. Observe how the pattern is becoming balanced from left to right.
Figure D creates:
/ X \
Figure E becomes:
/ X X
The next step completes the pattern by adding the matching slash at the opposite end, producing:
\ X X \
Therefore, the correct continuation is Option (4).
Select a figure from amongst the Answer Figures which will continue the same series as established by the five Problem Figures.
| Problem Figures | Answer Figures |
|---|---|
|
|
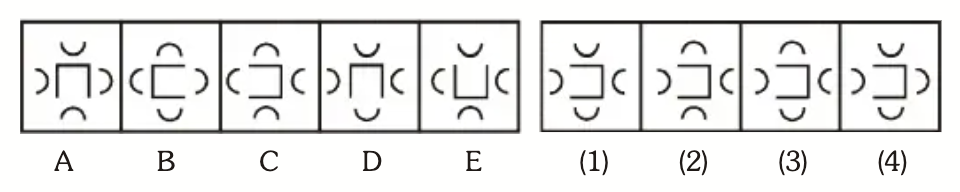
Pattern Identified: Cyclic Rotation of Curved Segments Around the Central Figure
🔍 Analysis
Each figure contains four curved segments positioned around the central square-like structure:
- One curve at the top
- One curve at the bottom
- One curve on the left
- One curve on the right
Observe Figures A to E carefully. The curves change their orientation and position in a cyclic manner around the central figure.
The arrangement in Figure E is not the end of the pattern. The next step continues the rotational sequence, causing the right-side curve to reverse while the remaining curves maintain their relative positions.
Among the answer figures:
- Options (1), (2) and (3) disturb the established orientation pattern.
- Option (4) correctly preserves the orientation of the top and bottom curves while continuing the rotation of the side curves.
Therefore, Option (4) is the correct continuation of the series.
Correct Answer: Option (D)
⚡ Quick Exam Shortcut
Ignore the central figure and focus only on the four surrounding curved segments.
Track how the curves rotate around the centre from one figure to the next.
After Figure E, the next valid arrangement is the one where the side curves continue the sequence without disturbing the top and bottom curves.
Shortcut Answer: Follow the rotation of the surrounding curves → Option (4).
Select a figure from amongst the Answer Figures which will continue the same series as established by the five Problem Figures.
| Problem Figures | Answer Figures |
|---|---|

|
|
Pattern Identified: Cyclic Movement of Symbols Along the Boundary
🔍 Analysis
There are three symbols involved in the series:
- +
- =
- −
Observe the movement of the + sign:
Left → Bottom-Left → Bottom-Right → Top-Right → Top-Left
Thus, the plus sign moves clockwise around the corners of the box. After Figure E, it returns to the left side position.
Now observe the = sign:
Bottom-Right → Centre-Right → Top-Centre → Left Side → Bottom-Centre
It also follows a cyclic movement around the boundary.
Figures A and E are mirror stages of the cycle. Therefore, after Figure E, the arrangement should begin repeating the initial pattern.
Among the answer figures, Option (1) correctly places:
- The + sign on the left side.
- The = sign near the bottom.
- No additional symbol is introduced.
Hence, Option (1) is the correct continuation of the series.
Correct Answer: Option (A)
⚡ Quick Exam Shortcut
Look at Figures A and E carefully.
The symbols have almost completed one full cycle around the boundary of the box. After Figure E, the pattern starts repeating from the initial arrangement.
Therefore, the next figure should resemble the beginning of the cycle, which is shown in Option (1).
Shortcut Answer: One complete cycle is finished → Pattern restarts → Option (1).
Select a figure from amongst the Answer Figures which will continue the same series as established by the five Problem Figures.
| Problem Figures | Answer Figures |
|---|---|

|
|
Pattern Identified: Progressive Upward Transfer of Symbols
🔍 Analysis
The symbols gradually move from the lower portion of the figure to the upper portion one by one.
The sequence of movement is:
+ → − → △ → ▢
By Figure E, all four symbols have reached their designated positions.
The arrangement formed in Figure E is therefore retained while the circular symbols maintain their relative positions.
Among the answer figures, only Option (4) preserves the completed pattern correctly.
Correct Answer: Option (D)
⚡ Quick Exam Shortcut
Track only the movement of the four geometric symbols:
+ → − → △ → ▢
One symbol moves upward in each step. By Figure E, all four have reached their final positions.
The next figure should preserve this completed arrangement, which matches Option (4).
Shortcut Answer: Follow the upward movement sequence → Option (4).