Choosing the Missing Figure in a Series
Practice and master this topic with our carefully crafted questions.
In each of the following questions, there is a set of four figures labelled A, B, C and D called the Problem Set followed by a set of four other figures labelled 1,2,3 and 4 called the Answer Set. Fig. (C) contains a question mark. Select a suitable figure from the Answer Set which will substitute this question mark so that a series is formed by the figures A, B, C and D taken in order. The number of the selected figure is the answer.
Select a suitable figure from the Answer Set which will substitute this question mark so that a series is formed by the figures A, B, C and D taken in order. The number of the selected figure is the answer.
| Problem Figures | Answer Figures |
|---|---|

|
|
Pattern Identified: Cyclic Shift of Arrow Directions
🔍 Analysis
Consider the arrows in the four positions:
- Top
- Right
- Bottom
- Left
Figure A contains:
Top = ↑
Right = →
Bottom = ↓
Left = ←
Figure B contains:
Top = →
Right = ↓
Bottom = ←
Left = ↑
Each arrow shifts one position in a cyclic order.
Applying the same transformation once more to Figure B gives:
Top = ↓
Right = ←
Bottom = ↑
Left = →
This arrangement matches Option (3).
Furthermore, applying the same shift again produces Figure D:
Top = ←
Right = ↑
Bottom = →
Left = ↓
which confirms the pattern.
Correct Answer: (C)
⚡ Quick Exam Shortcut
Read the arrows clockwise:
A: ↑ → ↓ ←
B: → ↓ ← ↑
C: ↓ ← ↑ →
D: ← ↑ → ↓
The sequence shifts one place at every step.
Therefore, the missing figure is Option (3).
Select a suitable figure from the Answer Set which will substitute this question mark so that a series is formed by the figures A, B, C and D taken in order. The number of the selected figure is the answer.
| Problem Figures | Answer Figures |
|---|---|

|
|
Pattern Identified: Symbol Transformation with Position Rearrangement
🔍 Analysis
Each figure contains four symbols placed at the four corners.
Compare Figures A and B:
| Position | Figure A | Figure B |
|---|---|---|
| Top-Left | X | ▢ |
| Top-Right | O | C |
| Bottom-Left | ▢ | △ |
| Bottom-Right | △ | O |
Notice the symbol progression:
X → ▢ → △ → O → C → =
Applying the same transformation to Figure B gives:
△ =
O C
However, before reaching Figure D, the symbols also undergo a positional rearrangement. The intermediate stage must preserve the progression while preparing for the arrangement seen in Figure D.
Among all answer figures, Option (4) is the only one that correctly bridges Figure B and Figure D by maintaining both:
- The symbol transformation sequence.
- The positional movement pattern.
Correct Answer: (D)
⚡ Quick Exam Shortcut
Look at both the symbol changes and their positions.
The symbols follow:
X → ▢ → △ → O → C → =
At the same time, the corner positions are being rearranged. The only option that fits both requirements and leads naturally to Figure D is Option (4).
Shortcut Answer: Symbol progression + position shift → Option (4).
Select a suitable figure from the Answer Set which will substitute this question mark so that a series is formed by the figures A, B, C and D taken in order. The number of the selected figure is the answer.
| Problem Figures | Answer Figures |
|---|---|
|
|
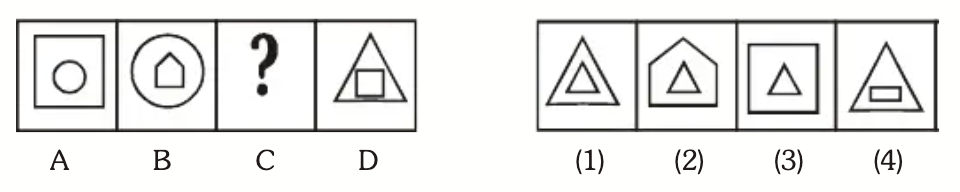
Pattern Identified: Inner Shape Becomes the Next Outer Shape
🔍 Analysis
Each figure contains an outer shape and an inner shape.
The inner shape of one figure becomes the outer shape of the next figure:
Square → Circle → Pentagon → Triangle → Square
Therefore:
A : Square → Circle
B : Circle → Pentagon
C : Pentagon → Triangle
D : Triangle → Square
The missing figure must have a pentagon outside and a triangle inside.
This matches Option (2).
Correct Answer: (B)
⚡ Quick Exam Shortcut
Write the shapes as pairs:
Square → Circle
Circle → Pentagon
? → ?
Triangle → Square
The inner shape always becomes the next outer shape.
Therefore, the missing figure is Pentagon → Triangle, i.e., Option (2).
Select a suitable figure from the Answer Set which will substitute this question mark so that a series is formed by the figures A, B, C and D taken in order. The number of the selected figure is the answer.
| Problem Figures | Answer Figures |
|---|---|

|
|
Pattern Identified: One New Symbol Added at the Top in Each Step
🔍 Analysis
The symbols are added one by one in the following order:
↓ → X → O → ▢
Each new symbol is placed above the existing symbols.
Therefore:
A : ↓
B : X, ↓
C : O, X, ↓
D : ▢, O, X, ↓
The missing figure must contain O, X and ↓ arranged in this order.
Among the answer figures, only Option (4) satisfies this condition.
Correct Answer: (D)
⚡ Quick Exam Shortcut
Count the symbols:
1 → 2 → 3 → 4
A new symbol is added at the top in every step:
↓ → X → O → ▢
Therefore, Figure C must contain O, X and ↓, which is Option (4).
Select a suitable figure from the Answer Set which will substitute this question mark so that a series is formed by the figures A, B, C and D taken in order. The number of the selected figure is the answer.
| Problem Figures | Answer Figures |
|---|---|

|
|
Pattern Identified: Alternating Change of Black-White Orientation
🔍 Analysis
Each figure consists of four small rectangles arranged in a 2 × 2 grid.
Observe Figures A, B and D:
- The shaded portions do not simply rotate.
- The orientation of the black-white divisions changes systematically from one figure to the next.
- Figure C must be the intermediate stage between Figures B and D.
Track the position of the black portions in each small rectangle:
The top-row rectangles gradually change from horizontal divisions to vertical divisions, while the bottom-row rectangles follow the complementary transformation.
The missing figure should therefore contain:
- Vertical divisions in the upper row.
- Horizontal divisions in the lower row.
- The black portions positioned exactly as required to bridge Figures B and D.
Among the answer figures, only Option (3) satisfies all these conditions.
Correct Answer: (C)
⚡ Quick Exam Shortcut
Look at the orientation of the four small rectangles instead of the whole figure.
The pattern alternates between:
Vertical Division → Horizontal Division → Vertical Division
The missing figure must be the transition stage between Figures B and D.
This matches Option (3).
Select a suitable figure from the Answer Set which will substitute this question mark so that a series is formed by the figures A, B, C and D taken in order. The number of the selected figure is the answer.
| Problem Figures | Answer Figures |
|---|---|

|
|
🔍 Analysis
The square is divided into eight triangular sectors. Focus only on the two black triangular sectors.
Observe their movement:
- From Figure A to Figure B, both black sectors rotate one position in the anti-clockwise direction.
- The same movement continues throughout the series.
- Figure D shows the next stage after the missing Figure C.
Therefore, the black sectors in Figure C must occupy the positions immediately preceding those shown in Figure D.
Among the answer figures, only Option (4) places both black sectors in the correct intermediate positions.
Hence, the missing figure is Option (4).
Correct Answer: (D)
⚡ Quick Exam Shortcut
Track only the two black triangular sectors.
A → B → C → D
Both black sectors rotate one position anti-clockwise in each step.
The figure that correctly represents the next intermediate stage is Option (4).
Shortcut Answer: Follow the movement of black sectors only → Option (4).
Select a suitable figure from the Answer Set which will substitute this question mark so that a series is formed by the figures A, B, C and D taken in order. The number of the selected figure is the answer.
| Problem Figures | Answer Figures |
|---|---|

|
|
🔍 Analyze the Series
The same curved figure rotates by 45° clockwise in each successive step.
A → B → C → D
Thus the orientations become:
0° → 45° → 90° → 135°
Therefore, Figure C must be the 90° clockwise rotation of Figure A, which produces a horizontal S-shaped figure.
Among the answer figures, only Option (3) matches this orientation.
Correct Answer: (C)
⚡ Quick Exam Shortcut
Observe the orientation of the curved figure only.
The figure rotates through an angle of 45° clockwise in each successive step:
0° → 45° → 90° → 135°
Therefore, the missing figure must represent the 90° clockwise rotation of Figure A.
Among the answer figures, only Option (3) shows the required horizontal orientation.
Shortcut Answer: 45° clockwise rotation pattern → Option (3).
Select a suitable figure from the Answer Set which will substitute this question mark so that a series is formed by the figures A, B, C and D taken in order. The number of the selected figure is the answer.
| Problem Figures | Answer Figures |
|---|---|
|
|
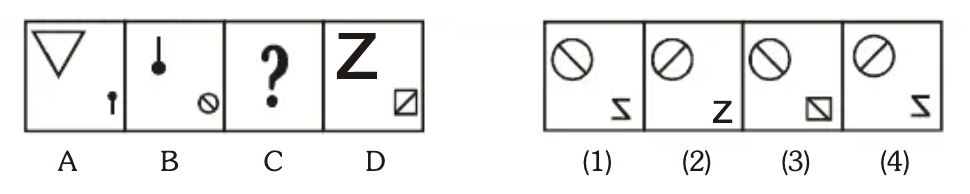
🔍 Analyze the Series
Observe the relationship between the small symbol of one figure and the large symbol of the next figure.
- In Figure A, the small symbol is a vertical line with a dot.
- In Figure B, this symbol appears enlarged.
- In Figure B, the small symbol is a circle with a diagonal line.
- Therefore, the large symbol in Figure C must be the enlarged circle with a diagonal line.
Now compare Figure C and Figure D.
The small symbol in Figure C must transform into the large symbol Z shown in Figure D.
The symbol that becomes Z after rotation is the reversed Z-shape shown in Option (4).
Therefore, Figure C should contain:
- Large symbol = Circle with diagonal line
- Small symbol = Reversed Z-shape
Only Option (4) satisfies this condition.
Correct Answer: (D)
⚡ Quick Exam Shortcut
Focus on the small symbols.
The small symbol of one figure becomes the large symbol of the next figure after rotation.
▽ → ●│ → ⊘ → Z
Since Figure D contains Z, Figure C must contain the rotated form that produces Z.
Shortcut Answer: Rotated small symbol → Next large symbol → Option (4).
Select a suitable figure from the Answer Set which will substitute this question mark so that a series is formed by the figures A, B, C and D taken in order. The number of the selected figure is the answer.
| Problem Figures | Answer Figures |
|---|---|

|
|
🔍 Analyze the Series
Observe both the arrow and the dot.
Arrow Pattern
The arrow moves around the circumference by 90° clockwise in each step:
Left → Top → Right → Bottom
Since:
- Figure A = Left
- Figure B = Top
- Figure D = Bottom
The missing Figure C must have the arrow at the Right position.
Dot Pattern
The dot moves one quadrant clockwise in each figure:
Top-Right → Bottom-Right → Bottom-Left → Top-Left
Also, the dot alternates:
Hollow → Filled → Hollow → Filled
Therefore, Figure C must contain:
- A hollow dot
- In the bottom-left quadrant
- An arrow on the right side
Among the answer figures, only Option (4) satisfies all these conditions.
Correct Answer: (D)
⚡ Quick Exam Shortcut
Track the arrow position:
Left → Top → Right → Bottom
Track the dot:
Top-Right → Bottom-Right → Bottom-Left → Top-Left
And its type:
Hollow → Filled → Hollow → Filled
Shortcut Answer: Right-side arrow + hollow dot in bottom-left quadrant → Option (4).
Select a suitable figure from the Answer Set which will substitute this question mark so that a series is formed by the figures A, B, C and D taken in order. The number of the selected figure is the answer.
| Problem Figures | Answer Figures |
|---|---|
|
|
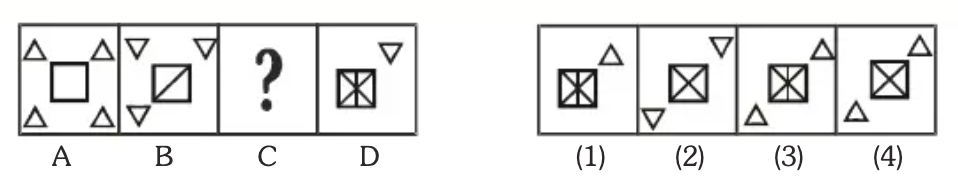
🔍 Analyze the Series
Observe the corner triangles first:
4 → 3 → 2 → 1
Therefore, the missing figure must contain 2 corner triangles.
Now observe the central square:
- Figure A: Empty square
- Figure B: One diagonal line
- Figure C: Two diagonals forming an X
- Figure D: X + one additional vertical line
Thus, Figure C should contain only an X inside the square.
Next, look at the positions of the remaining corner triangles:
- Figure A has 4 triangles.
- Figure B has 3 triangles (bottom-right triangle disappears).
- Figure C should have 2 triangles.
- Figure D has only the top-right triangle remaining.
So in Figure C, the remaining triangles must be:
- Top-right
- Bottom-left
Among the answer figures, only Option (4) shows:
- Exactly 2 corner triangles.
- An X inside the square.
- The correct triangle positions leading to Figure D.
Correct Answer: (D)
⚡ Quick Exam Shortcut
Count the corner triangles:
4 → 3 → 2 → 1
Then count the lines inside the square:
0 → 1 → 2 → 3
The missing figure must have:
- 2 corner triangles
- An X inside the square
The only figure satisfying both conditions is Option (4).
Shortcut Answer: 4→3→2→1 triangles and 0→1→2→3 inner lines → Option (4).