Understanding Decorators and Lifecycle Hooks in Salesforce LWC
Understand LWC decorators (@api, @track, @wire) and lifecycle hooks with clear examples — what each does and when to use it in your components.
How Lightning Web Components communicate — parent to child, child to parent, pub-sub and Lightning Message Service — with complete code examples.
In the dynamic world of web development, the ability to create interactive and responsive applications is a coveted skill. Salesforce's Lightning Web Components (LWC) provide the tools to do just that. However, to unlock their full potential, developers need to master the art of component communication.
Our blog series, "Mastering Component Communication in LWC," is your gateway to becoming a proficient LWC developer. Whether you're new to the world of LWC or an experienced developer looking to hone your skills, this series has something for everyone.
Throughout this journey, we'll explore four essential methods of communication:
But this series isn't just about theory. We'll bring each communication method to life with practical examples, code samples, and anticipated results. With these real-world applications, you'll not only understand the concepts but also gain the confidence to implement them in your own LWC projects.
Component communication is the backbone of creating seamless, interactive, and responsive applications. Join us on this journey, and by the end of this series, you'll have the knowledge and skills to make your LWCs communicate harmoniously, regardless of the complexity of your development tasks.
Hey Guys, In this topic we will cover how LWC component communicate with each other
There are four ways to communicate a component:
Parent components can communicate with their child components by passing data through properties. The child component can receive and react to the data from its parent.
To make parent to child communication, here are below steps:
A). Passing Primitive data to child
B). Passing Non-Primitive data to child
C). Passing data to child on action event
D). Calling child method to parent
In Lightning Web Components (LWC), you can easily pass primitive data from a parent component to a child component by setting properties on the child component. This allows the parent and child components to communicate effectively.
Let's break down the process with more details and code examples:
In the parent component's HTML file, you define the child component and set a property called message on it, which will hold the data to be communicated to the child component.
<template>
  <div class="slds-p-horizontal_small">
    Parent to Child | Child to Parent communication
  </div>
  <lightning-card title="Parent Component">
    <div class="slds-p-horizontal_small" style="border: solid;">
      <c-child-component message={messageToChild}></c-child-component>
    </div>
  </lightning-card>
</template>In the parent component's JavaScript file, you define the value for the messageToChild property. This value is the data that you want to pass to the child component. For this scenario, let's set it to "Hello from Parent!"
// parentComponent.js
import { LightningElement } from 'lwc';

export default class ParentComponent extends LightningElement {
  messageToChild = 'Hello from Parent!';
}In the child component's HTML file, you set up the space to receive and display the message property, which will be passed down from the parent.
<template>
  <lightning-card title="Child Component">
    <div class="slds-p-horizontal_small">
      {message}
    </div>
  </lightning-card>
</template>In the child component's JavaScript file, you declare the message property using the @api decorator. This decorator makes the property accessible for the parent component to set its value.
// childComponent.js
import { LightningElement, api } from 'lwc';

export default class ChildComponent extends LightningElement {
  @api message;
}
Expected Output

When you load the parent component, it renders the child component with the message "Hello from Parent!" displayed inside it.
This simple yet powerful technique of passing primitive data from a parent to a child component is fundamental for building structured and interconnected Lightning Web Components. It allows you to create reusable and modular components while ensuring effective communication within your application.
In Lightning Web Components (LWC), you can pass non-primitive data, such as objects or arrays, from a parent component to a child component for effective communication. This allows you to share complex data structures between components, creating a hierarchical relationship.
Here's a step-by-step guide with example code and expected output:
In the parent component's HTML file, you specify the child component (c-child-component) and set a property (contact) on it. This property will carry the non-primitive data to be communicated to the child component.
<template>
  <div class="slds-p-horizontal_small">
    Parent to Child | Child to Parent communication
  </div>
  <lightning-card title="Parent Component">
    <div class="slds-p-horizontal_small" style="border: solid;">
      <c-child-component contact={contactData}></c-child-component>
    </div>
  </lightning-card>
</template>In the parent component's JavaScript file, you define the value for the contactData property. This is the non-primitive data (an object in this case) you want to pass to the child component.
// parentComponent.js
import { LightningElement } from 'lwc';

export default class ParentComponent extends LightningElement {
  contactData = {
    name: 'Saurabh Samir',
    email: 'samir@example.com',
    phone: '123-456-7890'
  };
}In the child component's HTML file, you are ready to receive and display the contact property passed down from the parent.
<template>
  <lightning-card title="Child Component">
    <div class="slds-p-horizontal_small">
      <p>Name: {contact.name}</p>
      <p>Email: {contact.email}</p>
      <p>Phone: {contact.phone}</p>
    </div>
  </lightning-card>
</template>In the child component's JavaScript file, you declare the contact property as an @api property. This decorator makes it accessible for the parent component to set its value.
// childComponent.js
import { LightningElement, api } from 'lwc';

export default class ChildComponent extends LightningElement {
  @api contact;
}
Expected Output
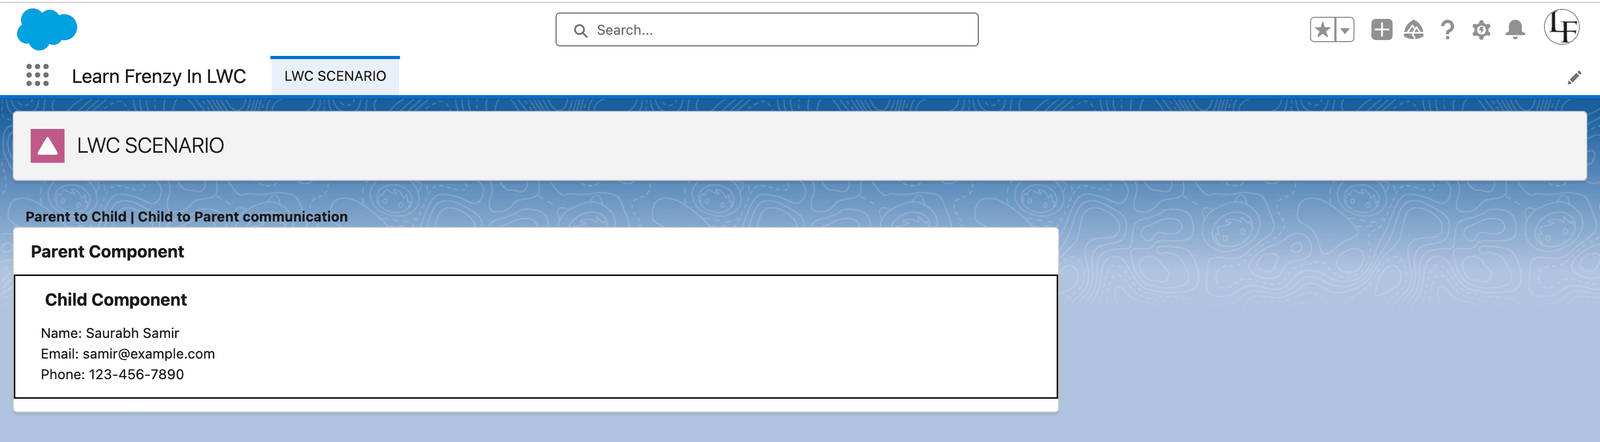
When you load the parent component, it will render the child component with the contact details (name, email, and phone) displayed inside it.
This illustrates how you can pass non-primitive data from a parent to a child component in LWC. It's a powerful method for sharing complex data structures, making your components more versatile and capable of handling rich, interconnected data.
In Lightning Web Components (LWC), you can pass data from a parent component to a child component when a specific action or event occurs. This allows for dynamic communication from the parent to the child, ensuring that data is shared when needed.
Let's go through the process with example code and an expected output:
In the parent component's HTML file, you include the child component (c-child-component) and set up an event handler for a specific action, like a button click, to pass data to the child component.
<template>
  <div class="slds-p-horizontal_small">
    Parent to Child | Child to Parent communication
  </div>
  <lightning-card title="Parent Component">
    <div class="slds-p-horizontal_small" style="border: solid;">


      <lightning-input type="text" placeholder="Enter something" onkeyup={inputTextHandler}></lightning-input>


      <lightning-button variant="brand" label="Send to Child" onclick={clickHandler}
        class="slds-m-left_x-small"></lightning-button>
    </div>
    <div class="slds-p-horizontal_small" style="border: solid;">


      <c-child-component receive-data={sendData}></c-child-component>
    </div>
  </lightning-card>
</template>In the parent component's JavaScript file, you define the clickHandler function, which sets the value for the sendData property when the button is clicked.
// parentComponent.js
import { LightningElement } from 'lwc';
export default class ParentComponent extends LightningElement {
  sendData;
  inputTextHandler(event) {
    this.textValue = event.target.value;
  }

  //Send data from parent to child on actions
  clickHandler() {
    this.sendData = this.textValue;
  }
}In the child component's HTML file, you are ready to receive and display the receiveData property passed from the parent.
<template>
  <lightning-card title="Child Component">
    <div slot="footer">
      Child : {receiveData}
    </div>
  </lightning-card>
</template>In the child component's JavaScript file, you declare the receiveData property as an @api property to make it accessible for the parent component.
// childComponent.js
import { LightningElement, api } from 'lwc';

export default class ChildComponent extends LightningElement {
  @api receiveData;
}
Expected Output
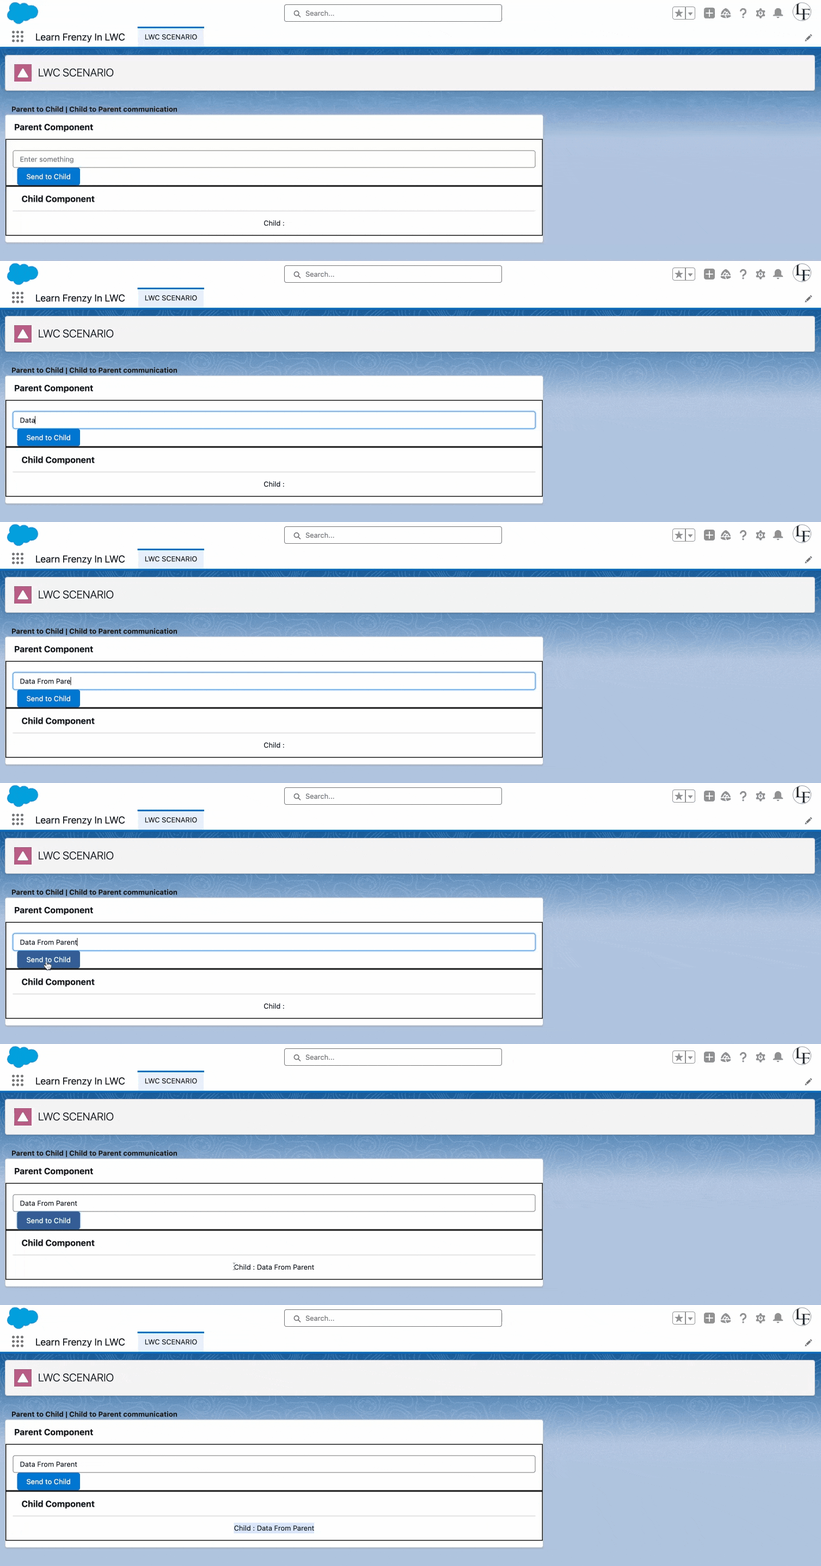
When you load the parent component, it will display a button labeled "Send to Child." Clicking the button triggers the clickHandler function in the parent component, setting the value of the sendData property to 'Data from Parent'. This data is then passed to the child component and displayed inside it.
This example illustrates how to pass data from a parent to a child component in LWC when a specific action event occurs. It allows for dynamic communication and is a valuable technique for sharing data precisely when it's needed.
In Lightning Web Components (LWC), you can call a method defined in a child component from a parent component to facilitate communication from parent to child. This approach allows the parent component to invoke specific actions or operations within the child component.
By using this.template.querySelector(), you can call child component method by passing child component name in querySelector parameter.
eg:- this.template.querySelector(‘c-child-component’).childMethod().
Here's a step-by-step guide with example code and an expected output:
In the child component's HTML file, is a simple template for the child component, displaying a lightning-card with a title and a footer section that may show information related to a "Child" The specific content of {showMethod} would depend on the JavaScript logic in the child component's JavaScript file.
Child: {showMethod}: Inside the footer section, the text "Child: " is followed by a placeholder, {showMethod}. In LWC, you can use placeholders to display dynamic data. In this context, {showMethod} is likely a variable or property in the child component, and its value will be displayed in this part of the footer.
<template>
  <lightning-card title="Child Component">
    <div slot="footer">
      Child : {showMethod}
    </div>
  </lightning-card>
</template>In the child component's JavaScript file, define the childMethod method using the @api decorator. This makes it accessible for the parent component.
// childComponent.js
import { LightningElement, api } from 'lwc';

export default class ChildComponent extends LightningElement {

showMethod=' '
  @api childMethod(){
            this.showMethod = 'Child Method Called'
            console.log('child method called');
    }
}In the parent component's HTML file, include the child component (c-child-component) and a button that, when clicked, will call the childMethod in the child component.
<template>
  <div class="slds-p-horizontal_small">
    Parent to Child | Child to Parent communication
  </div>
  <lightning-card title="Parent Component">
    <div class="slds-p-horizontal_small" style="border: solid;">
      <lightning-button variant="brand"
                        label="Call Child Method"
                        onclick={callChild}
                        class="slds-m-left_x-small">
      </lightning-button>
    </div>

    <c-child-component></c-child-component>
  </lightning-card>
</template>In the parent component's JavaScript file, define the callChild function. This function will use the dispatchEvent method to call the childMethod in the child component.
// parentComponent.js
import { LightningElement } from 'lwc';

export default class ParentComponent extends LightningElement {

   //Call method from child component
    callChild() {
    this.template.querySelector('c-child-component').childMethod();
  }
}
Expected Output
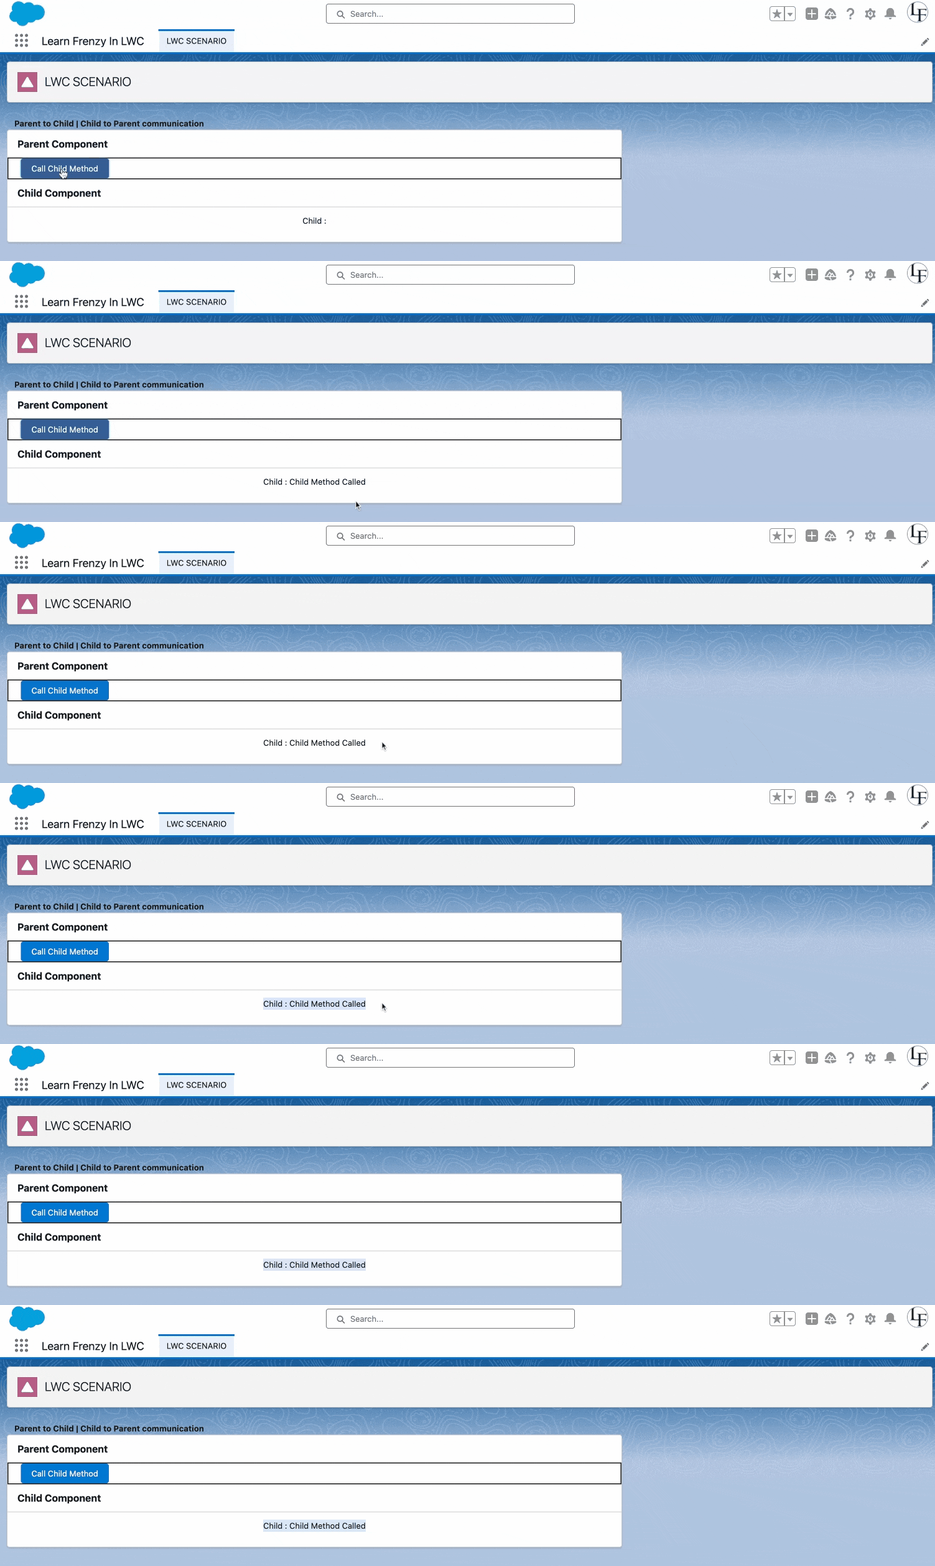
When you load the parent component, you will see a button labeled "Call Child Method." Clicking this button will trigger the callChild function in the parent component. This function finds the child component using this.template.querySelector and then calls the childMethod of the child component.
This example illustrates how to call a child method from a parent component in LWC, enabling parent-to-child communication by invoking specific actions or operations in the child component.
In Lightning Web Components (LWC), establishing communication from a child component to a parent component is a common requirement. You can achieve this by firing custom events from the child component, which the parent component listens to.
To make child to parent communication, we have to use Custom Events and dispatch that event, but before we move to Custom Events, lets understand first what is Events.
Any interaction with JS and HTML are handled through Event. When the user or the browser wants to play with page when the page loads, it is called an event. All events are prefix with 'on' keyword.
For eg. onclick, onchange, onkeyup etc.
To create custom event, use CustomEvent() constructor. It has one required parameter, which is a string indicating the event type.
To fire Custom Event, use EventTarget.dispatchEvent().
In LWC, EventTarget is this.
Here's an example with code and expected output:
In the parent component's HTML file, include the child component (c-child-component) and define an event handler to respond to the custom event dispatched by the child.
<template>
  <div class="slds-p-horizontal_small">
    Parent to Child | Child to Parent communication
  </div>
  <lightning-card title="Parent Component">
    <div class="slds-p-horizontal_small" style="border: solid;">
      <div>
        Parent :- {dataRecievedFromChild}
      </div>
    </div>
    <div class="slds-p-horizontal_Small" style="border: solid;">
      <c-child-component onsendevent={receivedEvent}>
      </c-child-component>
    </div>
  </lightning-card>
</template>In the parent component's JavaScript file, define the receivedEvent method to respond to the custom event. This method can perform any desired action in the parent component.
// parentComponent.js
import { LightningElement } from 'lwc';

export default class ParentComponent extends LightningElement {
  dataRecievedFromChild = ' '
  receivedEvent(event) {
    console.log('Event received from child component');
    this.dataRecievedFromChild = event.detail

  }
}In the child component's HTML file, include a button that, when clicked, triggers an event to communicate with the parent component.
<template>
  <lightning-card title="Child Component">
    <div slot="footer">
      <lightning-input type="text"
                       placeholder="Enter something"
                       onkeyup={childInputTextHandler}>
      </lightning-input>
      <lightning-button variant="brand"
                        label="Send to Parent"
                        onclick={childClickHandler}
                        class="slds-m-left_x-small">
      </lightning-button>
    </div>
  </lightning-card>
</template>In the child component's JavaScript file, define the childClickHandler method that dispatches a custom event to signal the parent component.
// childComponent.js
import { LightningElement } from 'lwc';

export default class ChildComponent extends LightningElement {

  childInputText = ''
  childInputTextHandler(event) {
    this.childInputText = event.target.value
  }

  childClickHandler() {
    this.dispatchEvent(new CustomEvent('sendevent', {
      detail: this.childInputText
      /* you can place data in form of object also
           detail: {
           msg: this.childInputText
          }
      */
    }))
  }
}
Expected Output
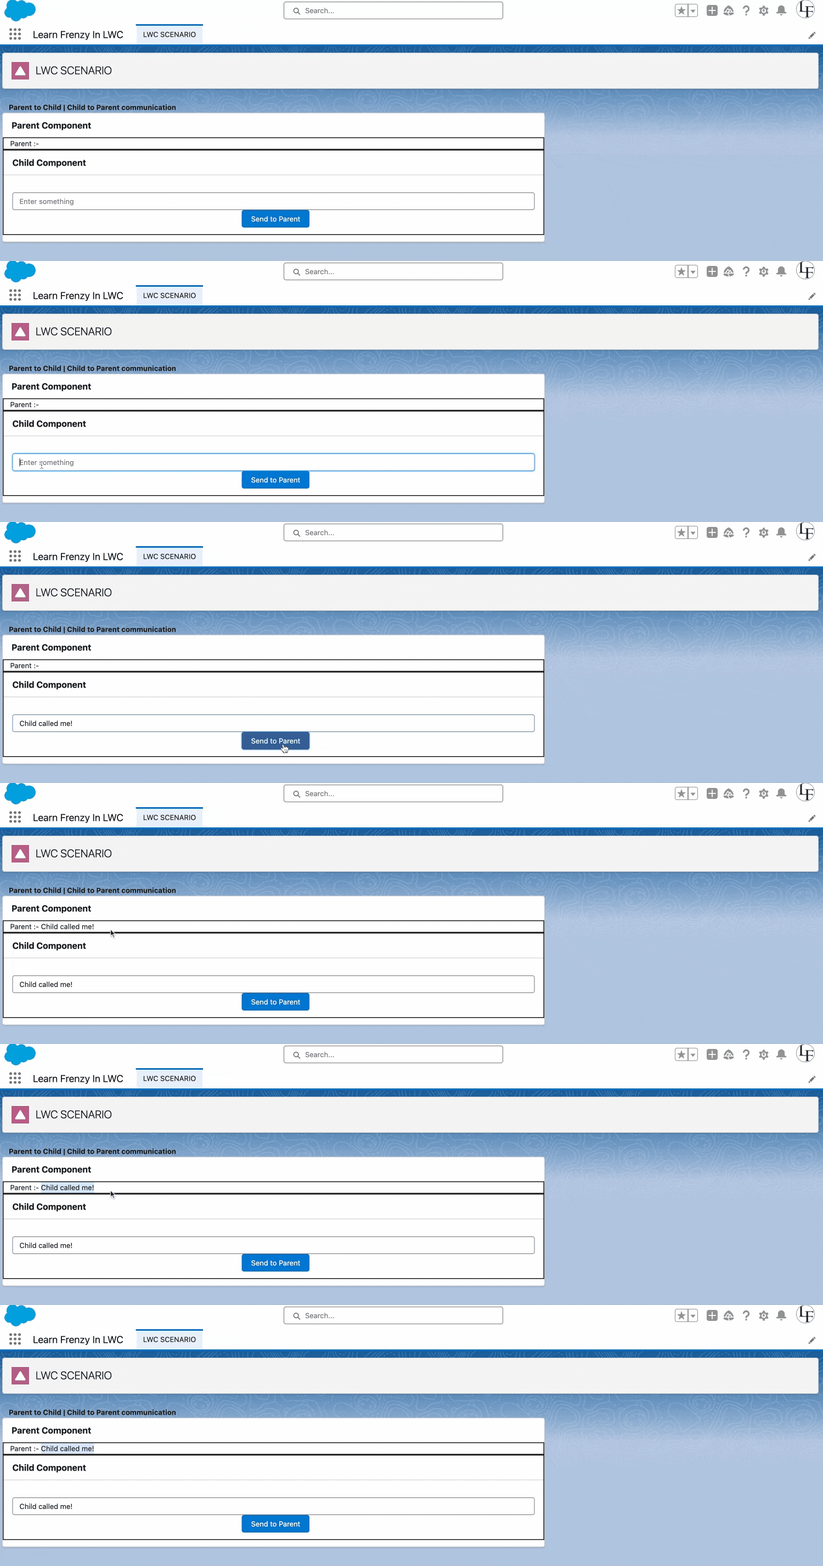
When you load the parent component, it will include the child component. Clicking the "Send to Parent" button in the child component will trigger the childClickHandler method, which dispatches a custom event. This event bubbles up to the parent component, where the receivedEvent function responds by showing the message "Parent Component: Child called me!"
This example demonstrates how child components can communicate with parent components in LWC by firing custom events that are handled by the parent component.
To achieve communication between two independent component, we use two techniques:
1) Pub-Sub model
2) Lightning Message Service (LMS)
In this topic we will learn how to make Independent Component Communication using Pub-Sub Model.
In Lightning Web Components (LWC), independent components can communicate with each other using a publish-subscribe (pub-sub) model. This approach allows components to exchange information without the need for a direct parent-child relationship. The pub-sub model is particularly useful when you have components that are not closely related but still need to share data or trigger actions.
Here's how it works:
Here are the key elements involved:
publish method.subscribe method. It specifies a callback function to handle the data when an event is published on a subscribed topic.Mind it!
In a publish-subscribe pattern, one component publishes an event. Other components subscribe to receive and handle the event. Every component that subscribes to the event receives the event. The
pubsubmodule restricts events to a single page i.e you can perform communication between LWC to LWC only, if you wanna perform communicate across DOM, use LMS instead pub-sub model.
Here's an example with code and expected output:
In your Salesforce project, create a JavaScript module that serves as the pub-sub service. This module will provide methods for publishing and subscribing to events. Here's a simplified version of this service:
// pubSubService.js

/* eslint-disable no-console */
const store = {};
/**
 * subscribers a callback for an event
 * @param {string} eventName - Name of the event to listen for.
 * @param {function} callback - Function to invoke when said event is fired.
 */

const subscribe = (eventName, callback) => {
  if (!store[eventName]) {
    store[eventName] = new Set();
  }
  store[eventName].add(callback);
};

/**
 * unsubscribe a callback for an event
 * @param {string} eventName - Name of the event to unsubscribe from.
 * @param {function} callback - Function to unsubscribe.
 */
const unsubscribe = (eventName, callback) => {
  if (store[eventName]) {
    store[eventName].delete(callback);
  }
};

/**
 * Publish an event to listeners.
 * @param {string} eventName - Name of the event to publish.
 * @param {*} payload - Payload of the event to publish.
 */

const publish = (eventName, payload) => {
  if (store[eventName]) {
    store[eventName].forEach(callback => {
      try {
        callback(payload);
      } catch (error) {
        console.error(error);
      }
    });
  }
};

export default {
  subscribe,
  unsubscribe,
  publish
};
In the above code, there are three Const variable which hold two paremeter, the first one is eventName and second is callback method
For this example, create two independent components that need to communicate with each other.
<template>
  <div class="slds-p-horizontal_small">
    Independent Component communication using Pub-Sub Model
  </div>
  <lightning-card title="First Component">
    <div class="slds-p-horizontal_Small">
      <lightning-input type="text"
                       placeholder="Enter something"
                       onkeyup={inputTextHandler}>
      </lightning-input>
      <lightning-button variant="brand"
                        label="Publish"
                        onclick={publishHandler}
                        class="slds-m-left_x-small">
      </lightning-button>
    </div>
  </lightning-card>
</template>
PubSubCompA (pubSubCompA.js)
// pubSubCompA.js

import { LightningElement } from 'lwc';
import pubSubService from 'c/pubSubService';

export default class PubsubCompA extends LightningElement {
  compAMessage = ''
  inputTextHandler(event) {
    this.compAMessage = event.target.value
  }
  publishHandler() {
    pubSubService.publish('messageFromCompA', this.compAMessage)
    console.log('published Comp A');
  }
}<template>
<div class="slds-p-horizontal_small">
Independent Component communication using Pub-Sub Model
</div>
<lightning-card title="Second Component">
<div class="slds-p-horizontal_small">
message: - {messageData}
</div>
</lightning-card>
</template>PubSubCompB (pubSubCompB.js)
// pubSubCompB.js

import { LightningElement } from 'lwc';
import pubSubService from 'c/pubSubService';

export default class PubsubCompB extends LightningElement {
  messageData = ''
  connectedCallback() {
    this.subscribeComponent()
  }
  subscribeComponent() {
    pubSubService.subscribe('messageFromCompA', (message) => {
      this.messageData = message
    })
  }
}
Expected Output
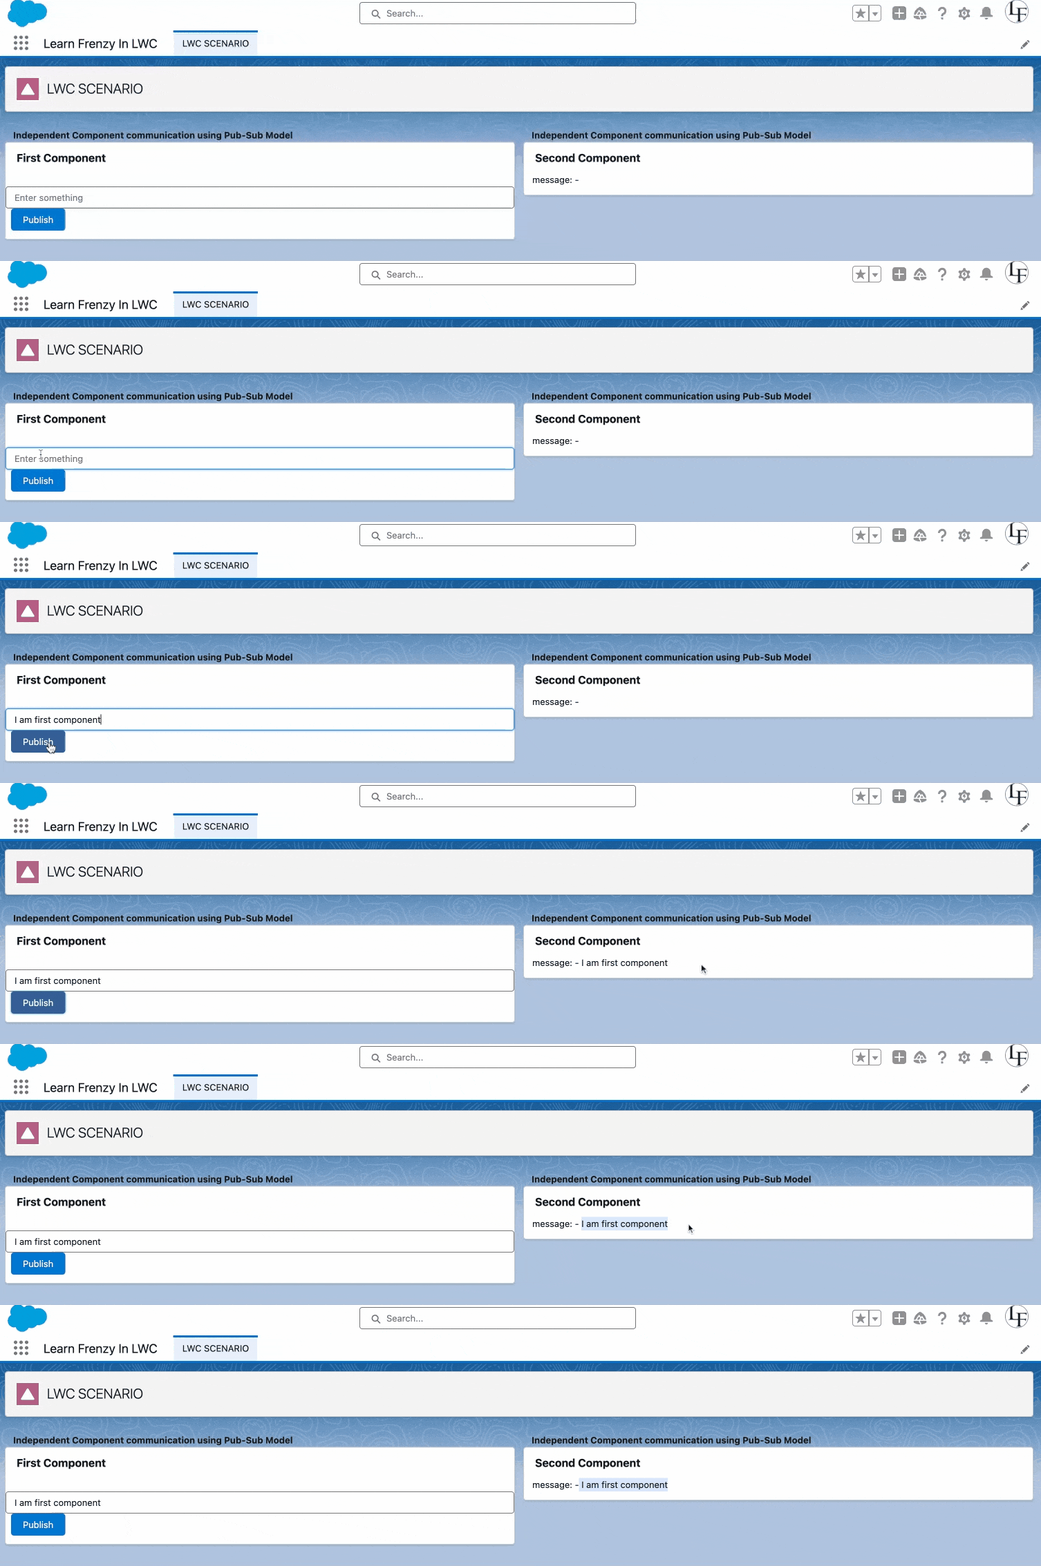
This example showcases how independent components in LWC can communicate using a publish-subscribe model. Second Component subscribes to a custom store and updates its content when First Component publishes a message to that topic.
"Stay tuned for more exciting LWC topics, and keep exploring the world of Lightning Web Components to become a Salesforce development pro. Happy coding!"

One short email when we publish something new — interview questions, Salesforce guides and career tips. No spam, unsubscribe in one click.
Understand LWC decorators (@api, @track, @wire) and lifecycle hooks with clear examples — what each does and when to use it in your components.
JavaScript fundamentals for Lightning Web Components — scope, this, closures, promises, events and modules — explained with LWC-focused examples.
The JavaScript concepts to know before starting Lightning Web Components — variables, functions, objects, arrays, classes, modules and promises.
Questions, corrections or your own experience — they all help the next reader.