Top 30 Salesforce CPQ Interview Questions & Answers
Thirty Salesforce CPQ interview questions with answers — quote-to-cash, products, bundles, price rules, product rules, approvals and contracts.
Scenario-based Lightning Web Components interview questions as a real interview — data flow, events, wire service, Apex calls and performance.

Hello everyone, Welcome in SFDC Worlds...!!
As Salesforce world is moving towards Lightning Web components (LWC), So today I will share the scenario-based Lightning web components interview questions with you.
Asking simple straightforward questions in Salesforce is history. Few years back Salesforce certified people were very less. Hence criteria was just to check whether that person know about Salesforce or not.
So questions used to be:
• What are Lightning Web Components (LWC)?
• What is Lightning Framework in Salesforce?
• How is LWC different from Aura?
• What is the use of a Lightning Component Framework?
• In how many ways can lightning components be made?
• What are the different Lightning page types?
etc.
If you notice above questions are crisp to the point. But now since in market there are many Salesforce certified people above style of interview doesn't work. One could easily memories these.
Now the style of asking questions is different for the interviewer. There is more focus on asking real time scenario questions rather than how etc.
Check Scenario Based LWC Interview Questions as one can have the theoretical knowledge. But the recruiters also check for scenario-based knowledge or Practical knowledge. Recruiters always ask tricky questions on the problems that one can face during implementation.
Only the person which has faced the problems while execution can only answer the questions.
In this blog series, I have tried to cover all LWC Scenario Based Interview Questions which are often asked by Salesforce Developer in an interview.
Please go through them in depth.
Lightning Web Components are custom HTML elements build using the HTML Elements and modern JavaScript. We can build components using any of the models and can place these components on the same lightning page.
As of now, we have built a lightning component using the "Aura Components model". we can also build a lightning component using the "Lightning Web Components model".
Instead of up to 8 files you only need 4. For one: all JavaScript (3 files) now lives in one ES6 JS file and we don't have an auradoc or svg file for now
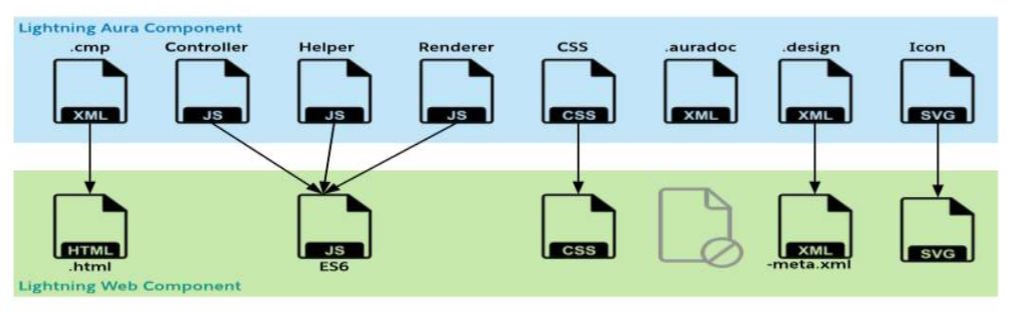
Mind it!
For developing LWC we require "Salesforce Extensions for Visual Studio Code" and for deploying LWC from an org we require Salesforce CLI.
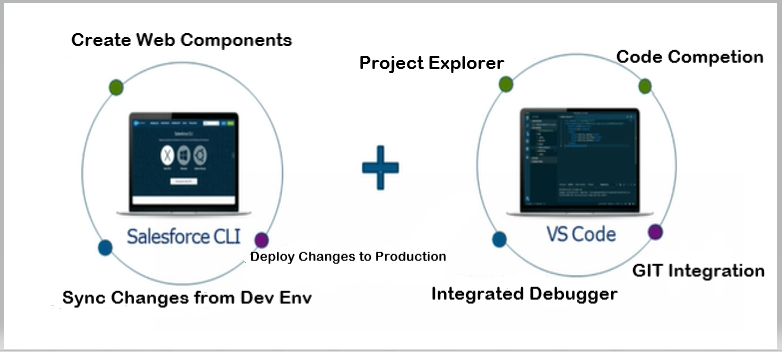
Aura Components make use of own custom component model, custom templates, custom components, etc. while LWC is built on web standards and it makes use of web components, templates, custom elements which we have in web standards.
Both the Aura component, LWC make use of Security, LDS and Base lightning components.
1) Aura component and LWC can exist on the same lightning page.
2) Aura component can include LWC
Understanding the Lightning Web Component framework
The Lightning web component is the component-based framework built using SLDS (Salesforce Lightning Design System) and web components.
Lightning Web Components are custom HTML elements build using the HTML Elements and modern JavaScript.
Lightning Web Component framework has a rich set of out the box components and APIs to communicate with the Salesforce Database.
Because the Lightning Web Components framework is built on the code which natively runs in the browser, most of the code that you write in them is standard HTML and JavaScript.
Unlike the Aura Component Framework, they don't need the additional resources to be loaded.
Similar to an AURA component, the main contents of a LWC are also html, JavaScript. There are optional content like CSS. But then in addition to these for LWC, an xml configuration file is also included which defines the metadata values for the component. So, a LWC component would look like:
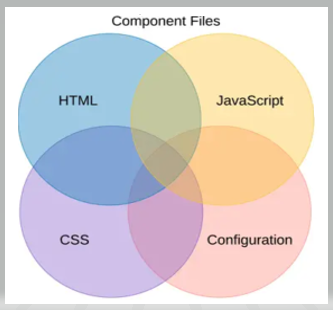
myComponent folder
myComponent.html
myComponent.js
myComponent.js-meta.xml
myComponent.css
myComponent.svg
The folder and its files must follow these naming rules.
 Interview Series
Let start the interview series on Scenario Based Interview Questions on Lightning Web Components (Between Interviewer & Interviewee).
Interviewer
What are Lightning Web Components, and how are they different from Aura components?
Interviewee
Lightning Web Components are the latest Salesforce UI framework based on modern web standards such as Web Components. Unlike Aura components, LWC uses a more efficient and lightweight architecture, providing better performance and ease of development. Here's an example LWC component:
Example Code : html
<template>
  <lightning-card title="Hello World">
    <div class="slds-p-around_medium">
      <h1>Hello, Lightning Web Components!</h1>
    </div>
  </lightning-card>
</template>
Explanation: In the example code above, we have a basic LWC component that displays a simple greeting message.
Interviewer
Do you think Aura Web Components and Lightning Web Components can coexist together?
Interviewee
Yes, both Aura Lightning components and Lightning Web Components can coexist together.
Interviewer
What are the advantages of using Lightning Component Framework?
Interviewee
Here are some of the benefits of using the Lightning Component Framework.
1. It provides out-of-the-box components.
2. Rich Custom Component Ecosystem.
3. Fast Development.
4. Device-aware and Cross Browser Compatibility.
Interviewer
Explain the Lightning Web Component Bundle?
Interviewee
LWC bundle contains an HTML file, a JavaScript file, and a Metadata Configuration file and these files are created once we create a Lightning web component.
Component: HTML File
Every user interface (UI) component must have an HTML file with the root tag <template>
It should be saved as “<component>.html” like myComponent.html below.

Component: JavaScript File
All business logic for components is defined in a JavaScript file, and it’s written as “<component>.js”. To import a class, function, or variable declared in a module, use the “import” statement. To allow other code to use a class, function, or variable declared in a module, use the “export” statement.
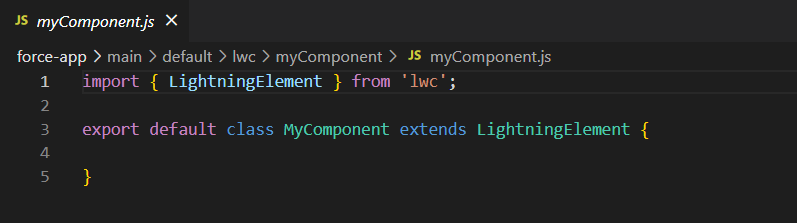
Component: Metadata Configuration File
Every component must have a configuration file. The configuration file defines the metadata values for the component, including the design configuration for Lightning App Builder and Community Builder.
Mind it!
All LWC configuration settings are included in a metafile. For example, “<isexposed>” is set to true to expose the component in all orgs. We can define targets where we wanted to use our LWC using the “<target>” tag.
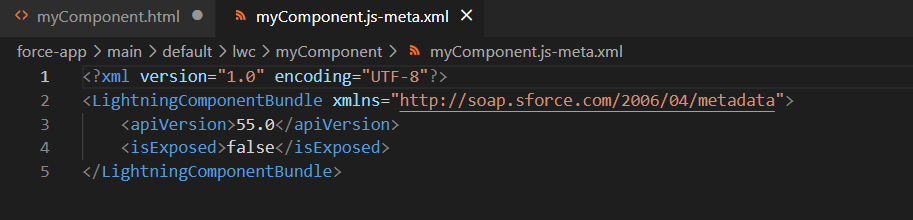
Above mentioned file are default ,we can also add CSS, SVG and other optional files like “Additional JavaScript file” with a unique name.
The file structure of Lightning Web Components
myComponent folder
myComponent.html
myComponent.js
myComponent.js-meta.xml
myComponent.css
myComponent.svg
Interviewer
What is the purpose of JavaScript file in Lightning Web Component bundle?
Interviewee
The JavaScript file defines the behavior of HTML element present in HTML file.
JavaScript files in Lightning web components are ES6 modules. By default, everything declared in a module is local—it’s scoped to the module.
To import a class, function, or variable declared in a module, use the import statement. To allow other code to use a class, function, or variable declared in a module, use the export statement.

Interviewer
What is difference between var and let in JS ?
Interviewee
In simple words difference is var is function scoped while let is block scoped.
Var allows you to redeclare same variable while let will throw an error.
Var variables are hoisted that is you can access them even before they are declared in code its just they will return undefined value while with let it will throw an error.
Interviewer
What is Meta configuration file in Lightning Web Component?
Interviewee
The Meta configuration file defines the metadata values for the components.
If we don’t include a configuration file for our component, we get an error shown below when we push your changes.
Error Message
"Cannot find Lightning Component Bundle
".
Interviewer
How can you display components HTML conditionally?
Interviewee
If we want to render HTML conditionally, add the if:true|false directive to a nested <template> tag that encloses the conditional content.
Interviewer
How we can iterate list in Lightning Web Component (LWC)?
OR How to iterate over an array in HTML file?
Interviewee
There are 2 ways of iterating your list in LWC templates :
1. for:each
2. Iterator
Whenever we use for:each or Iterator we need to use key directive on the element on which we are doing iteration. Key gives unique id to each item. Remember, without key we cannot do iteration.
When a list changes, the framework uses the key to re-render only the item that changed. It is used for performance optimization and isn’t reflected in the DOM at run time.
for:each
Example
HelloForEach.html
<template>
    <lightning-card title="HelloForEach" icon-name="custom:custom14">
        <ul class="slds-m-around_medium">
            <template for:each={contacts} for:item="contact">
                <li key={contact.Id}>
                    {contact.Name}, {contact.Title}
                </li>
            </template>
        </ul>
    </lightning-card>
</template>
HelloForEach.js
import { LightningElement } from 'lwc';
export default class HelloForEach extends LightningElement {
    contacts = [
        {
            Id: 1,
            Name: 'Saurabh Samir',
            Title: 'Salesforce Developer',
        },
        {
            Id: 2,
            Name: 'Jack Jones',
            Title: 'VP of Sales',
        },
        {
            Id: 3,
            Name: 'Vivek Wali',
            Title: 'CEO',
        },
    ];
}
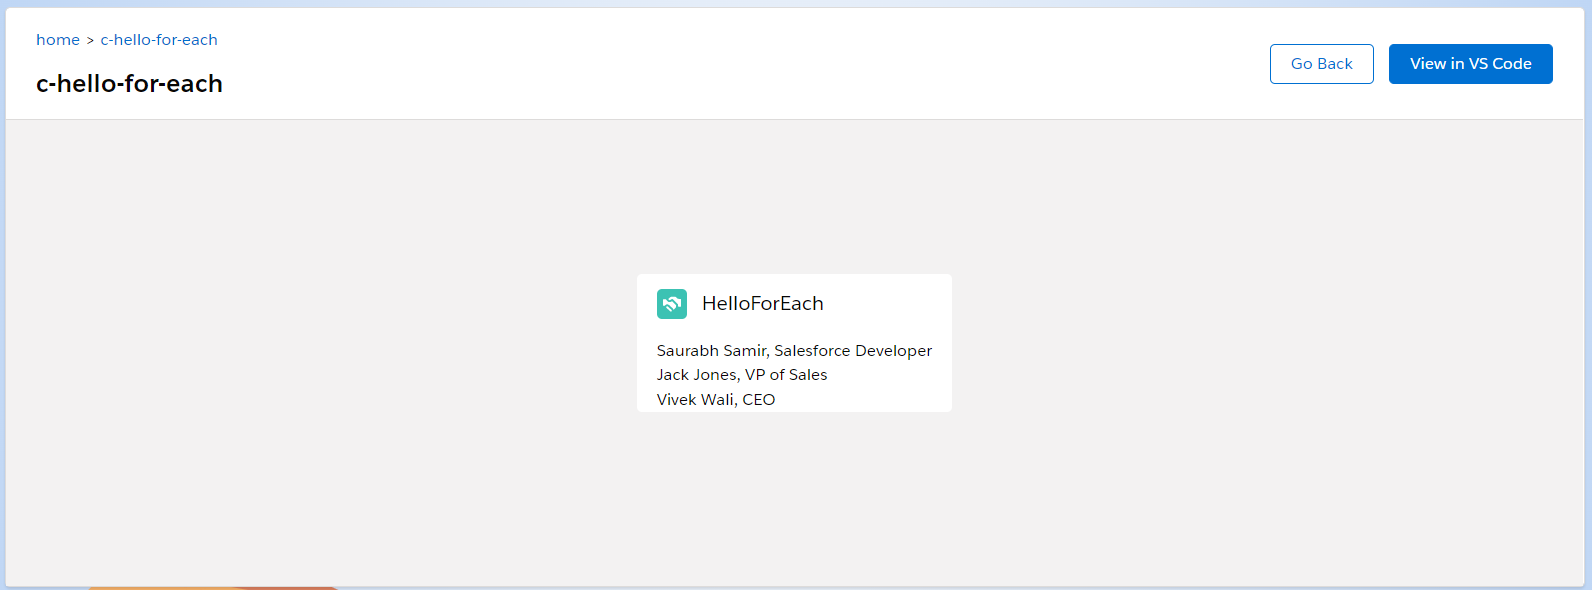
iterator
If you want add special behavior to the first or last item in a list, use the iterator directive, iterator:iteratorName={array}. Use the iterator directive on a template tag.
Use iteratorName to access these properties:
• value—The value of the item in the list. Use this property to access the properties of the array.
For example, iteratorName.value.propertyName.
Sample Example
HelloIterator.html
<template>
    <lightning-card title="HelloIterator" icon-name="custom:custom14">
        <ul class="slds-m-around_medium">
            <template iterator:it={contacts}>
                <li key={it.value.Id}>
                    <div if:true={it.first} class="list-first"></div>
                    {it.value.Name}, {it.value.Title}
                    <div if:true={it.last} class="list-last"></div>
                </li>
            </template>
         </ul>
    </lightning-card>
</template>
HelloIterator.js
import { LightningElement } from 'lwc';
export default class HelloForEach extends LightningElement {
    contacts = [
        {
            Id: 1,
            Name: 'Saurabh Samir',
            Title: 'Salesforce Developer',
        },
        {
            Id: 2,
            Name: 'Jack Jones',
            Title: 'VP of Sales',
        },
        {
            Id: 3,
            Name: 'Vivek Wali',
            Title: 'CEO',
        },
    ];
}
helloIterator.css
.list-first {
    border-top: 1px solid black;
    padding-top: 5px;
}

.list-last {
    border-bottom: 1px solid black;
    padding-bottom: 5px;
}

Interviewer
How we can pass data from HTML to JS controller?
Interviewee
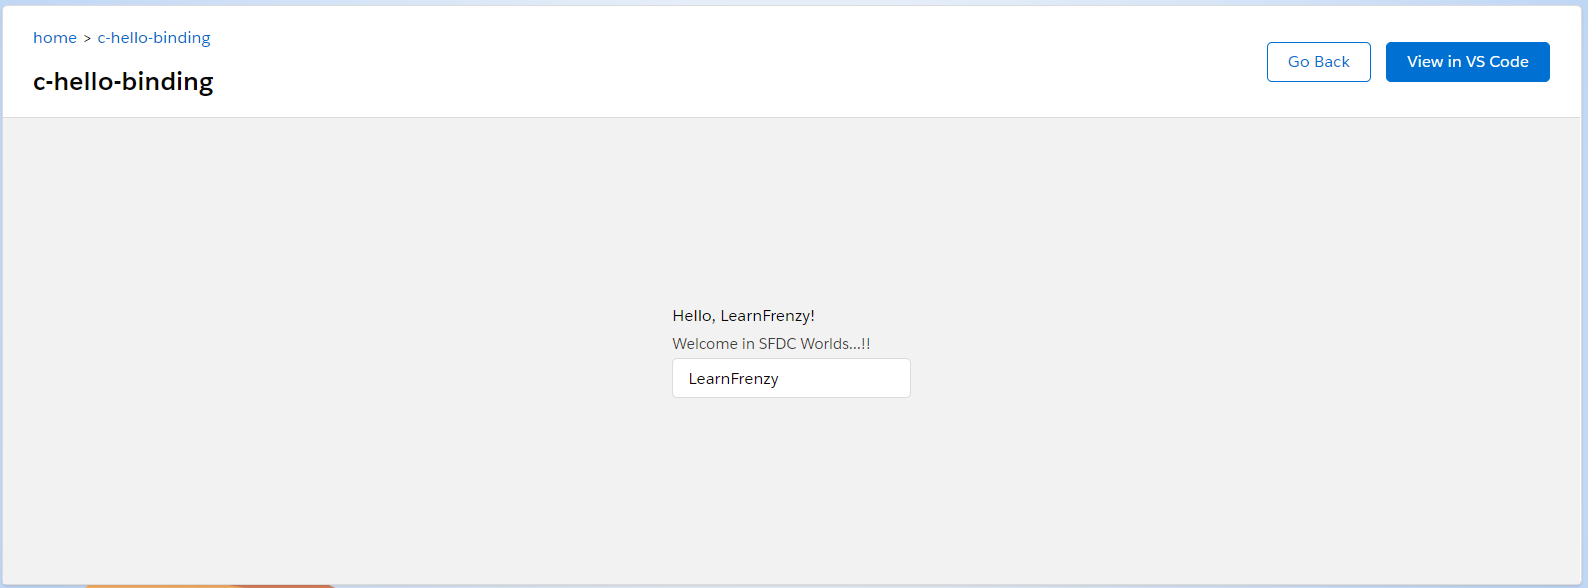
We can use the onchange attribute to listen for a change to its value. When the value changes, the handleChange function in the JavaScript file executes.
Notice that to bind the handleChange function to the template, we use the same syntax, {handleChange}
Sample Example
helloBinding.html
<template>
    <p>Hello, {greeting}!</p>
    <lightning-input label="Welcome in SFDC Worlds...!!" value={greeting} onchange={handleChange}>
</lightning-input>
</template>
helloBinding.js
import { LightningElement } from 'lwc';

export default class HelloBinding extends LightningElement {
    greeting = 'LearnFrenzy';

    handleChange(event) {
        this.greeting = event.target.value;
    }
}
Output
Interviewer
What is LMS ?
Interviewee
LMS is defined as the standard publish-subscribe library that enables communication with DOM across the components be it Visualforce Pages, Aura components, and Lightning Web Components (LWC) all can use it to publish message and listen to messages published by others.
Interviewer
Do we have application events in LWC?
Interviewee
We don't have application event as such in LWC like Aura rather we have LMS in LWC to communicate between components which are not part of same hierarchy.
Interviewer
How can we navigate user from LWC component to record detail page?
Interviewee
Can be done using NavigationMixin service.
Interviewer
Do we have force:createRecord equivalent in LWC?
Interviewee
Using navigation mixin only you can also create new record where you define object , action as new and pass any default values you want to set.
Interviewer
Can I get current user ID in LWC without apex?
Interviewee
Yes we can get current user ID without apex by simply importing
import Id from '@salesforce/user/Id'Interviewer
What is difference between ‘==’ and ‘===’ ?
Interviewee
Both are used to compare two variables but == doesn't take data type into consideration and does type coercion ie interpreter tries to automatically convert data types to match the values while in === case if data type is not same it will always return false.
For example
2==”2” will return True (Type coercion happens)
2===”2” will return False ( No Type coercion)
Interviewer
What is String interpolation?
Interviewee
It means simply when string literal is evaluated all the placeholders added into it are calculated at run time and replaced in string with values. Place holder can be anything a variable , expression even a function call. In JavaScript its performed using (backtick).
In lightning AURA components, we have used concatenation lot of time to join multiple strings. But now we need to change something in the lightning web component.
For example
console.log('string1'+'string2'+'string3');Now we need to change our habits and learn something called interpolation.
Let's understand with the help of an example :
Example -1 :
const greeting = 'Hello';
const who = 'Salesforce LearnFrenzy!';<p></p>
const message = ${greeting}, ${who}!`;
message; // => ‘Hello, Salesforce LearnFrenzy!'
Example -2 :
function favouriteBlogs{
let firstBlog = 'Salesforce Official';
const secondBlog = 'Salesforce LearnFrenzy';

//Please observe the string Interpolation below
console.log('My favourite blogs are ${firstBlog} and ${secondBlog}');
}
//Console > My favourite blogs are Salesforce Official and Salesforce LearnFrenzy
As you can observe in the above code we need to just use ${firstBlog} instead of maintaining '+' signs.
Mind it!
Let/Const : Of course, we are familiar with var in JavaScript before, but fortunately/unfortunately now we need to use Let/Const.
Let : Whenever you want to reassign the value for any variable then we will define with Let variable.
It also signals that the variable will be used only in the block it's defined in, which is not always the entire containing function.
Const : Whenever you use const then the identifier won't be reassigned further. The value will remain constant.
Interviewer
Why do we put constants outside of class in LWC?
Interviewee
We cant put constants inside a class or function in JavaScript its illegal for example below piece of code will throw you an error.
export default class someClass extends LightningElement {
const someVar = 'someValue' ;
}
Interviewer
What are template literals ? What is the use?
Interviewee
In JavaScript string interpolation is performed using template literals.
Template literals are created using (`) backtick character apart from string interpolation they also are used for adding multi-line strings without having to use “\n”
For example :
console.log('string text line 1\n' +
'string text line 2');
console.log(`string text line 1
string text line 2`);
//Both will result in same output
Interviewer
What are the types of decorators in lightning web components and explain all three decorators in lightning web components?
Interviewee
The Lightning Web Components programming model has three decorators that add functionality to a property or function. The ability to create decorators is part of ECMAScript, but these three decorators are unique to Lightning Web Components.
1. @api: To expose a public property, decorate it with @api. An owner component that uses the component in its markup can access the component’s public properties.
2. @track: To track a private property’s value and re-render a component when it changes, decorate the property with @track. Tracked properties are also called private reactive properties.
3. @wire: To read Salesforce data, Lightning web components use a reactive wire service. When the wire service provisions data, the component re-renders.
Interviewer
What are the public properties in Lightning Web Component?
Interviewee
Public properties are reactive. If the value of a public property changes, the component re-renders. To expose a public property, decorate a field with @api. Public properties define the API for a component.
Interviewer
How do you implement client-side caching in LWC?
Interviewee
In Lightning Web Components (LWC), client-side caching can be implemented using the @wire decorator with the refresh parameter. The refresh parameter allows you to control when the cached data should be refreshed from the server. By setting refresh to true, you can force a refresh of the data on each component instantiation or when a specific variable changes.
Here's an example of how to implement client-side caching in LWC:
First, create the Apex class with the method you want to call:
// Apex class: AccountController.cls
public with sharing class AccountController {
    @AuraEnabled(cacheable=true)
    public static List<account> getAccounts() {
        // Simulate some time-consuming operation
        System.debug('Method called on the server.');
        try {
            Thread.sleep(3000);
        } catch (Exception ex) {
        }
        return [SELECT Id, Name, Industry FROM Account];
    }
}
Then, create the LWC component to call the Apex method with client-side caching:
<template>
    <lightning-button label="Fetch Accounts" onclick="{handleFetchAccounts}"></lightning-button>
    <template if:true="{accounts.data}">
        <ul>
            <template for:each="{accounts.data}" for:item="account">
                <li key="{account.Id}">{account.Name} - {account.Industry}</li>
            </template>
        </ul>
    </template>
    <template if:true="{accounts.error}">
        <p>Error fetching accounts: {accounts.error}</p>
    </template>
</template>
// clientSideCaching.js
import { LightningElement, wire } from 'lwc';
import getAccounts from '@salesforce/apex/AccountController.getAccounts';
export default class ClientSideCaching extends LightningElement {
@wire(getAccounts, { refresh: true }) // Set refresh to true to enable caching
accounts;
handleFetchAccounts() {
// This method will call the Apex method again, but the cached data will be returned due to client-side caching.
this.accounts = getAccounts({ refresh: true });
}
}In this example, we use the @wire decorator with the refresh parameter set to true. When the component is first loaded, the Apex method getAccounts is called, and the result is cached on the client-side. Subsequent calls to getAccounts from within the component (e.g., by clicking the "Fetch Accounts" button) will use the cached data unless refresh is explicitly set to true. This reduces the need for unnecessary server calls and improves the performance of the component.
Mind it!
Note that client-side caching is especially useful when dealing with data that doesn't change frequently or when you want to minimize the number of server calls in your LWC components. However, it's essential to consider the caching strategy based on your specific use case and data requirements.
Interviewer
Explain the use of track and immutable in LWC.
Interviewee
In Lightning Web Components (LWC), both track and immutable are used to manage the reactivity of properties in the component.
@track Decorator
The @track decorator is used to make a property reactive in LWC. When a property is marked with @track, any change to its value triggers a re-render of the component, updating the corresponding parts of the template that use this property. It ensures that the component stays in sync with the data changes, and any updates are reflected in the UI.
Example:
<template>
    <p>Count: {count}</p>
    <lightning-button label="Increment" onclick="{handleIncrement}"></lightning-button>
</template>
// trackExample.js
import { LightningElement, track } from 'lwc';
export default class TrackExample extends LightningElement {
@track count = 0;
handleIncrement() {
this.count++;
}
}In this example, the count property is marked with the @track decorator. When the "Increment" button is clicked, the handleIncrement method updates the count property. As a result, the template is automatically updated to reflect the new value of count.
@immutable Decorator
The @immutable decorator is used to prevent direct modification of a property in LWC. When a property is marked with @immutable, you cannot directly modify its value after it has been initialized. This helps enforce better data encapsulation and prevents accidental changes to the property from outside the component.
Example:
<template>
    <p>Message: {message}</p>
    <lightning-button label="Update Message" onclick="{handleUpdateMessage}"></lightning-button>
</template>
// immutableExample.js
import { LightningElement, immutable } from 'lwc';
export default class ImmutableExample extends LightningElement {
@immutable message = 'Initial message';
handleUpdateMessage() {
this.message = 'Updated message'; // This will throw an error due to the @immutable decorator.
}
}In this example, the message property is marked with the @immutable decorator. If you attempt to directly modify the message property in the handleUpdateMessage method, it will throw an error at runtime, preventing you from changing the value of the property.
Mind it!
Note that @immutable only prevents direct assignment to the property; you can still modify properties of an object marked as @immutable. If you need to enforce immutability for nested properties, you need to use other approaches like using Object.freeze().
Both @trackand @immutable decorators are essential tools for managing state and data reactivity in LWC components. Using them appropriately helps create more predictable and maintainable components in Salesforce Lightning.
Interviewer
How do you call an Apex method imperatively from an LWC component?
Interviewee
To call an Apex method imperatively from an LWC (Lightning Web Component), you can use the wire service. The wire service is used for declarative data retrieval, but it can also be used to call Apex methods imperatively using the @wire decorator with a custom function.
Extra Knowledge!
Here's an example of how to call an Apex method imperatively from an LWC component:
First, create the Apex class with the method you want to call:
// Apex class: AccountController.cls
public with sharing class AccountController {
    @AuraEnabled(cacheable=true)
    public static List<account> getAccounts() {
        return [SELECT Id, Name, Industry FROM Account];
    }
}
Then, create the LWC component and call the Apex method imperatively:
<template>
    <lightning-card title="Accounts">
        <template if:true="{accounts.data}">
            <ul>
                <template for:each="{accounts.data}" for:item="account">
                    <li key="{account.Id}">{account.Name} - {account.Industry}</li>
                </template>
            </ul>
        </template>
        <template if:true="{accounts.error}">
            <p>Error fetching accounts: {accounts.error}</p>
        </template>
    </lightning-card>
</template>
// imperativeApexCall.js
import { LightningElement, wire } from 'lwc';
import getAccounts from '@salesforce/apex/AccountController.getAccounts';
export default class ImperativeApexCall extends LightningElement {
@wire(getAccounts)
accounts;
}In this example, we use the @wire decorator with the getAccountsmethod to call the getAccounts Apex method imperatively. The data returned from the Apex method will be available in the accounts property, which is automatically managed by the @wire service. The @wire decorator handles caching, data refresh, and error handling, making it a convenient way to call Apex methods from LWC components.
Interviewer
What is the role of the lightning-datatable component in LWC?
Interviewee
The lightning-datatable component is used to display tabular data in a customizable and user-friendly format. Here's an example:
<template>
    <lightning-datatable data="{data}" columns="{columns}" key-field="Id"></lightning-datatable>
</template>
// datatableExample.js
import { LightningElement } from 'lwc';
export default class DatatableExample extends LightningElement {
data = [
{ Id: '001', Name: 'Account 1', Industry: 'Finance' },
{ Id: '002', Name: 'Account 2', Industry: 'Technology' },
{ Id: '003', Name: 'Account 3', Industry: 'Healthcare' },
];
columns = [
{ label: 'Account Name', fieldName: 'Name', type: 'text' },
{ label: 'Industry', fieldName: 'Industry', type: 'text' },
];
}Interviewer
How do you handle errors in LWC components?
Interviewee
Errors in LWC components can be handled using try-catch blocks. Here's an example:
// errorHandlingExample.js
import { LightningElement } from 'lwc';

export default class ErrorHandlingExample extends LightningElement {
    handleButtonClick() {
        try {
            // Some code that might throw an error
        } catch (error) {
            console.error('An error occurred:', error);
        }
    }
}
Interviewer
What are LWC getters and setters, and how are they used?
Interviewee
In Lightning Web Components (LWC), getters and setters are special methods used to define and access component properties with custom behavior. They allow you to add additional logic when getting or setting the value of a property. Getters are used to retrieve the value of a property, and setters are used to update the value of a property. They provide a way to encapsulate the property's behavior and ensure that any required actions or validations are executed when the property is accessed or modified.
Here's an example of how to use getters and setters in LWC:
<template>
    <p>Current Count: {count}</p>
    <lightning-input label="Enter Increment Value" type="number" onchange="{handleIncrement}"></lightning-input>
</template>
// getterSetterExample.js
import { LightningElement } from 'lwc';
export default class GetterSetterExample extends LightningElement {
_count = 0; // Private variable to store the value
// Getter for count property
get count() {
return this._count;
}
// Setter for count property
set count(value) {
// Perform any validations or actions before setting the value
if (value >= 0) {
this._count = value;
}
}
handleIncrement(event) {
// Get the value from the input and update the count property using the setter
this.count = parseInt(event.target.value);
}
}In this example, we have a count property with a custom getter and setter. The getter (get count()) returns the private variable _count, and the setter (set count(value)) allows us to perform validations before updating the value of _count.
When the user enters a value in the <lightning-input> field, the handleIncrement method is called. It parses the input value as an integer and sets it to the count property using the custom setter. The setter ensures that the count property can only be updated with non-negative values.
Using getters and setters, you can implement additional logic or validations to ensure data integrity and control how properties are accessed and modified. This allows you to create more robust and flexible LWC components while maintaining encapsulation and abstraction.
Interviewer
When do I use @track on a property ? Do I still need it considering all properties are by default reactive now?
Interviewee
After Spring 20 all the properties are made by default reactive i.e. we don't need @track for primitive properties. We still need it for array or object type properties.
Interviewer
Can I use multiple decorators on one property?
Interviewee
No we cant use multiple decorators on same property.
Interviewer
Suppose you have written a LWC which has the @wire decorator to get the data from apex. But you are unable to get the data from the server. You checked your apex code but could not figure out the issue. What could be one of the reason?
Interviewee
check whether you have used cacheable=true along with @AuraEnabled annotation in the apex method.
Interviewer
Will the below code deploy? (Assuming all variables and apex class function exists).
@wire(getBikes,{bikeTypeId : this.bikeTypeId})
getBikes(error,data){

}
Interviewee
No it wont when passing a variable in wire you should always use $ along with variable, it should be written like :
@wire(getBikes,{bikeTypeId : '$bikeTypeId'})Interviewer
Why do we use $ when passing property in wire function, what does it mean?
Interviewee
$ prefix tells the wire service to treat values passed as a property of the class and evaluate it as this.propertyName and the property is reactive. If the property’s value changes, new data is provisioned and the component renders.
Interviewer
Suppose you are using getRecord in LWC to get any field value from the current record. Now you need to pass the retrieved value to an apex method using wire approach. How can you pass the value?
Interviewee
Example: exploreGetRecord.js
import { LightningElement, wire, api } from "lwc";

//1. import the methods getRecord and getFieldValue
import { getRecord, getFieldValue } from "lightning/uiRecordApi";

//2. Import reference to the object and the fields
import NAME_FIELD from "@salesforce/schema/Account.Name";
import RATING_FIELD from "@salesforce/schema/Account.Rating";
import INDUSTRY_FIELD from "@salesforce/schema/Account.Industry";

const fields = [NAME_FIELD, RATING_FIELD, INDUSTRY_FIELD];
export default class ExploreGetRecord extends LightningElement {
  @api
  recordId;

  //3. Wire the output of the out of the box method getRecord to the property account
  @wire(getRecord, {
    recordId: "$recordId",
    fields
  })
  account;

  renderedCallback() {
    console.log(this.account.data);
  }

  //4. Fetch the field values from the record
  get name() {
    return getFieldValue(this.account.data, NAME_FIELD);
  }

  get rating() {
    return getFieldValue(this.account.data, RATING_FIELD);
  }

  get industry() {
    return getFieldValue(this.account.data, INDUSTRY_FIELD);
  }
}
exploreGetRecord.html
<template>
<div class="slds-m-around_medium">
<p><b>Account Name :</b>{name}</p><br>
<p><b>Industry :</b> {industry}</p><br>
<p><b>Rating :</b>{rating}</p>
</div>
</template>
exploreGetRecord.js-meta.xml
<?xml version="1.0" encoding="UTF-8"?>
<LightningComponentBundle xmlns="http://soap.sforce.com/2006/04/metadata">
    <apiVersion>55.0</apiVersion>
    <isExposed>true</isExposed>
    <targets>
        <target>lightning__AppPage</target>
        <target>lightning__RecordPage</target>
        <target>lightning__HomePage</target>
    </targets>
</LightningComponentBundle>
Now we can add this lwc component on the account detail page.
We will have the following output.

Interviewer
See the below code and answer the following question : If I want to refresh the wired data in the above function, can I call refreshApex(this.someVar) ?
@wire(getBikes,{bikeTypeId : '$bikeTypeId'})
getBikes({error,data}){
    if(data){
        this.someVar = data;
        this.error = undefined;
    }
    else if(error){
        this.error = error;
        this.someVar = undefined ;
    }
}
Interviewee
No we cant call refreshApex(this.someVar) rather refreshApex is called on whole result provisioned from the wire service not just the data part, we will have to rewrite it as below :
@wire(getBikes,{bikeTypeId : '$bikeTypeId'})
getBikes(result){
    this.mainResult = result;
    if(result.data){
        this.someVar = result.data;
        this.error = undefined;
    }
    else if(result.error){
        this.error = result.error;
        this.someVar = undefined ;
    }
}
Now we can refresh data as refreshApex(this.mainResult)
Interviewer
Can we call a wire function inside a javascript function like below :
searchBikes(event){
    @wire(getBikes,{bikeTypeId: '$bikeTypeId'}
          getBikes(data,error){
          }
          }
Assume searchBikes is being called on click of button? Will I be able to deploy the code ?
Interviewee
No you can't call it like this, code will not deploy. You will receive error as leading decorators must be attached to class which means decorators like wire can be directly under class only not inside any other function.
Similarly if you try to define variable with @track or api decorator inside a function it will fail.
Interviewer
When is the wire method/property called in the lifecycle of a component ?
Interviewee
Wired service is called right after component is created i.e. after constructor and is again called when parameter that you are passing is made available.
Interviewer
What are lifecycle hooks in LWC ?
Interviewee
A lifecycle hook is a callback method triggered at a specific phase of a component instance’s lifecycle.
There are following hooks supported in LWC :
Constructor : Called when the component is created.
Connectedcallback : Called when the element is inserted into a document. This hook flows from parent to child.
RenderedCallback : Called after every render of the component. This lifecycle hook is specific to Lightning Web Components, it isn’t from the HTML custom elements specification. This hook flows from child to parent. Ie its not part of HTMLElement rather defined in LightningElement.
Disconnectedcallback : Called when the element is removed from a document. This hook flows from parent to child.
Errorcallback : Called when a descendant component throws an error. The error argument is a JavaScript native error object, and the stack argument is a string. This lifecycle hook is specific to Lightning Web Components, it isn’t from the HTML custom elements specification.
Interviewer
Is wire method called multiple times during lifecycle of component ?
Interviewee
Every time the @api record gets updated the wire method gets called again. So yes it might be called several times.
Interviewer
What is render() , is it part of lifecycle hook? Why do we use it ?
Interviewee
As of my knowledge the render() function is not a standard part of the Lightning Web Component (LWC) lifecycle hooks. Instead, it is considered an advanced feature that is used in specific scenarios for performance optimizations.
In LWC, the standard lifecycle hooks are:
constructor()
connectedCallback()
disconnectedCallback()
renderedCallback()
errorCallback()
The render() function is not part of this list.
What is the render() function, and why do we use it?
The render() function is an advanced feature in LWC that allows you to customize the rendering of your component's template. It is not a lifecycle hook, but rather a method you can define in your LWC component's JavaScript class.
By defining the render() function, you take control over how the template of your component is rendered. You can use it to modify the default rendering behavior and create custom rendering logic for your component.
However, it is essential to understand that using the render() function should be approached with caution, as it bypasses some of the built-in optimizations provided by LWC's declarative rendering. It is recommended to use the default LWC template rendering as much as possible, as it ensures better performance and maintainability.
You may use the render() function in specific scenarios where the default rendering behavior is not sufficient or when you need to perform complex rendering logic that is not easily achievable using LWC's template syntax. For example, you might use render() in situations where you need to conditionally render portions of your template, or when you need to render dynamic content based on data or complex calculations.
Here's a simple example of how you can use the render() function:
import { LightningElement, render } from 'lwc';

export default class CustomRenderComponent extends LightningElement {
  customRender() {
    return (
      <div>
        <p>This is a custom rendering using the render() function.</p>
      </div>
    );
  }

  render() {
    return this.customRender();
  }
}
Please note that using the render() function is an advanced concept, and it is not commonly used in regular LWC development. Before employing it, it is recommended to explore other standard LWC features and lifecycle hooks to achieve your desired functionality. Always ensure that your component's rendering logic aligns with LWC's best practices to maintain performance and stability.
Interviewer
What is the difference in below two codes , will they both compile ? Give same results ?
Code -1
@wire(getBikes)
getBikes({data,error}){
    if(data)
        console.log('print here');
    Else if(error)
        console.log('print in else');
}
Code -2
@wire(getBikes,{})
getBikes({error,data}){
    if(data)
        console.log('print here');
    Else if(error)
        console.log('print in else');
}
Interviewee
The two code snippets you provided are related to using the @wire decorator in LWC (Lightning Web Components) to perform data retrieval using the Wire Service. However, there is a difference between the two snippets in how they pass parameters to the @wire decorator and handle the response. Let's go through the differences:
Code - 1
@wire(getBikes)
getBikes({data, error}) {
  if (data)
    console.log('print here');
  else if (error)
    console.log('print in else');
}
In this code, the @wire decorator is used without passing any parameters. When you don't pass any parameter, the Wire Service fetches the default values for you (by looking at the imports) and it will invoke the method getBikes() when the component is connected to the DOM. The response from the method is automatically provided as the argument to the getBikes() function, which is an object containing data and error. The response from the wire will automatically be assigned to the data and error variables based on whether the data retrieval was successful or if there was an error.
Code - 2
@wire(getBikes, {})
getBikes({error, data}) {
  if (data)
    console.log('print here');
  else if (error)
    console.log('print in else');
}
In this code, the @wire decorator is used with an empty object ({}) as the parameter. The empty object is used to specify configuration options to the wire adapter, but in this case, since it's empty, it serves no specific purpose for the getBikes method.
Just like in Code - 1, the getBikes() method is invoked when the component is connected to the DOM. The response from the method is automatically provided as the argument to the getBikes() function, which is an object containing data and error. The response from the wire will automatically be assigned to the data and error variables.
Will they both compile? Will they give the same results?
Yes, both code snippets will compile without any issues, assuming that the getBikes function is properly defined and imported as the wire adapter. In both cases, the @wire decorator will handle the response from the wire adapter and assign it to the corresponding variables (data and error).
The results will be the same for both code snippets in terms of handling the response from the wire. The logic inside the getBikes method is identical, and it will print "print here" when data is available and "print in else" when there is an error.
Overall, both code snippets are functionally equivalent, and they will behave the same way in terms of handling the response from the getBikes wire adapter. The only difference is the presence or absence of an empty object passed as a configuration option to the wire adapter, which, in this case, does not affect the functionality.
Interviewer
Is it mandatory to use data,error only in wired method, can I use some other variable like below :
@wire(getBikes)
getBikes({myData,myError}){
    if(mydata)
        console.log('i am in data');
    else if(myError)
        console.log('I am in error');
}
Will the code deploy successfully or I will receive an error ?
Interviewee
In Lightning Web Components (LWC), the variables used to handle the response from a wired method must be named data and error. Using other variable names, like myData and myError as shown in your example, will result in an error during deployment or compilation.
The Wire Service in LWC automatically maps the response from the wired function to the data and error variables. It does so based on the destructuring assignment of the response object:
@wire(getBikes)
getBikes({ data, error }) {
  // ...
}
The data variable will hold the response data if the data retrieval is successful, while the error variable will hold the error information if there's an issue with the data retrieval.
If you use different variable names like myData and myError, the Wire Service won't be able to automatically map the response, leading to an error during deployment or compilation.
To avoid errors, you should stick to the standard naming convention and use data and error as the variable names in the wired method. If you need to use different variable names for some reason, you may manually map the values from the response object to your custom-named variables within the wired method. However, it is generally recommended to use the standard data and error variable names to follow best practices and make the code more understandable for other developers.
Interviewer
Can I Deploy Component With Empty CSS File In Salesforce?
Interviewee
Yes, you can deploy a Lightning Web Component (LWC) with an empty CSS file in Salesforce. Salesforce allows you to include an empty CSS file or omit the CSS file altogether if you don't need any custom styling for your component.
Here's an example of deploying an LWC with an empty CSS file:
Assume you have the following LWC component structure:
emptyComponent.html: The HTML template file.
emptyComponent.js: The JavaScript file.
emptyComponent.css: The CSS file (which will be empty).
emptyComponent.html
<template>
  <div>
    <p>This is an example of an LWC with an empty CSS file.</p>
  </div>
</template>
emptyComponent.js
import { LightningElement } from 'lwc';

export default class EmptyComponent extends LightningElement {}
emptyComponent.css
/* This CSS file is intentionally left empty. */Now, when you deploy this LWC to Salesforce, it will work perfectly fine. Salesforce does not require the presence of a CSS file, and if the CSS file is empty, it will not cause any issues during deployment.
The empty CSS file will be useful in scenarios where you don't need any custom styles for your component or when you are using a base LWC component without requiring additional styling. This practice can also be helpful in reducing the amount of unused CSS being loaded into your Lightning component, thus improving performance.
Mind it!
Keep in mind that Salesforce also allows you to include CSS directly in the <template>section of your LWC component using inline styles or to use scoped CSS. But if you don't need any styling at all, an empty CSS file will suffice, and your component will deploy without any problems.
Interviewer
How can you style an LWC component using CSS?
Interviewee
Styling an LWC (Lightning Web Component) is done using CSS, just like in traditional web development. LWC allows you to define CSS styles within the component itself or in a separate CSS file, depending on your preference.
Here's how you can style an LWC component using CSS:
Inline CSS
You can use the style attribute in the HTML template of your LWC component to apply inline styles.
<template>
  <p style="color: blue; font-size: 16px; font-weight: bold;">This text is styled using inline CSS.</p>
</template>
CSS File
For more organized and maintainable styling, you can create a separate CSS file and include it in your LWC component using the import statement.
Example Code : css
/* styledComponent.css */
.custom-text {
  color: blue;
  font-size: 16px;
  font-weight: bold;
}
Example Code : html
<template>
  <p class="custom-text">This text is styled using a CSS class from a separate file.</p>
</template>
Example Code : js
// styledComponent.js
import { LightningElement } from 'lwc';
import styles from './styledComponent.css';

export default class StyledComponent extends LightningElement {
  // Use the styles imported from the CSS file
  static styles = [styles];
}
Scoped CSS
By default, CSS styles defined in the component file or imported CSS file are applied globally to the whole application. However, if you want to apply styles only to the specific component and avoid conflicts with other components, you can use scoped CSS.
Example Code : css
/* scopedStyles.css */
:host {
  /* Styles applied to the root element of this component only */
  display: block;
  padding: 10px;
  border: 1px solid #ccc;
}

p {
  color: blue;
  font-size: 16px;
  font-weight: bold;
}
Example Code : html
<template>

  <p>This text is styled using scoped CSS.</p>
</template>
Example Code : js
// scopedStyles.js
import { LightningElement } from 'lwc';
import scopedStyles from './scopedStyles.css';

export default class ScopedStylesComponent extends LightningElement {
  // Use the scopedStyles imported from the CSS file
  static styles = [scopedStyles];
}
Using scoped CSS ensures that the styles you define within the component will only apply to the elements inside that component and won't affect other components or the global styling of the application.
Remember that in LWC, we use the static styles property to apply the CSS to the component. Whether you use inline styles, separate CSS files, or scoped CSS, styling in LWC follows the standard CSS rules and selectors.
Interviewer
How do you handle CSS scoping in LWC?
Interviewee
In Lightning Web Components (LWC), CSS scoping is automatically handled by the framework to ensure that styles defined in one component do not interfere with styles in other components. This feature is called "CSS scoping" or "CSS encapsulation". It helps to create more modular and maintainable components by preventing unintended style overrides and conflicts.
Extra Knowledge!
Here's how CSS scoping works in LWC:
Scoped CSS: By default, the CSS styles defined within an LWC component's style block only apply to the elements within that component's template. The styles are scoped to the component, meaning they won't affect other components on the same page.
Shadow DOM: LWC uses the Shadow DOM to encapsulate component styles. The Shadow DOM creates a separate DOM subtree for each component, isolating its styles, DOM structure, and behavior from the rest of the page.
Selectors: Selectors defined in the component's style block target only the elements within the component's template. For example, if you define a class selector in the style block, it will apply only to the elements with that class inside the component.
No Global Styling: Styles defined in one LWC component won't inadvertently affect other components or the global CSS of the parent application.
Here's an example of CSS scoping in LWC:
<template>
    <div class="component-container">
        <p class="component-text">This text is styled within the component.</p>
    </div>
</template>

<style>
    .component-container {
        border: 1px solid #ccc;
        padding: 10px;
    }

    .component-text {
        color: blue;
        font-size: 16px;
    }
</style>
In this example, the styles defined in the <style> block are scoped to the scopedComponent and will only apply to the elements within that component's template. If you use this component multiple times on the same page or in different pages, the styles won't conflict with each other.
LWC's built-in CSS scoping ensures that styles are isolated within the component, making it easier to manage and reason about the styling of individual components in a complex application. This approach follows modern web development best practices and helps create more maintainable and reusable components.
Interviewer
Are quick actions supported for LWC components ?
Interviewee
Quick actions are supported by LWC in Summer 21 or later orgs. LWC quick actions are only supported on record pages.
Interviewer
How can i reference record ID of page in my component which is fired from quick action.
Interviewee
TTo reference the record ID of the page in your Lightning Web Component (LWC) fired from a Quick Action, you can use the lightning/pageReferenceUtils module. This module provides utility functions to extract parameters, including the record ID, from the page URL.
Here's how you can do it:
In your LWC component's JavaScript file (yourComponent.js), import the lightning/pageReferenceUtils module.
import { LightningElement, wire } from 'lwc';
import { getRecordId } from 'lightning/pageReferenceUtils';
Use the getRecordId function to extract the record ID.
export default class YourComponent extends LightningElement {
  recordId;

  connectedCallback() {
    this.recordId = getRecordId();
  }
}
The getRecordId function will automatically fetch the record ID of the page where the component is loaded, regardless of whether it is launched from a Quick Action or any other context.
Now, the recordId property will hold the record ID, and you can use it in your component's logic as needed.
For example, if you want to display the record ID, you can use it in the template (yourComponent.html) like this:
<template>
  <div>
    <p>Record ID: {recordId}</p>
  </div>
</template>
When you place this component on a record page and trigger it from a Quick Action, it will automatically fetch and display the record ID of the page where the Quick Action is invoked.
Note: Ensure that your LWC is available on the record page layout or is accessible in the context where you want to use the Quick Action. Also, when using the Quick Action, make sure to pass the record ID to the LWC using appropriate configuration.
Interviewer
What is a promise in async transactions? What are it different stages.
Interviewee
Promises are special objects in JavaScript which represents the success or failure value of an asynchronous operation.
When you create an asynchronous operation using promise, an object is returned to which you attach the callbacks for success and failure.
Basically, whatever operation you need to perform, you pass that as function to the promise. When the promise is executed you attach the success and handler function to it.
For example : when you call apex imperatively it returns you a promise object on the basis of object returned execution either goes into (then) i.e. transaction was successful or (catch) which means transaction failed.
Let's take an example of file upload. Assume that you want a file to be uploaded in an asynchronous way in the background. And you want to log success messages whenever the operation is completed.
I have created a simple promise method here.
new Promise(resolve => {
    console.log("File upload started");
    window.setTimeout(resolve, 2000); // assume that file takes 2 seconds to upload.
}).then((result) => {
    console.log('File is uploaded');
})
console.log('This block of code continues and get executed before file upload.');
Output for the above code will be:
File upload started
This block of code continues and get executed before file upload.
File is uploaded // after 2 seconds
Now we will see how we can add the error handler.
new Promise(resolve => {
    console.log("File upload started");
    window.setTimeout(resolve, 2000);
}).then((result) => {
    throw new Error("error");
    console.log('File is uploaded');
}).catch(() => {
    console.log('File upload failed');
    // handle error here.
})
Output for the above code will be:
File upload started
File upload failed // after 2 seconds
A Promise is in one of these states
Interviewer
Why we use promises?
Interviewee
There are multiple reasons.
Interviewer
Why Promises are so much important for Lwc? & What are the common use cases?
Interviewee
Promises are everywhere in LWC, this framework heavily uses promises. You are using promises if you are using these things from LWC. All things mentioned below are applications of Promises.
If you have ever used imperative calls in lwc, you must have noticed that we use .then() and .catch() methods to handle success and error.
The Common Use Cases
The most common use case of promise is to load the external style/script in LWC. See the code used to load third party styles and scripts in the Lightning web component.
Promise.all([
    loadScript(this, LIB + '/learfrenzy_lib.js'),
    loadStyle(this, LIB + '/learnfrenzy_styles.css')
])
    .then(() => {
        // do something when scipt and styles loaded.
    })
    .catch(error => {
        this.dispatchEvent(
            new ShowToastEvent({
                title: 'Error loading Libs',
                message: error.message,
                variant: 'error'
            })
        );
    });
Another scenario could be when you want to chain imperative calls to two apex methods. For example if you have two apex methods methodA and methodB, now you want to pass the result of methodA into methodB, then you can do it like this.
methodA()
    .then((result) => ((this.output = result), methodB({ someparam: result })))
    .then((result) => (this.output = result));
Calling an API from JavaScript.
fetch('https://calllearnfrenzyapi.com/api')
    .then(response => {
        // process success
    })
    .catch( error => {
        // handle error here
    })
Interviewer
What are the downsides of promises?
Interviewee
One of the biggest downsides of the promises is callback hell. Callback hell is a series of nested calls to the promises.
Interviewer
What to understand Callback and Callback hell in JavaScript ?
Interviewee
Callback functions are functions passed as arguments to another function, which will be called in the function it was passed to.
They are basically functions that are executed only after a result is produced. Callbacks are an important part of asynchronous JavaScript.
The best example of this is window.setTimeout. We pass a function to setCallout, which gets called when the timeout is completed.
function myCallbackFunction(){
    console.log("in myCallbackFunction");
}
window.setTimeout(myCallbackFunction, 2000);
Callback Hell: Callback Hell is essentially nested callbacks stacked below one another forming a pyramid structure. Every callback depends/waits for the previous callback, thereby making a pyramid structure that affects the readability and maintainability of the code.
In most simple words callback hell occurs when there are many functions you want to call async and you end up putting them one side each another and as the code grows it becomes very difficult to read.
For Example
getData(function(x)
{
getMoreData(x, function(y)
{
getMoreData(y, function(z)
{ ... }
);
});
});
Interviewer
Can i call function annotated with @AuraEnabled(cacheable= true) imperatively ?
Interviewee
Yes
Interviewer
Can we do DML in method annotated with @AuraEnabled(cacheable= true)?
Interviewee
No we cant do DML inside any method annotated with cacheable = true , you will receive an error as DMLLimit Exception.
Interviewer
How to refresh cache when calling method imperatively ?
Interviewee
We have to use getRecordNotifyChange(RecordIds) which refreshes the LDS cache providing you the latest data this will work only if cacheable = true was there.
Otherwise we will have to call the function again from our js to get the latest data.
Interviewer
When do we face error of "Cant assign to Read only property" in LWC?
Interviewee
This error usually occurs when you are trying to make changes to a property which is marked as @api , ideally you should clone the value then make the changes to it.
Interviewer
How to query all lightning-input , combobox, radio buttons using one querySelector or do I have to use multiple ?
Interviewee
We can query all of them using one query selector only no need to write multiple for each tag. We can pass all tags (,) separated to query all.
const allValid = […this.template.querySelectorAll('lightning-input,lightning-combobox,lightning-radio-group')];If you are wondering why are we using (…) spread operator before querySelectorAll its because querySelector returns you the nodelist and using spread operator we convert it to array of items otherwise we wouldn't be able to use array functions like map or reduce.
Interviewer
How can expression functions similar to Visualforce and Lightning Aura Components be achieved within lightning web components?
For example, <template if:true={index % 7 == 0}><br></template>expression index % 7 == 0 is not complying at all.
accountList.html
<template>
    <template if:true={accounts.data}>
        <template for:each={accounts.data} for:item='item' for:index='index'>
            <!--LWC DOES NOT SUPPORT EXPRESSION FUNCTIONS-->
            <!--<template if:true={index % 7 == 0}><br></template>-->
            {item}
        </template>
    </template>
</template>
accountList.js
import {LightningElement, wire} from 'lwc';
import getAccounts from '@salesforce/apex/TestController.getAccounts';
export default class AccountList extends LightningElement {
    @wire(getAccounts) accounts;
}
Since LWC doesn't support Expression Functions, I'd like to know how to implement them.
Interviewee
There are multiple options. First, note, that all computations are in JavaScript, not in the markup.
Option -1
You implement the display of your {item} (which is currently only the JSON object), into a dedicated component AccountListItem.
import {LightningElement, api} from 'lwc';

export default class AccountListItem extends LightningElement {
   @api index;
   @api item;

   get isMod7() {
     return this.index % 7 == 0;
   }
}
Option-2
You use a wired function instead of a wired property. And then do some fun stuff with a changed data model. Although this is hacky.
import {LightningElement, wire, track} from 'lwc';
import getAccounts from '@salesforce/apex/TestController.getAccounts';

export default class AccountList extends LightningElement {

    @wire(getAccounts)
    wiredAccounts({ error, data}) {
       if (error) {
         // do error handling, please
       } else if (data) {
         this.accounts = data.map((acct, index) => {
               return {
                  acct: acct,
                  isMod5: index % 7 == 0 ? true : false
               }
           })
       }
    }
Scenario 1
Build an LWC component to create a new account with custom fields and validate input data before saving.
Answer:To create an LWC component for creating a new account with custom fields and validating input data before saving, follow these steps:
Create the Lightning Web Component (LWC) named "AccountForm" using the Salesforce CLI or Salesforce Developer Console.
Here's an example of how you can implement the "AccountForm" component:
accountForm.html
<template>
    <lightning-card title="Create New Account">
        <div class="slds-p-around_medium">
            <lightning-input label="Account Name" value="{accountName}" required="" onchange="{handleInputChange}"></lightning-input>
            <lightning-input label="Industry" value="{industry}" required="" onchange="{handleInputChange}"></lightning-input>


            <div class="slds-m-top_medium">
                <lightning-button variant="brand" label="Save Account" onclick="{handleSave}"></lightning-button>
            </div>

            <template if:true="{error}">
                <p class="slds-text-color_error">{error}</p>
            </template>
        </div>
    </lightning-card>
</template>
accountForm.js
import { LightningElement, track } from 'lwc';
import { createRecord } from 'lightning/uiRecordApi';
import ACCOUNT_OBJECT from '@salesforce/schema/Account';

export default class AccountForm extends LightningElement {
    @track accountName = '';
    @track industry = '';
    // Add more custom fields here

    @track error = '';

    handleInputChange(event) {
        const { name, value } = event.target;
        this[name] = value;
    }

    async handleSave() {
        // Validate input data before saving
        if (!this.accountName || !this.industry) {
            this.error = 'Account Name and Industry are required fields.';
            return;
        }

        const fields = {};
        fields.Name = this.accountName;
        fields.Industry = this.industry;
        // Add more custom field assignments here

        try {
            const record = await createRecord({ apiName: ACCOUNT_OBJECT.objectApiName, fields });
            this.resetForm();
            // Optionally, you can handle the success message or navigate to the newly created account record page.
        } catch (error) {
            this.error = 'Error creating account: ' + error.body.message;
        }
    }

    resetForm() {
        // Clear form fields and error message
        this.accountName = '';
        this.industry = '';
        this.error = '';
    }
}
In this example, the "AccountForm" component allows users to enter values for the custom fields "Account Name" and "Industry." The component validates that these fields are not empty before attempting to create a new account. If any required field is missing, an error message is displayed.
When the "Save Account" button is clicked, the component uses the createRecord method from the lightning/uiRecordApi module to create the account record with the specified field values. If the account is successfully created, the form is reset. If there is an error during the account creation, an error message is displayed.
Mind it!
Note: Make sure to add the necessary custom fields to the "Account" object in Salesforce and update the component to include assignments for those fields. Also, update the success and error handling based on your specific use case and requirements.
Scenario 2
Create a simple LWC component to display the current date and time.
Answer:To create a simple Lightning Web Component (LWC) to display the current date and time, follow these steps:
Create the Lightning Web Component (LWC) named "CurrentDateTime" using the Salesforce CLI or Salesforce Developer Console.
Here's an example of how you can implement the "CurrentDateTime" component:
currentDateTime.html
<template>
    <lightning-card title="Current Date and Time">
        <div class="slds-p-around_medium">
            <p>{currentDateTime}</p>
        </div>
    </lightning-card>
</template>
currentDateTime.js
import { LightningElement, track } from 'lwc';

export default class CurrentDateTime extends LightningElement {
    @track currentDateTime;

    connectedCallback() {
        // Get the current date and time and update the component property
        this.updateCurrentDateTime();
        // Refresh the date and time every second (1000 milliseconds)
        this.refreshInterval = setInterval(() => this.updateCurrentDateTime(), 1000);
    }

    disconnectedCallback() {
        // Clear the interval when the component is removed from the DOM
        clearInterval(this.refreshInterval);
    }

    updateCurrentDateTime() {
        const now = new Date();
        this.currentDateTime = now.toLocaleString(); // Use any desired date and time format here
    }
}
In this example, the "CurrentDateTime" component displays the current date and time using the toLocaleString() method of the JavaScript Date object. The component's connectedCallback() method is used to initialize the current date and time and set up an interval to update the date and time every second.
The component template displays the current date and time within a lightning-card component. You can adjust the date and time format by modifying the toLocaleString() method to suit your requirements.
After creating the component, you can use it in your Lightning App or any other component where you want to display the current date and time:
Example usage
<c-current-date-time></c-current-date-time>This will display the current date and time within the "CurrentDateTime" component in the context where it's used.
Scenario 3
Build an LWC component that retrieves and displays the current user's name.
Answer:To build a Lightning Web Component (LWC) that retrieves and displays the current user's name, you can use the @wire decorator along with the getCurrentUser method from the lightning/uiRecordApi module. This method fetches the user's information, including their name, from Salesforce and automatically updates the component when the data is available.
Here's how you can implement the "CurrentUser" component:
currentUser.html
<template>
    <lightning-card title="Current User Information">
        <div class="slds-p-around_medium">
            <template if:true="{userName}">
                <p>Hello, {userName}!</p>
            </template>
            <template if:false="{userName}">
                <p>Loading...</p>
            </template>
        </div>
    </lightning-card>
</template>
currentUser.js
import { LightningElement, wire } from 'lwc';
import { getCurrentUser } from 'lightning/uiRecordApi';

export default class CurrentUser extends LightningElement {
    @wire(getCurrentUser)
    currentUser({ error, data }) {
        if (data) {
            // If data is available, update the userName property with the user's name
            this.userName = data.fields.Name.value;
        } else if (error) {
            // Handle error if any
            console.error('Error fetching current user information:', error);
        }
    }
}
In this example, the "CurrentUser" component uses the @wire decorator to call the getCurrentUser method, which retrieves the current user's information. The currentUser function is invoked with the result of the wire, which contains the user's data or any error information.
When the data is available (data is not null), the user's name is extracted from the response and stored in the userName property, which is then displayed in the component's template.
If the data is not available yet (data is null), the component displays "Loading..." until the data is retrieved. If there's an error during the data retrieval, the error is logged to the console for debugging purposes.
After creating the component, you can use it in your Lightning App or any other component where you want to display the current user's name:
Example usage
<c-current-user></c-current-user>This will display a greeting with the current user's name within the "CurrentUser" component in the context where it's used.
Scenario 4
Implement an LWC component that displays a countdown timer. The timer should start when a button is clicked and show an alert when it reaches zero.
Answer:To implement an LWC component that displays a countdown timer, you can use JavaScript's setInterval() function to decrement the timer value every second. When the timer reaches zero, you can display an alert message.
Here's how you can create the "CountdownTimer" component:
countdownTimer.html
<template>
    <lightning-card title="Countdown Timer">
        <div class="slds-p-around_medium">
            <p>Time Left: {timerValue}</p>
            <lightning-button label="Start Timer" variant="brand" onclick="{startTimer}"></lightning-button>
        </div>
    </lightning-card>
</template>
countdownTimer.js
import { LightningElement, track } from 'lwc';

const TIMER_DURATION = 10; // Set the duration of the countdown in seconds

export default class CountdownTimer extends LightningElement {
    @track timerValue = TIMER_DURATION;
    timerInterval;

    startTimer() {
        // Clear any existing timer interval
        clearInterval(this.timerInterval);

        // Set the initial value for the timer
        this.timerValue = TIMER_DURATION;

        // Start the countdown timer
        this.timerInterval = setInterval(() => {
            this.timerValue--;

            // Check if the timer has reached zero
            if (this.timerValue <= 0) {
                clearInterval(this.timerInterval);
                this.showAlert();
            }
        }, 1000); // Update the timer every second (1000 milliseconds)
    }

    showAlert() {
        // Show an alert when the timer reaches zero
        alert('Time\'s up!');
    }
}
In this example, the "CountdownTimer" component displays the remaining time in seconds when the "Start Timer" button is clicked. The countdown starts from the TIMER_DURATION value (set to 10 seconds in this example).
The startTimer() method uses the setInterval() function to decrement the timerValue property every second until it reaches zero. When the timer value becomes zero, the interval is cleared, and the showAlert()method displays an alert message ("Time's up!").
After creating the component, you can use it in your Lightning App or any other component where you want to display the countdown timer:
Example usage
<c-countdown-timer></c-countdown-timer>When you click the "Start Timer" button, the countdown timer will begin, and an alert will be displayed when it reaches zero.
Scenario 5
Implement an LWC component that displays a modal dialog when a link is clicked.
Answer:To implement an LWC component that displays a modal dialog when a link is clicked, you can use the lightning/ui*Api module to control the visibility of the modal and the lightning-button component to trigger the display.
Here's how you can create the "ModalDialog" component:
modalDialog.html
<template>
    <lightning-card title="Modal Dialog Example">
        <div class="slds-p-around_medium">
            <a href="#" onclick="{openModal}">Open Modal</a>

            <template if:true="{isModalOpen}">
                <div class="slds-backdrop slds-backdrop_open"></div>
                <section role="dialog" tabindex="-1" aria-labelledby="modal-heading-01" aria-modal="true" aria-describedby="modal-content-id-1" class="slds-modal slds-fade-in-open slds-modal_medium">
                    <div class="slds-modal__container">
                        <header class="slds-modal__header">
                            <h2 id="modal-heading-01" class="slds-text-heading_medium">Modal Header</h2>
                        </header>
                        <div class="slds-modal__content slds-p-around_medium" id="modal-content-id-1">
                            <p>This is a modal dialog content.</p>
                        </div>
                        <footer class="slds-modal__footer">
                            <lightning-button label="Close" variant="neutral" onclick="{closeModal}"></lightning-button>
                        </footer>
                    </div>
                </section>
            </template>
        </div>
    </lightning-card>
</template>
modalDialog.js
import { LightningElement, track } from 'lwc';

export default class ModalDialog extends LightningElement {
    @track isModalOpen = false;

    openModal() {
        // Show the modal dialog
        this.isModalOpen = true;
    }

    closeModal() {
        // Close the modal dialog
        this.isModalOpen = false;
    }
}
In this example, the "ModalDialog" component displays a link, "Open Modal." When the link is clicked, the openModal() method is called, which sets the isModalOpen property to true, making the modal dialog visible.
The modal dialog itself is displayed using conditional rendering (<template if:true="{isModalOpen}">...</template>). The dialog is composed of an overlay backdrop and a section that represents the modal itself. The modal contains a header, content, and footer, with a "Close" button to close the modal.
The closeModal() method is triggered when the "Close" button is clicked, and it sets the isModalOpen property back to false, hiding the modal dialog.
To use this component, make sure to create an LWC named "modalDialog" using the Salesforce CLI or Developer Console. Then, you can add the component to your Lightning App or any other parent component where you want to display the modal dialog:
Example usage
<template>
    <c-modal-dialog></c-modal-dialog>
</template>
When you click the "Open Modal" link, the modal dialog will be displayed with the header, content, and "Close" button. Clicking the "Close" button will hide the modal dialog again.
These scenario-based LWC interview questions cover a range of use cases and real-world scenarios. They should help you prepare for your Salesforce LWC interview and demonstrate your practical knowledge and skills in Lightning Web Components development. Good luck with your interview!

One short email when we publish something new — interview questions, Salesforce guides and career tips. No spam, unsubscribe in one click.
Thirty Salesforce CPQ interview questions with answers — quote-to-cash, products, bundles, price rules, product rules, approvals and contracts.

The 30 Salesforce Apex interview questions asked most — collections, SOQL, DML, governor limits, triggers, async Apex and testing — with answers.

Salesforce Headless 360 explained — what headless CRM means, how APIs and data cloud power it, and what it changes for developers and businesses.
Questions, corrections or your own experience — they all help the next reader.
ujjwala
Sushilkumar Kulkarni
Bhavitha