In the fast-paced world of Salesforce development, getting things done quickly and efficiently is crucial. One of the key tools that helps developers achieve this is Lightning Data Services (LDS). As part of the Lightning Platform, LDS provides a powerful framework for working with Salesforce data in Lightning Web Components (LWC).
In this blog series, we'll explore how Lightning Data Services changes the way we handle Salesforce data in LWCs. From simplifying data retrieval and manipulation to ensuring data consistency and security, LDS offers a wide range of features that make development easier and improve the user experience.
Join us as we dive into the details of Lightning Data Services, discovering its capabilities, best practices, and real-world uses. Whether you're an experienced Salesforce developer or just starting with LWCs, this series will give you the knowledge and tools you need to use LDS effectively and efficiently in your projects.
Understanding Lightning Data Service (LDS)
Lightning Data Service (LDS) is a powerful tool provided by Salesforce that allows Lightning Web Components (LWC) to interact with Salesforce data without the need for Apex code. It operates on the client-side and offers several key features that streamline data retrieval and management within LWC.
Core Concepts:
LDS revolves around the concept of data encapsulation, where data is encapsulated within individual components rather than being accessed directly through Apex queries. This means that each component manages its own data independently, reducing dependencies and improving modularity.
Importance of Data Encapsulation:
By encapsulating data within components, LDS promotes better organization and reusability of code. Each component is responsible for fetching and managing its own data, which enhances encapsulation and reduces coupling between components. This modular approach simplifies development and maintenance, allowing developers to focus on building self-contained, reusable components.
Client-Side Caching:
One of the key benefits of LDS is its client-side caching mechanism. When a component fetches data using LDS, the data is cached locally in the browser's memory. Subsequent requests for the same data within the same session can be served from the cache, eliminating the need for additional server round trips. This improves performance and responsiveness of the application, especially in scenarios where the same data is accessed frequently.
Benefits Over Traditional Apex Data Queries:
Compared to traditional Apex data queries, LDS offers several advantages:
- Reduced Server Load: Since data is fetched and cached on the client side, LDS reduces the load on the Salesforce server by minimizing the number of server requests.
- Faster Response Times: With client-side caching, LDS can serve data more quickly, leading to faster response times and improved user experience.
- Enhanced Offline Support: LDS supports offline data access, allowing components to continue functioning even when the user is offline or experiencing connectivity issues.
- Automatic Record Updates: LDS automatically detects changes to records and updates the local cache accordingly, ensuring that components always have access to the latest data without manual refreshing.
Example:
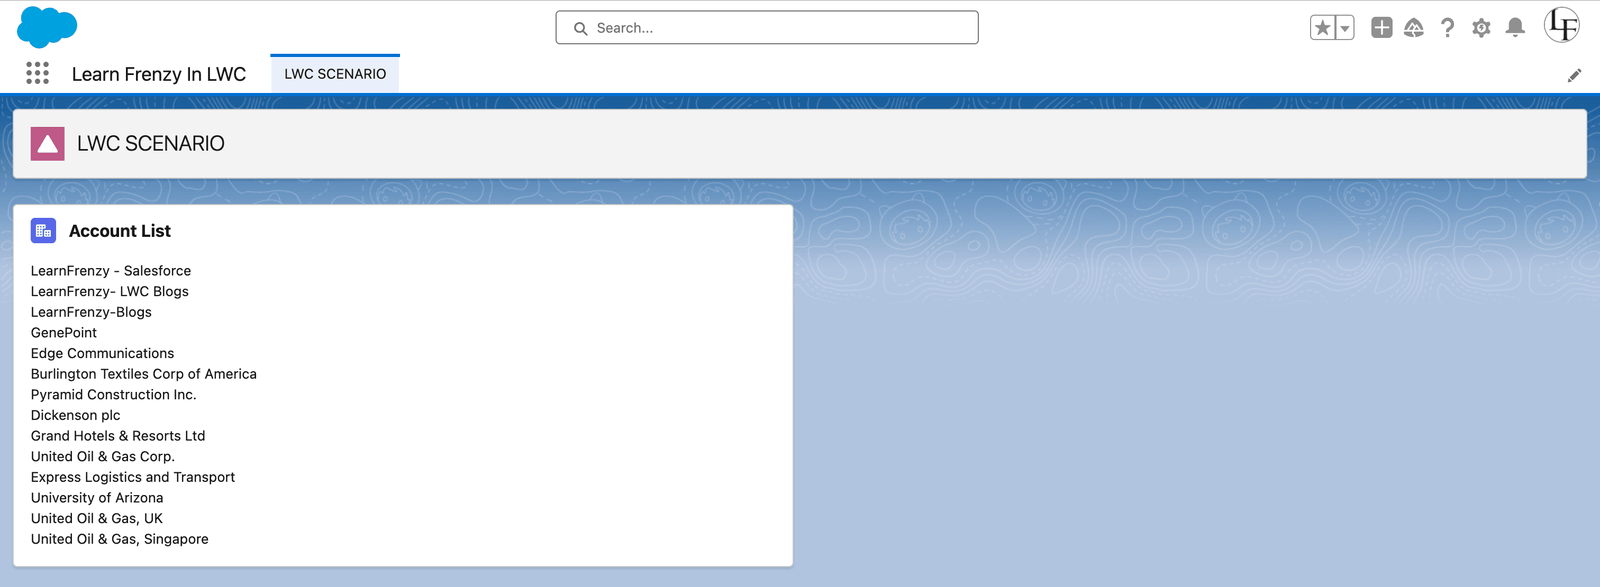
Let's consider an example where we have a Lightning Web Component that displays a list of accounts using LDS.
Create a Lightning Web Component: accountsList.html
        <template if:true={accounts}>

                <template for:each={accounts} for:item="account">
                    <li key={account.Id}>{account.Name}</li>
                </template>

        </template>
        <template if:false={accounts}>
            No accounts found.
        </template>
JavaScript File: accountsList.js
// accountsList.js
import { LightningElement, wire } from 'lwc';
import { getListUi } from 'lightning/uiListApi';
import ACCOUNT_OBJECT from '@salesforce/schema/Account';

export default class AccountsList extends LightningElement {
    @wire(getListUi, { objectApiName: ACCOUNT_OBJECT, listViewApiName: 'All' })
    wiredAccounts({ error, data }) {
        if (data) {
            this.accounts = data.records.records;
        } else if (error) {
            console.error(error);
        }
    }
}
Output:
In this example, we use the getListUi wire adapter from lightning/uiListApi to fetch a list of accounts. The result is automatically cached by LDS, and subsequent requests for the same data will be served from the cache, resulting in improved performance and responsiveness.
This example demonstrates the core concepts of LDS, including data encapsulation, client-side caching, and the benefits it offers over traditional Apex data queries.
In this topic, we will cover how Lightning Data Service (LDS) are work with salesforce Data in LWC Component.
- lightning-record-form with demonstration.
- lightining-record-edit-form with demonstration.
- lightning-record-view-form with demonstration.
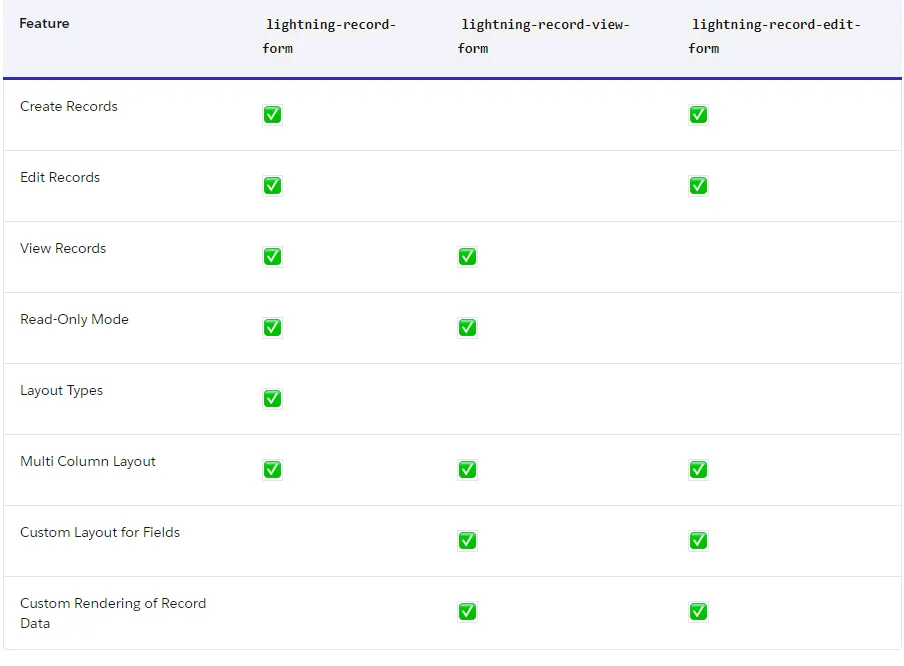
The base component of Lightning Data Service are
lightning-record-edit-form—Displays an editable form.lightning-record-view-form—Displays a read-only form.lightning-record-form— Supports edit, view, and read-only modes.
![]() MIND IT !
MIND IT !
lightning-record-form
The lightning-record-form component in Lightning Web Components (LWC) provides a simple and efficient way to create, view, and edit records without writing Apex code. It encapsulates common record-related functionalities and handles data retrieval, validation, and submission seamlessly.
features:
- Switches between view and edit modes automatically when the user begins editing a field in a view form
- Provides Cancel and Save buttons automatically in edit forms
- Uses the object’s default record layout with support for multiple columns
- Loads all fields in the object’s compact or full layout, or only the fields you specify
Step-by-step guide to implementing record creation, editing, and viewing functionalities:
To demonstrate the usage of lightning-record-form, let's create a Lightning Web Component that allows users to create, view, and edit account records.
1. Creating a Record:
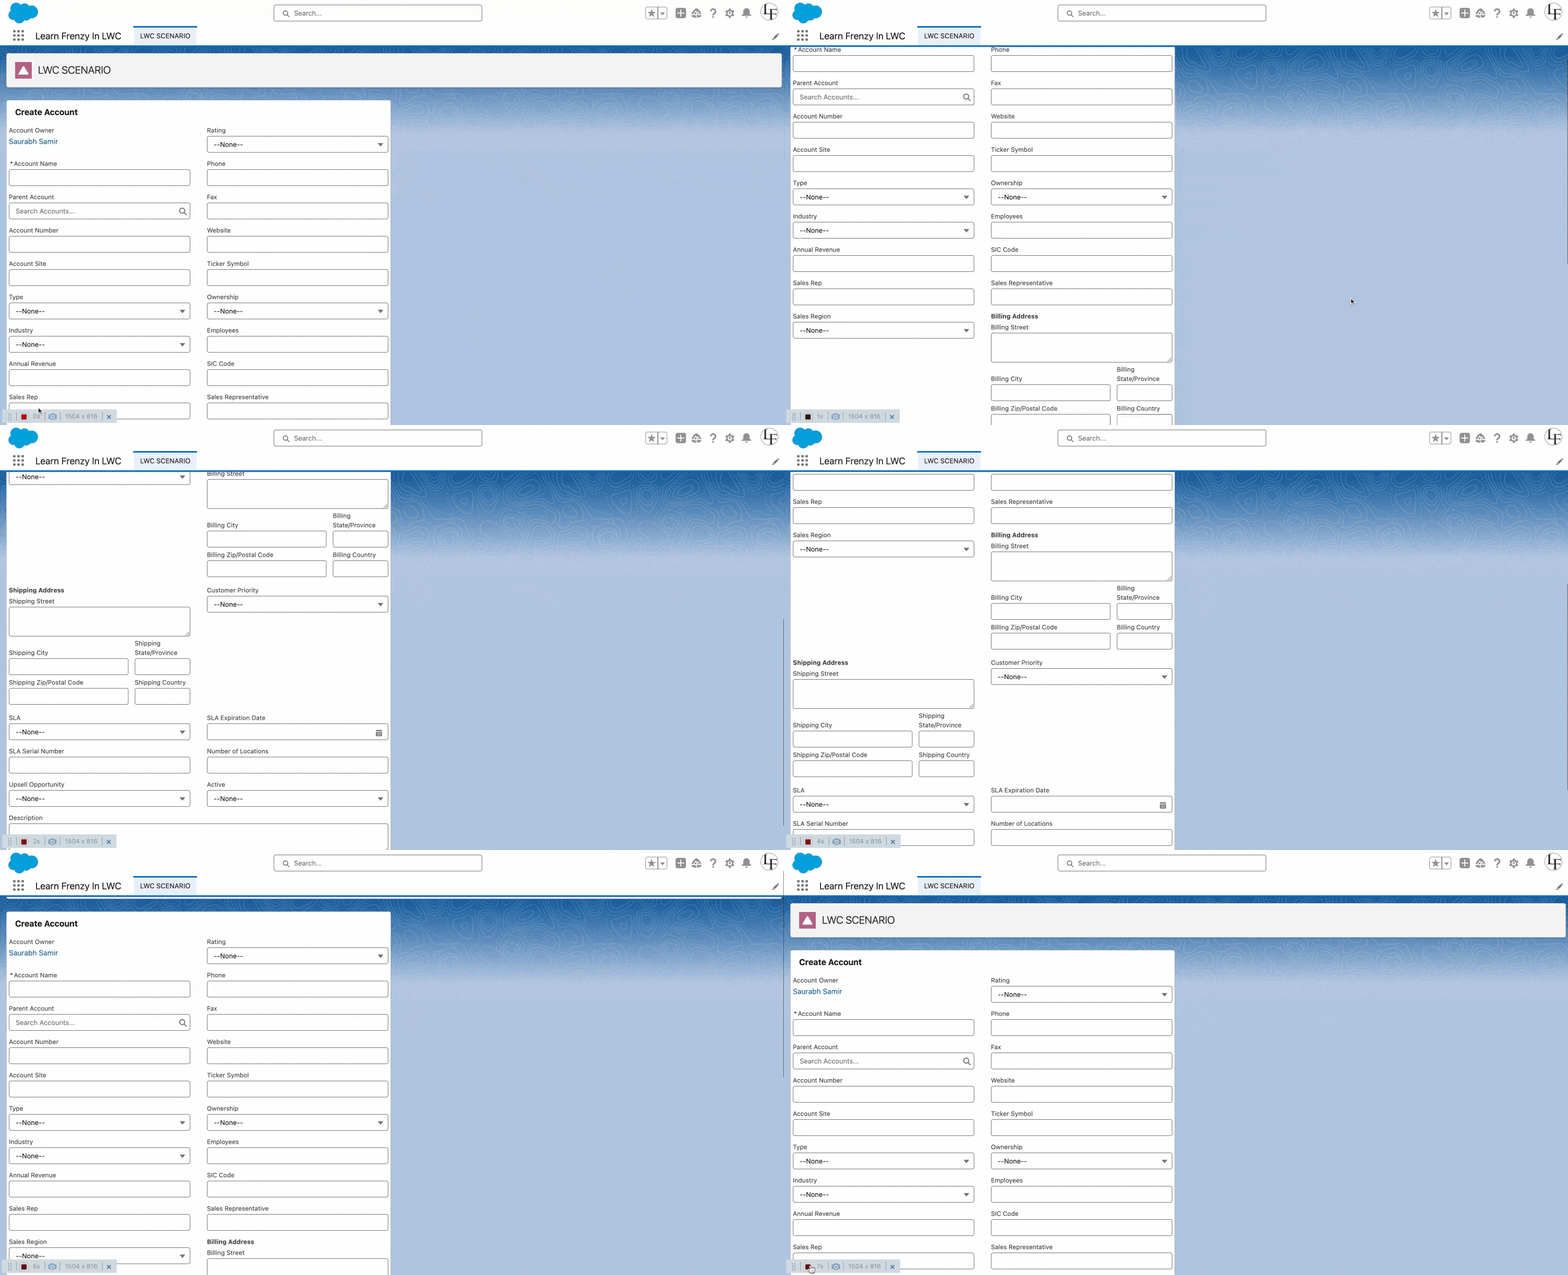
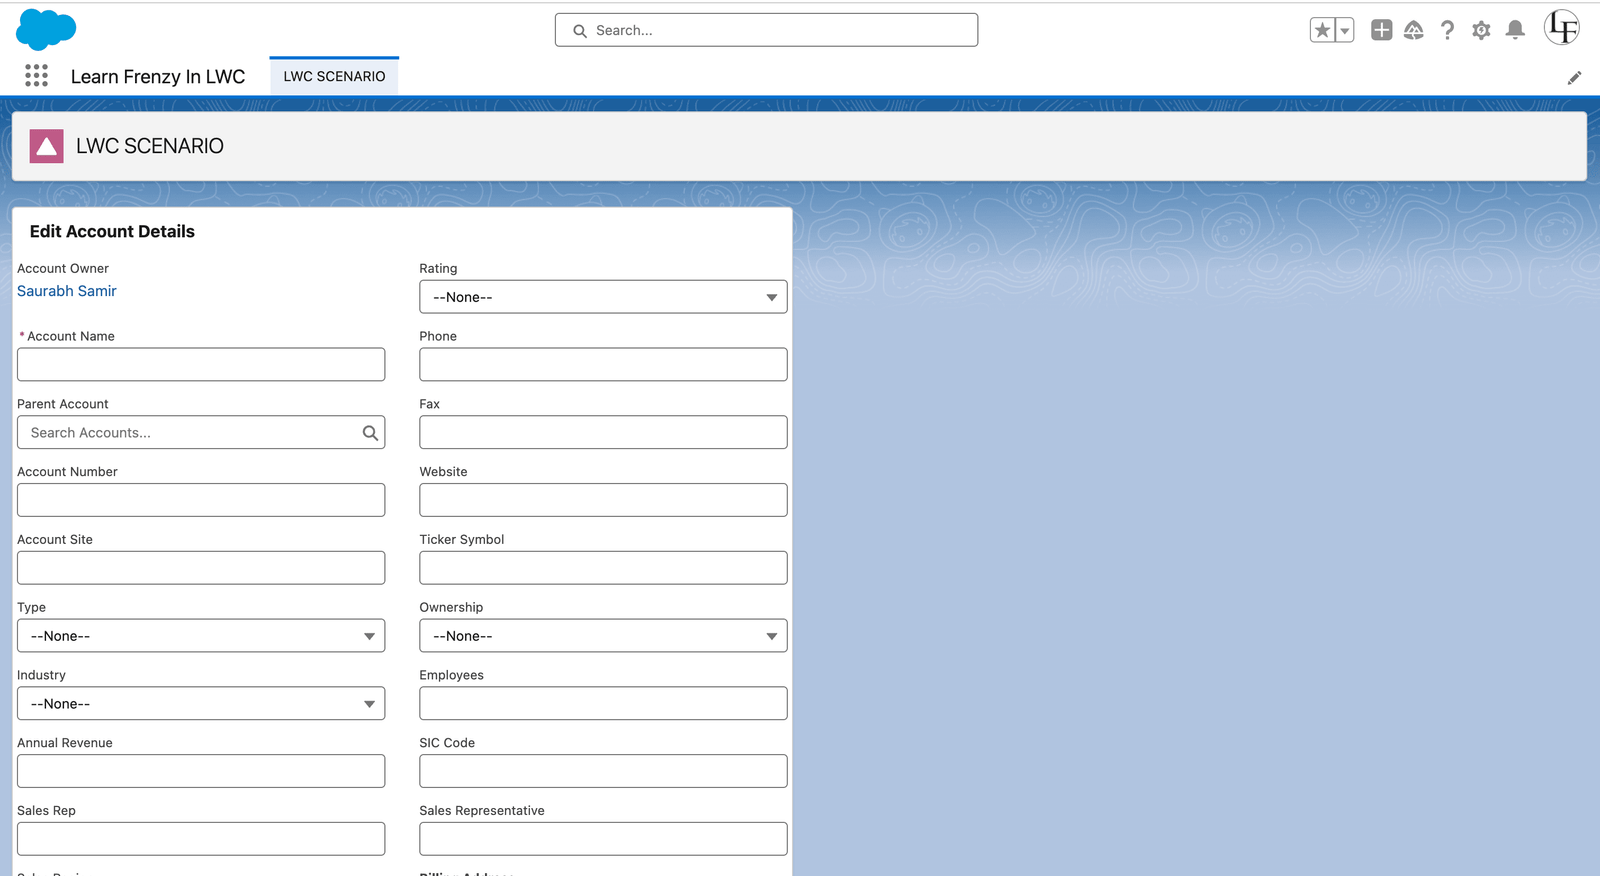
In this example, we use lightning-record-form to create a form for creating account records. We specify the object API name as "Account" and the layout type as "Full" to include all fields. The mode is set to "edit" to enable editing mode.
Output:
When the createAccountForm component is rendered, users can fill out the form to create a new account record.
2. Viewing a Record:
In this example, we use lightning-record-form to display the details of an existing account record. We specify the record ID dynamically using the record-id attribute and set the mode to "view" to render the form in read-only mode.
Output:
When the viewAccountDetails component is rendered with a valid record ID, it displays the details of the specified account record in read-only mode.
3. Editing a Record:
In this example, we use lightning-record-form to allow users to edit the details of an existing account record. We specify the record ID dynamically using the record-id attribute and set the mode to "edit" to enable editing mode.
Output:
When the editAccountDetails component is rendered with a valid record ID, it displays the details of the specified account record in edit mode, allowing users to update the record.
Customization options such as specifying fields, layouts, and modes:
lightning-record-form offers several customization options to tailor the form according to your requirements:
- Specify fields: You can specify which fields to include or exclude from the form using the fields attribute.
- Layout type: Choose between "Full" or "Compact" layout types to control the display of fields.
- Modes: Set the mode attribute to "view" for read-only mode, "edit" for editing mode, or "read" for a read-only view with edit capability.
By following this step-by-step guide and leveraging the customization options provided by lightning-record-form, you can seamlessly integrate record creation, viewing, and editing functionalities into your Lightning Web Components.
Real-Time Scenario: Creating New Accounts using Lightning-record-form
Imagine you're building a Salesforce application for a sales team that needs to quickly add new accounts to their database during client meetings or prospecting activities. To streamline this process, you decide to implement a Lightning Web Component (LWC) that allows users to create new account records on the fly.
Implementation:
You create a Lightning Web Component named "CreateAccountForm" that utilizes the lightning-record-form component to facilitate the creation of new account records.
createAccountForm.html
// createAccountForm.js
import { LightningElement } from 'lwc';
import { ShowToastEvent } from 'lightning/platformShowToastEvent';
import API_NAME from '@salesforce/schema/Account'
import NAME_FIELD from '@salesforce/schema/Account.Name'
import INDUSTRY_FIELD from '@salesforce/schema/Account.Industry'
import RATING_FIELD from '@salesforce/schema/Account.Rating'
import TYPE_FIELD from '@salesforce/schema/Account.Type'

export default class CreateAccountForm extends LightningElement {

  objectFields = [NAME_FIELD, RATING_FIELD, INDUSTRY_FIELD, TYPE_FIELD] //"fields" accept only in array form
  apiName = API_NAME
  dataId

  handleSuccess(event) {
    this.dataId = event.detail.id
    console.log(this.dataId);
    this.dispatchEvent(new ShowToastEvent({
      title: 'Record Created',
      message: 'record created with id ' + this.dataId, variant: 'success'
    }));
  }
}
Output:
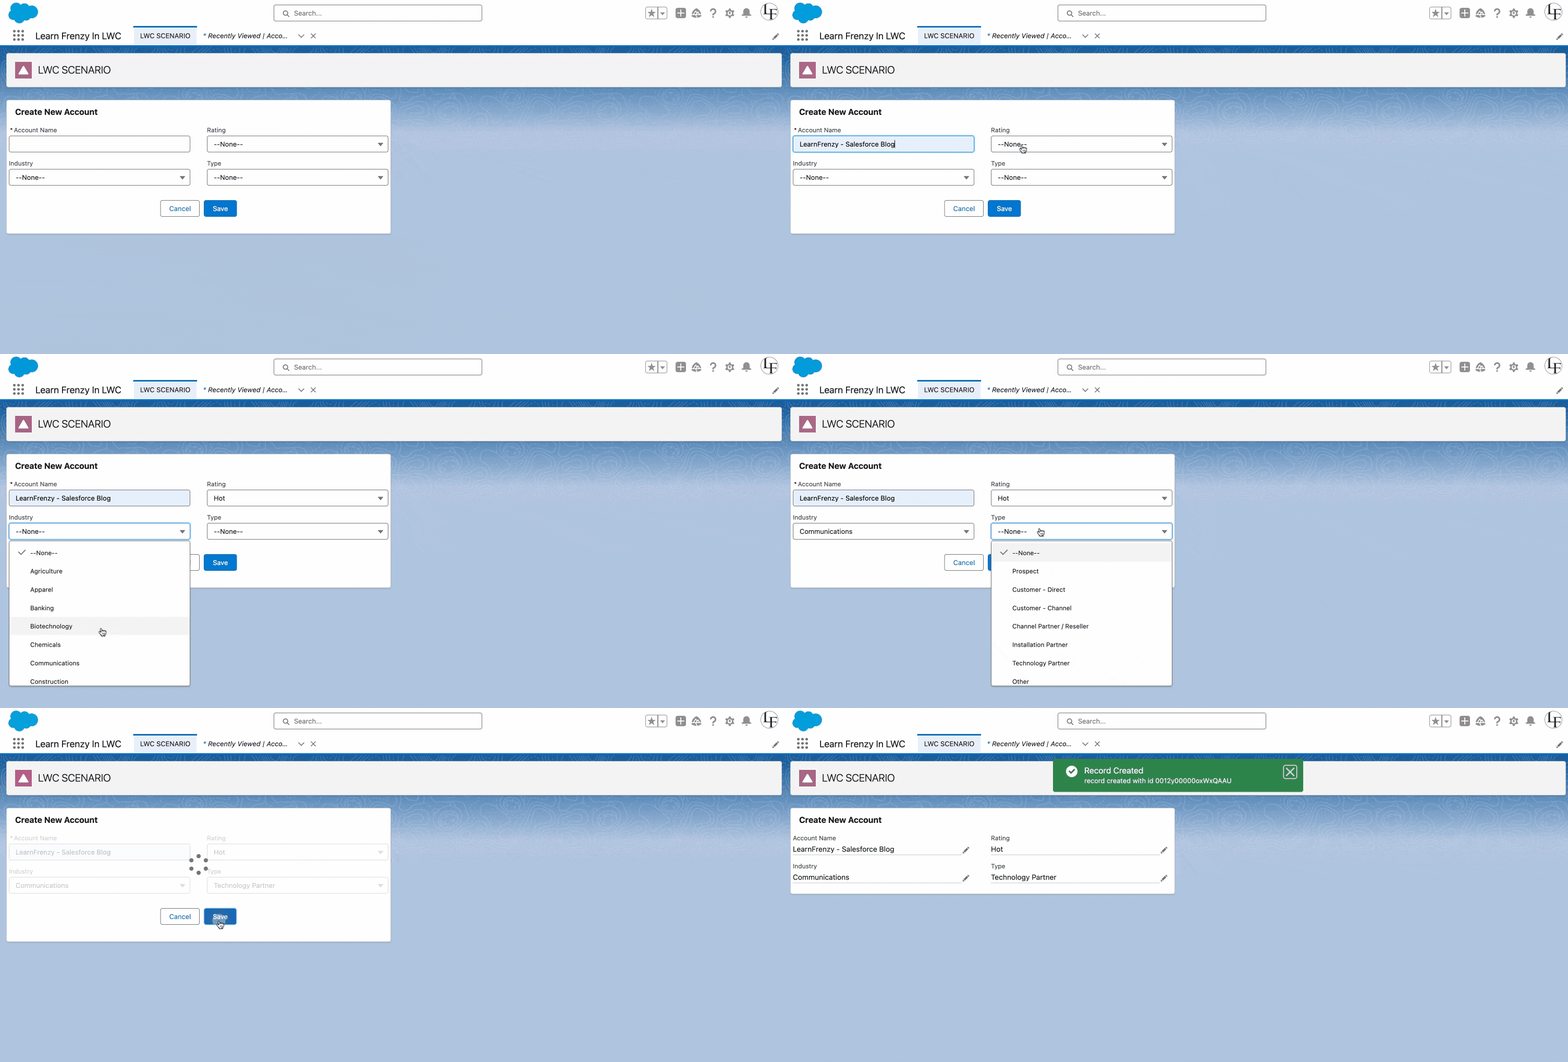
When users access the "CreateAccountForm" component, they are presented with a form that includes all the necessary fields to create a new account record. They can fill out the form with the relevant information such as account name, industry, rating and type.
Upon submitting the form, the lightning-record-form component triggers the "onsuccess" event, which is handled by the "handleSuccess" method in the JavaScript file. Inside this method, you can perform any additional actions, such as notifying the user of the successful record creation or redirecting them to another page.
The newly created account record is then visible in the Salesforce database, allowing the sales team to access and manage it as needed.
This real-time scenario demonstrates how Lightning Web Components and lightning-record-form can be utilized to simplify and streamline the process of creating new records in Salesforce, improving productivity and efficiency for users.
lightning-record-edit-form
Lightning-record-edit-form is a powerful tool provided by Salesforce to enable users to edit records directly within Lightning Web Components (LWC). It simplifies the process of editing records by encapsulating common functionalities such as form layout customization, field validations, and integration with server-side Apex controllers.
features:
- Editing a record’s specified fields, given the record ID.
- Creating a record using specified fields.
- Customizing the form layout
- Custom rendering of record data
![]() MIND IT !
MIND IT !
To specify editable fields, use `lightning-input-field` components inside `lightning-record-edit-form` component.
To display record fields as read-only in `lightning-record-edit-form`, use `lightning-output-field` components to specify those fields.
Practical Examples:
Let's explore some practical examples to understand the usage of lightning-record-edit-form:
1. Editing Account Details:
editAccountDetails.html
editAccountDetails.js
// editAccountDetails.js
import { LightningElement, api } from 'lwc';
import { ShowToastEvent } from 'lightning/platformShowToastEvent';

export default class EditAccountDetails extends LightningElement {
    @api recordId;

    handleSuccess(event) {
        // Handle successful record editing
        const editedAccountId = event.detail.id;
        // Notify user with a success toast message
        const msgEvent = new ShowToastEvent({
        title: 'Successfully Saved',
        message: 'Hurrey!! Record Saved Successfully with an id:- '+event.detail.id,
        variant: 'success'
        })
        this.dispatchEvent(msgEvent)
    }
}
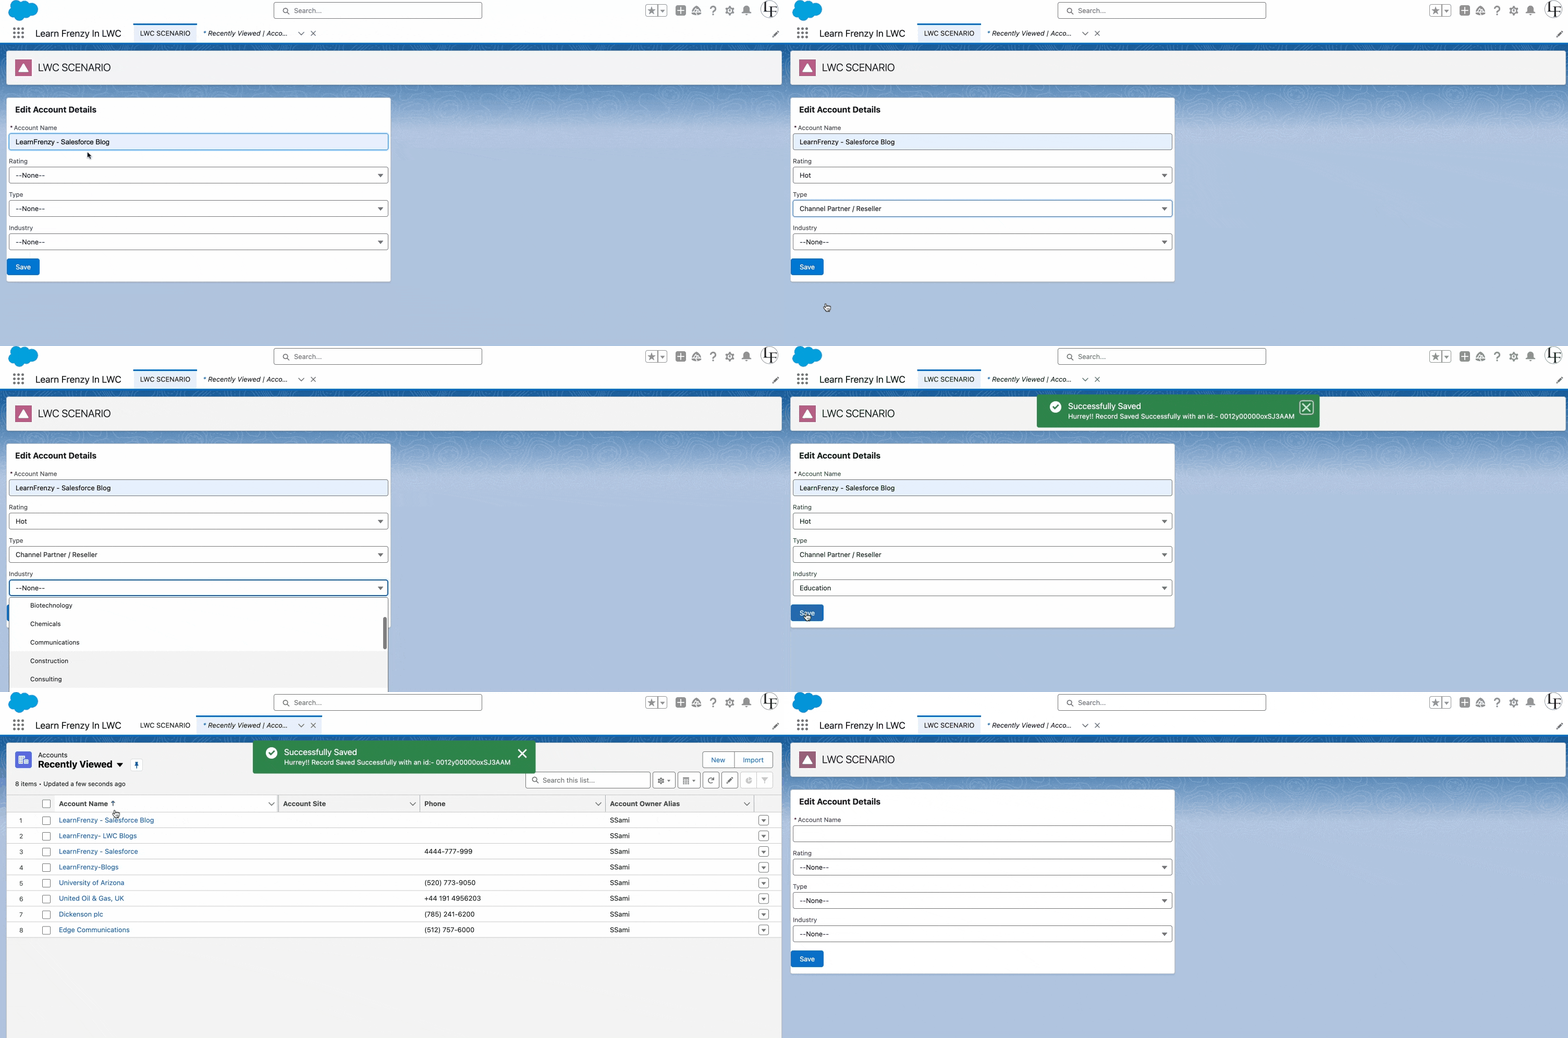
In this example, we use lightning-record-edit-form to allow users to edit the details of an existing account record. We specify the record ID dynamically using the record-id attribute and include lightning-input-field components for each field we want to display and edit. The onsuccess event is handled by the handleSuccess method to perform any actions after successful record editing.
Output:
2. Customizing Form Layout:
customLayoutExample.html
customLayoutExample.js
// customLayoutExample.js
import { LightningElement, api } from 'lwc';

export default class CustomLayoutExample extends LightningElement {
    @api recordId;
}
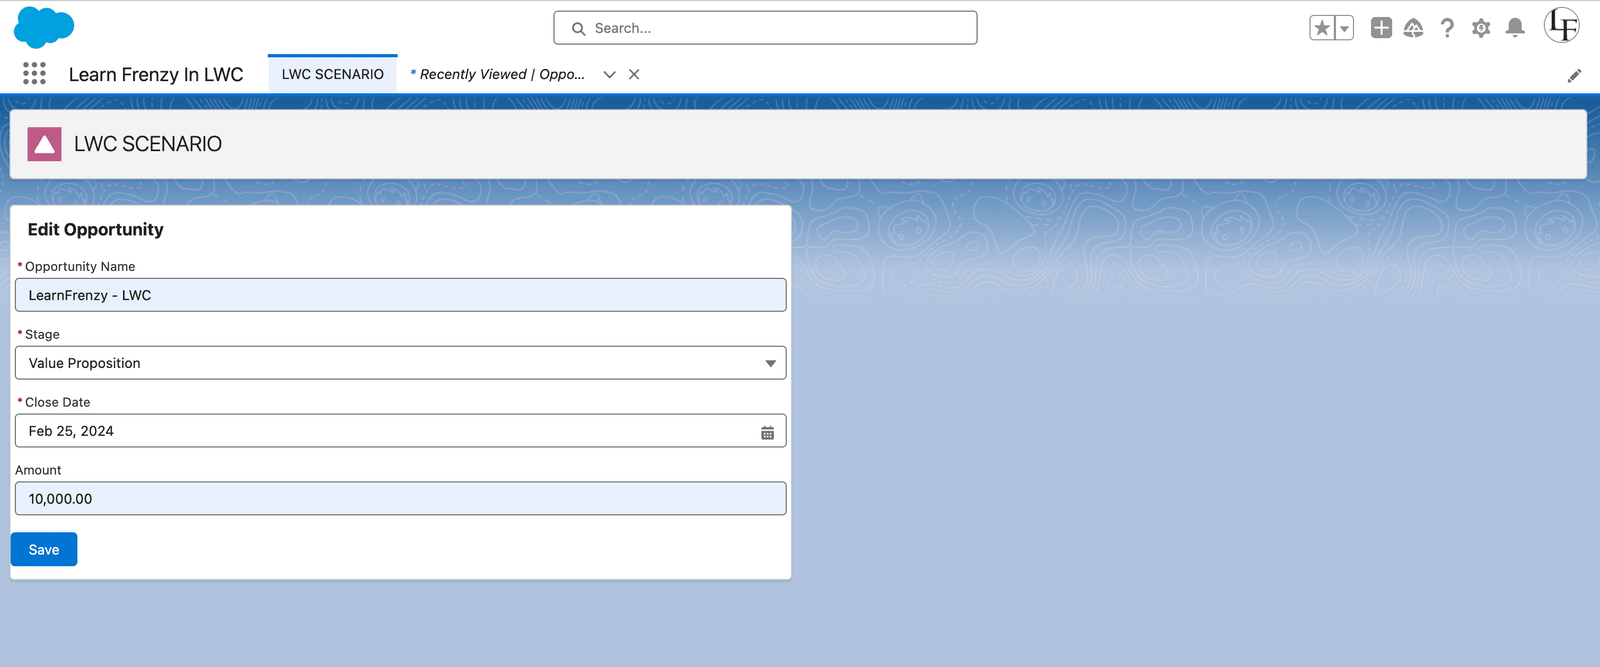
In this example, we customize the layout of the lightning-record-edit-form by specifying the layout-type as "Compact" and the number of columns as "2". This results in a more compact form layout with fields arranged in two columns.
Output:
Handling Field Validations and Error Messages.
Handling Field Validations:
fieldValidationExample.html
<lightning-record-edit-form record-id={recordId} object-api-name="Contact" layout-type="Full" onsubmit={handleSubmit}>
In this example, we add the "required" attribute to the lightning-input-field components for the "FirstName", "LastName", and "Email" fields. This enforces field validation and ensures that users cannot submit the form without providing values for these required fields.
fieldValidationExample.js
// fieldValidationExample.js
import { LightningElement, api } from 'lwc';
import { ShowToastEvent } from 'lightning/platformShowToastEvent';

export default class FieldValidationExample extends LightningElement {
    @api recordId;

    handleSubmit(event) {
        // Prevent the default form submission behavior
        event.preventDefault();

        // Validate the form fields before submission
        const fields = this.template.querySelectorAll('lightning-input-field');
        let isValid = true;
        fields.forEach(field => {
            field.reportValidity();
            if (!field.checkValidity()) {
                isValid = false;
            }
        });

        // If all fields are valid, submit the form
        if (isValid) {
            this.template.querySelector('lightning-record-edit-form').submit();
        } else {
            // Display an error toast message
            const toastEvent = new ShowToastEvent({
                title: 'Error',
                message: 'Please fill in all required fields.',
                variant: 'error'
            });
            this.dispatchEvent(toastEvent);
        }
    }
}
In this JavaScript file, we define a Lightning Web Component named "FieldValidationExample". We use the @api decorator to expose the recordId property, which allows the Lightning-record-edit-form to dynamically set the ID of the Contact record to edit.
The `handleSubmit` method is triggered when the form is submitted. Inside this method, we first prevent the default form submission behavior using `event.preventDefault()`. Then, we validate each form field using the `reportValidity()` and `checkValidity()` methods. If any field fails validation, isValid is set to false.
If all fields are valid, we submit the form using the submit() method of the lightning-record-edit-form component. If any field fails validation, we display an error toast message using the ShowToastEvent module.
Output:
The output of the scenario described in the fieldValidationExample.js file is as follows:
- When the user submits the form:
- If all required fields (First Name, Last Name, Email) are filled in with valid values, the form is submitted successfully, and the changes are saved to the Contact record.
- If any required field is left empty or contains an invalid value, an error toast message is displayed indicating that all required fields must be filled in.
- If an error occurs during form submission:
- If there are any server-side errors during the submission process, the form submission fails, and the user may receive an error message depending on the specific error encountered.
Overall, the output ensures that the user is prompted to fill in all required fields with valid values before the form can be successfully submitted, thereby enhancing data integrity and user experience.
![]() MIND IT !
MIND IT !
Integration with Apex controllers for server-side processing.
Integration with Apex Controllers:
To integrate lightning-record-edit-form with Apex controllers for server-side data manipulation, you can handle the onsubmit event and call an Apex method to perform data manipulation logic on the server-side. The Apex method can perform actions such as updating records, performing additional validations, or triggering workflows.
lightning-record-view-form
The `lightning-record-view-form` component allows you to display record details in a read-only format. It automatically renders fields based on the record layout, making it ideal for viewing existing records without allowing users to edit them.
You can customize the form layout or provide custom rendering of record data. If you don’t require customizations, use `lightning-record-form` instead.
To specify read-only fields, use `lightning-output-field` components inside `lightning-record-view-form`. It requires a record ID to display the fields on the record.
Demonstrations of lightning-record-view-form for Displaying Read-only Record Details:
The lightning-record-view-form component allows you to display record details in a read-only format. It automatically renders fields based on the record layout, making it ideal for viewing existing records without allowing users to edit them.
HTML Template (recordViewFormExample.html):
JavaScript File (recordViewFormExample.js):
//recordViewFormExample.js
import { LightningElement } from 'lwc';
import API_NAME from '@salesforce/schema/Account'
import NAME_FIELD from '@salesforce/schema/Account.Name'
import INDUSTRY_FIELD from '@salesforce/schema/Account.Industry'
import RATING_FIELD from '@salesforce/schema/Account.Rating'
import TYPE_FIELD from '@salesforce/schema/Account.Type'

export default class RecordViewFormExample extends LightningElement {
    apiName = API_NAME

    accField = {
        name: NAME_FIELD,
        rating: RATING_FIELD,
        industry: INDUSTRY_FIELD,
        type: TYPE_FIELD
    }
}
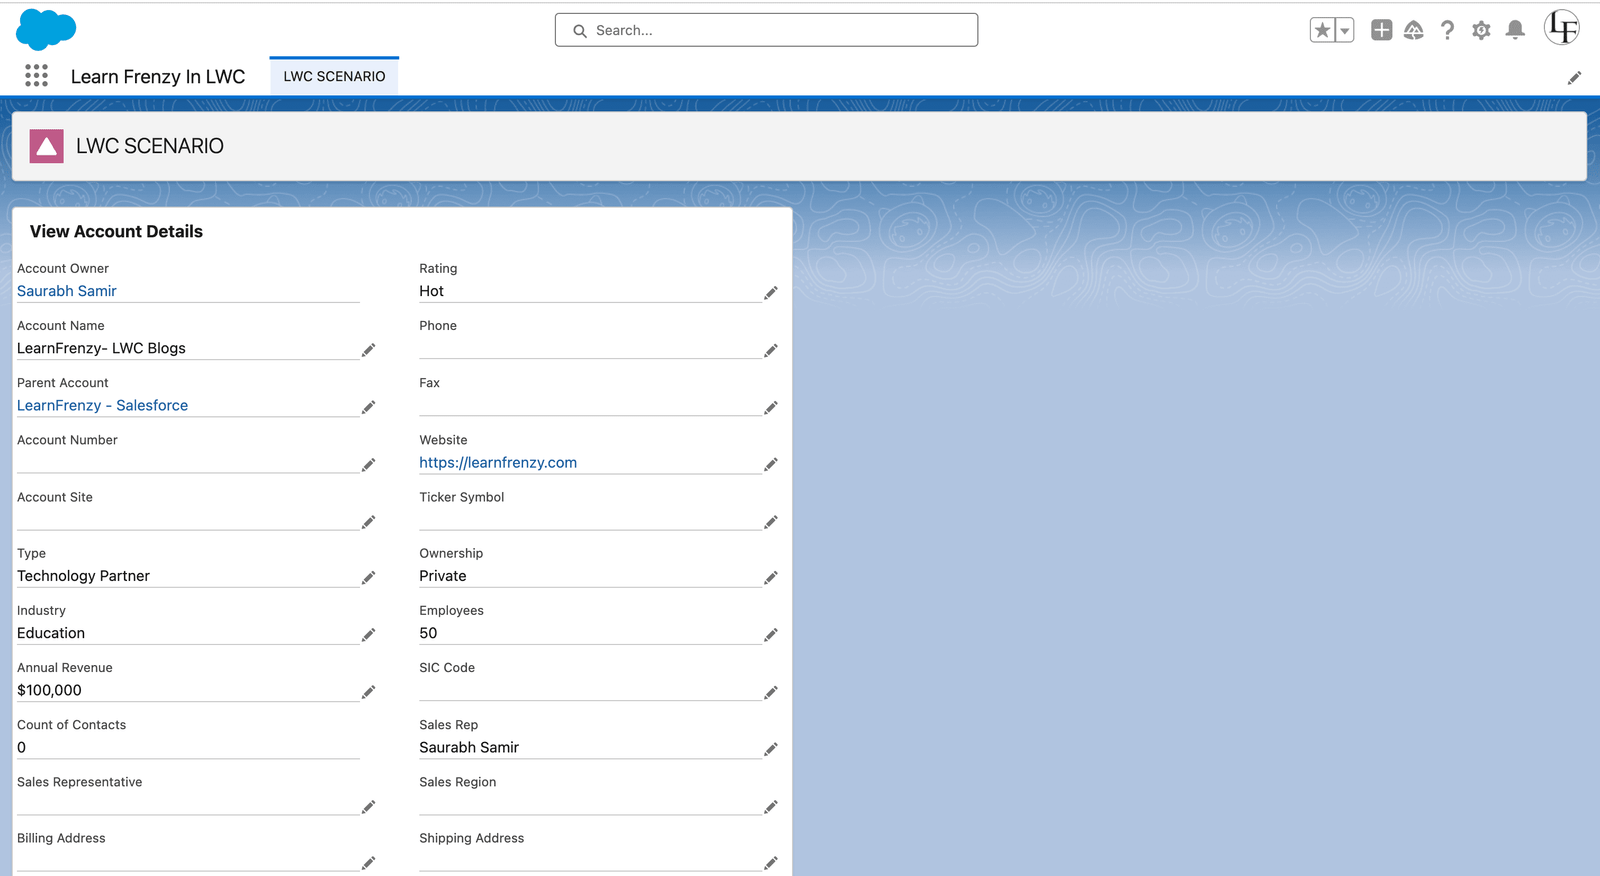
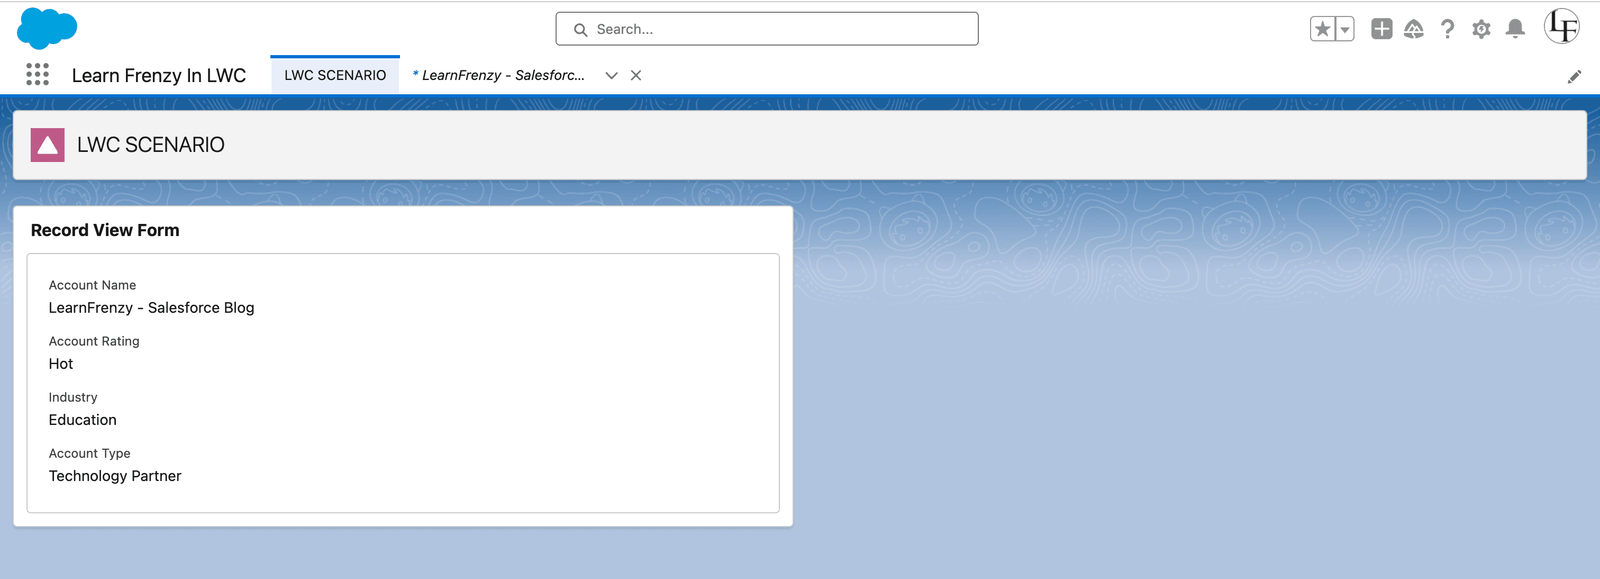
Output:
When you include this component in your Lightning web page and specify a valid record ID, it displays the details of the corresponding account record in a read-only format. Users can view the record's fields but cannot edit them.
Advanced Techniques and Best Practices
1. Tips for optimizing performance and minimizing data transfer.
Example:
Consider a scenario where you have a list of contacts to display in your Lightning web component (LWC). Instead of fetching all contact fields for each record, you can specify only the required fields to minimize data transfer:
// Fetching only required fields
const fields = ['Name', 'Email', 'Phone'];
const contacts = await getContacts({ fields });
Output:
By fetching only the necessary fields from the server, you reduce the amount of data transferred over the network. This optimization leads to faster loading times for your component and improves overall performance.
2. Handling Errors and Exceptions Gracefully:
Example:
Suppose you're performing an operation that may encounter an error, such as saving a record. You can use try-catch blocks to handle errors gracefully:
try {
    await saveRecord(recordData);
    this.showToast('Success', 'Record saved successfully!', 'success');
} catch(error) {
    console.error('An error occurred:', error.message);
    this.showToast('Error', 'Failed to save record. Please try again.', 'error');
}
Output:
With error handling in place, if an error occurs during the operation (e.g., due to network issues), the user will see a friendly error message instead of encountering a system error. This enhances the user experience and guides users on how to proceed.
3. Utilizing LDS Events for Inter-Component Communication:
Example:
Suppose you have two Lightning web components (LWCs) on a page, and you want them to communicate with each other. You can use Lightning Data Service (LDS) events for this purpose:
// Publishing an event in one component
const messagePayload = { text: 'Hello from PublisherComponent!' };
publish(this.messageContext, MY_CUSTOM_MESSAGE_CHANNEL, messagePayload);
// Subscribing to the event in another component
subscribe(this.messageContext, MY_CUSTOM_MESSAGE_CHANNEL, (event) => {
    const message = event.messagePayload.text;
    this.displayMessage(message);
});
Output:
With LDS events, you can establish communication between components without tightly coupling them. When one component publishes an event, the other component subscribed to that event receives the message payload and can respond accordingly. This enables modular and flexible component architecture.
By following these best practices and implementing these advanced techniques, developers can build efficient, robust, and user-friendly Lightning web components (LWCs) for Salesforce applications, even as beginners.
“Stay tuned for more exciting LWC topics, and keep exploring the world of Lightning Web Components to become a Salesforce development pro.”
Happy coding with LWC!

.png)
Comments (2)
What others are saying about this article
Prince Kumar
ReaderLearnFrenzy Team
ReaderBest Way: Create a JavaScript Service Module
1. Create a File: Make a new JS file (e.g., ldsUtils.js) in your modules folder.
2. Write Helper Functions: Create functions that use getRecord and return a Promise.
3. Import Anywhere: Import and use these functions in any component's JavaScript file.
Leave a Comment
Share your thoughts and join the discussion