Welcome in Salesforce Marketing Cloud Worlds. Here i'm starting the Salesforce Marketing Cloud Technical Blog series for beginners, this may helps beginners and intermediate level learners to possess an honest knowledge of Salesforce Marketing Cloud .
Hey Guys, In this post, you will learn how to create a form using HTML and AMPscript and include functions that allow you to quickly insert data into a data extension.
After reading this post you will be able to:
• Create a landing page in Marketing Cloud CloudPages
• Create a Data Extension in Marketing Cloud Email Studio
• Create a form using HTML
• Insert Data - AMPscript
1. How to create a landing page in Marketing Cloud CloudPages.
A landing page is a web page that you can view from a browser, or link to in other websites and emails. You can also create custom forms with AMPscript in landing pages.
First of all, we will create a cloud page to save the user's data which will contain many fields.
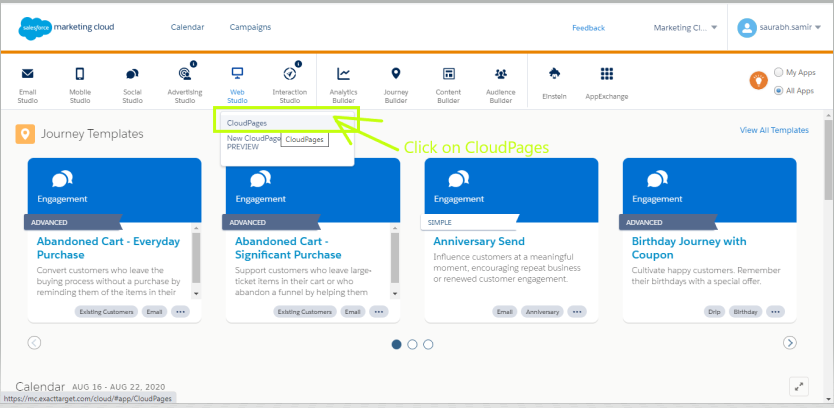
Under Web Studio> Cloud Page> Create a Collection> Create a Landing Page.
Go to Web Studio > CloudPages > Click on CloudPages
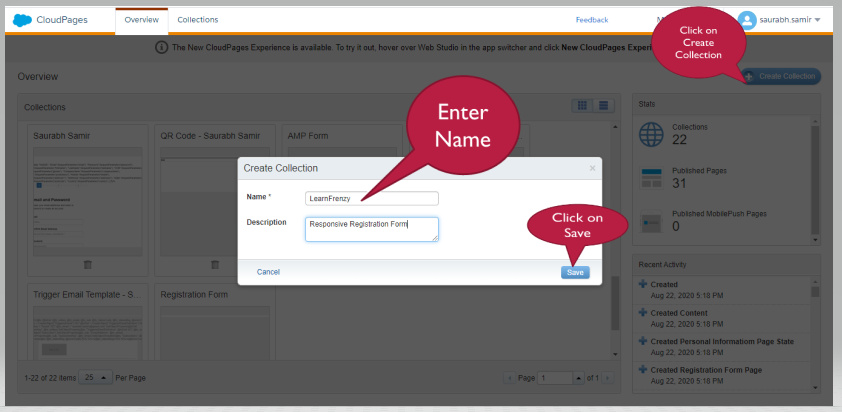
Click on Create Collection
Under Create Collection > Enter Name > Enter Description> Click on Save
Here Collection Name is LearnFrenzy
![]() MIND IT !
MIND IT !
Here, we will create a landing page with Content Builder Cloudpages.
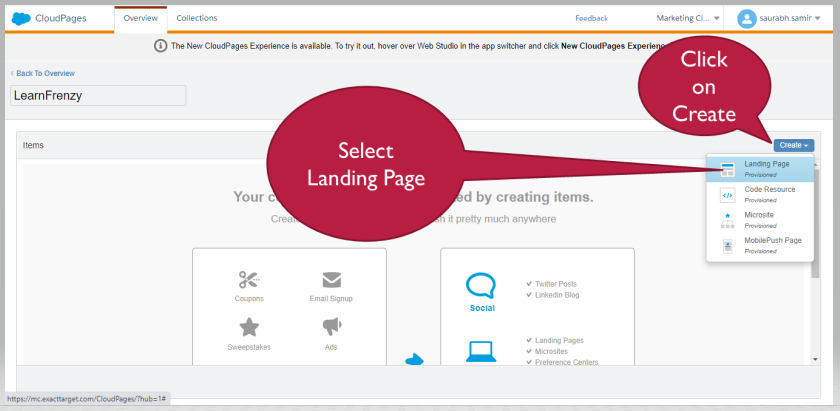
Step #1: In a collection (Here Collection Name is LearnFrenzy), click Create, then click Landing Page.
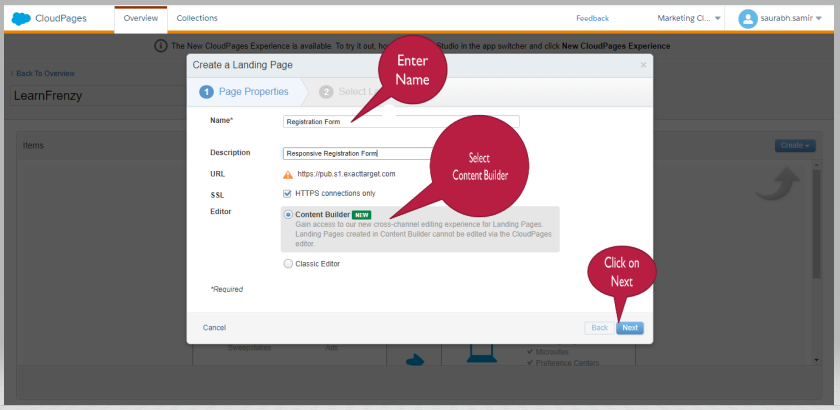
Step #2: Under the Create a Landing Page
- • Enter a name for the landing page. This field is required. You can change the name on the editor canvas by clicking the Name, entering the new name, and clicking Submit.
- • Optionally complete the Description field. You can change the description on the editor canvas by clicking the block under the title, entering the new description, and clicking Submit.
- • If using a private domain, select the domain from the URL dropdown.
- • HTTPS connections only - To make it accessible only by secure connection, select HTTPS connections. This prevents access over HTTP, reducing security vulnerability. Deselect this option if you want users to have access using an unsecured HTTP connection.
- • Select Content Builder and click Next.
Here Landing Page Name is Registration Form (Under Collections -"LearnFrenzy")
Step #3: Select a layout and click Create. The editor appears with the Blocks tab selected.
Step #4: Use Content Blocks to create your content.
• Button
• Free Form
• HTML
• Image
• Smart Capture
• Text
• Social Follow
• Social Share
• Optionally use the Content tab to drag saved content saved in a content area.
• Optionally use the Layouts tab to drag a new layout configuration in a content area.
• Optionally use the Design tab to set or change styles for the entire landing page.
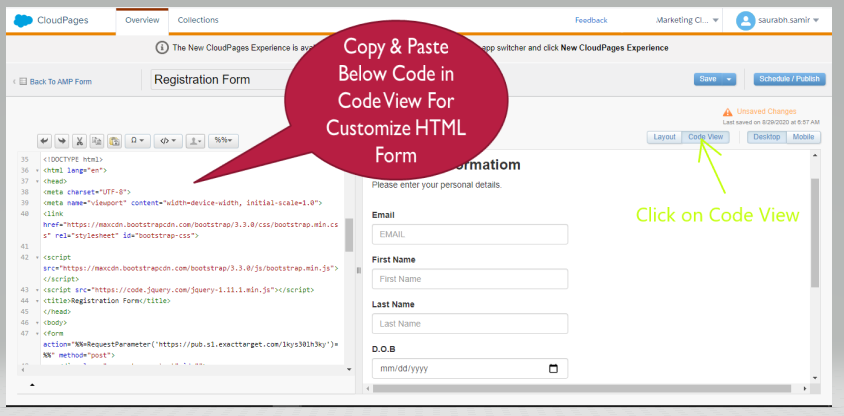
Step #5: Optional: Use the Layout/Code View toggle to change your editing experience.
-> Code View
Optional: Use the Desktop/Mobile toggle to see how your content looks in each view.
Click Save or Schedule / Publish.
After creation a landing page , we will create a data extension with the same fields as present in the HTML Form.
2. Create a Data Extension in Marketing Cloud
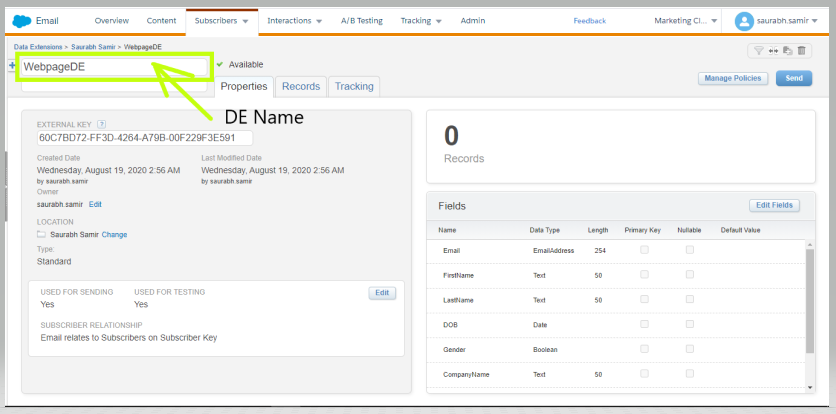
Create a Data Extension under Email Studio > Email > Subscribers > Data Extensions with the same fields as present in the HTML or as shown below
Here Data Extension Name : WebpageDE
We don’t have to assign a Primary Key, but for the purpose of this example SubscriberKey and/or EmailAddress can be assigned as such.
![]() MIND IT !
MIND IT !
Refer to How to Create a Data Extension in Marketing Cloud link for more details.
3. Create an HTML form
Create a simple responsive HTML landing page in cloud pages under Web Studio > CloudPages as shown below
HTML Code : Registration Form
<!DOCTYPE html>
<html lang="en">
<head>
<meta charset="UTF-8">
<meta name="viewport" content="width=device-width, initial-scale=1.0">
<link href="https://maxcdn.bootstrapcdn.com/bootstrap/3.3.0/css/bootstrap.min.css" rel="stylesheet" id="bootstrap-css">
<script src="https://maxcdn.bootstrapcdn.com/bootstrap/3.3.0/js/bootstrap.min.js"></script>
<script src="https://code.jquery.com/jquery-1.11.1.min.js"></script>
<title>Registration Form</title>
</head>
<body>
<form action="%%=RequestParameter('PAGEURL')=%%" method="post">
      <div class="row setup-content" id="">
        <div class="col-xs-6 col-md-offset-3">
          <div class="col-md-12">
            <h3><strong>Personal Informatiom</strong></h3>
            <p>
              Please enter your personal details.
            </p><br>
            <div class="form-group">
              <label class="control-label">Email</label>
              <input  type="email"
                      required="required"
                      class="form-control"
                      placeholder="EMAIL"
                      id="email"
                      name="email">
            </div>

            <div class="form-group">
              <label class="control-label">First Name</label>
              <input type="text"
                     required="required"
                     class="form-control"
                     placeholder="First Name"
                     id="firstname"
                     name="firstname">
            </div>
            <div class="form-group">
              <label class="control-label">Last Name</label>
              <input  type="text"
                      required="required"
                      class="form-control"
                      placeholder="Last Name"
                      id="lastname"
                      name="lastname">
            </div>
            <div class="form-group">
              <label class="control-label">D.O.B</label>
              <input type="date" class="form-control" id="date" name="dob">
            </div>

            <label class="control-label">Gender</label>
            <div class="form-group">
              <div class="col-sm-3">
                <label class="radio-inline">
                  <input name="gender" id="input-gender-male" value="Male" type="radio" />Male
                </label>
              </div>
              <div class="col-sm-3">
                <label class="radio-inline">
                  <input name="gender" id="input-gender-female" value="Female" type="radio" />Female
                </label>
              </div><br>
            </div>
            <div class="form-group">
              <label class="control-label">Company Name</label>
              <input type="text"
                     required="required"
                     class="form-control"
                     placeholder="Company Name"
                     id="companyname"
                     name="companyname">
            </div>
            <div class="form-group">
              <label class="control-label">Proficiency</label>
              <input  type="text"
                      required="required"
                      class="form-control"
                      placeholder=""
                      id="proficiency"
                      name="proficiency">
            </div>
            <button id="myButton" class="btn btn-success btn-lg pull-left" type="submit">Submit</button>
          </div>
        </div>
     </div>
    </form>
  </body>
</html>
The form action method attribute specifies how to send form-data. In this case, we are using post, which appends form-data inside the body of the HTTP request (data is not shown is in URL).
The RequestParameter('PAGEURL') function reloads the page when the form is submitted, posting the form parameters back to the same page, which are then retrieved by the RequestParameter() AMPscript functions.
This code gives us an idea of how our form will look like but as you will publish the cloud page and click on the submit button nothing will happen as we are not using any function to insert the data.
DESIGN
4. Create form logic using AMPscript
Now I use the Insert Data function to insert data into the Salesforce data extension. Check out the code given below.
%%[
InsertData(
    "WebpageDE",
    "Email",RequestParameter("email"),
    "FirstName",RequestParameter("firstname"),
     "LastName",RequestParameter("lastname"),
     "DOB",RequestParameter("dob"),
     "Gender",RequestParameter("gender"),
     "CompanyName",RequestParameter("companyname"),
     "Proficiency",RequestParameter("proficiency")

     )
]%%

<!DOCTYPE html>
<html lang="en">
<head>
<meta charset="UTF-8">
<meta name="viewport" content="width=device-width, initial-scale=1.0">
<link href="https://maxcdn.bootstrapcdn.com/bootstrap/3.3.0/css/bootstrap.min.css" rel="stylesheet" id="bootstrap-css">
<script src="https://maxcdn.bootstrapcdn.com/bootstrap/3.3.0/js/bootstrap.min.js"></script>
<script src="https://code.jquery.com/jquery-1.11.1.min.js"></script>
<title>Registration Form</title>
</head>
<body>
<form action="%%=RequestParameter('PAGEURL')=%%" method="post">
      <div class="row setup-content" id="">
        <div class="col-xs-6 col-md-offset-3">
          <div class="col-md-12">
            <h3><strong>Personal Informatiom</strong></h3>
            <p>
              Please enter your personal details.
            </p><br>
            <div class="form-group">
              <label class="control-label">Email</label>
              <input  type="email"
                      required="required"
                      class="form-control"
                      placeholder="EMAIL"
                      id="email"
                      name="email">
            </div>

            <div class="form-group">
              <label class="control-label">First Name</label>
              <input type="text"
                     required="required"
                     class="form-control"
                     placeholder="First Name"
                     id="firstname"
                     name="firstname">
            </div>
            <div class="form-group">
              <label class="control-label">Last Name</label>
              <input  type="text"
                      required="required"
                      class="form-control"
                      placeholder="Last Name"
                      id="lastname"
                      name="lastname">
            </div>
            <div class="form-group">
              <label class="control-label">D.O.B</label>
              <input type="date" class="form-control" id="date" name="dob">
            </div>

            <label class="control-label">Gender</label>
            <div class="form-group">
              <div class="col-sm-3">
                <label class="radio-inline">
                  <input name="gender" id="input-gender-male" value="Male" type="radio" />Male
                </label>
              </div>
              <div class="col-sm-3">
                <label class="radio-inline">
                  <input name="gender" id="input-gender-female" value="Female" type="radio" />Female
                </label>
              </div><br>
            </div>
            <div class="form-group">
              <label class="control-label">Company Name</label>
              <input type="text"
                     required="required"
                     class="form-control"
                     placeholder="Company Name"
                     id="companyname"
                     name="companyname">
            </div>
            <div class="form-group">
              <label class="control-label">Proficiency</label>
              <input  type="text"
                      required="required"
                      class="form-control"
                      placeholder=""
                      id="proficiency"
                      name="proficiency">
            </div>
            <button id="myButton" class="btn btn-success btn-lg pull-left" type="submit">Submit</button>
          </div>
        </div>
     </div>
    </form>
  </body>
</html>
In the above code, data is getting saved into the Salesforce data extension “WebpageDE” whenever a person hits the Submit after populating the fields.
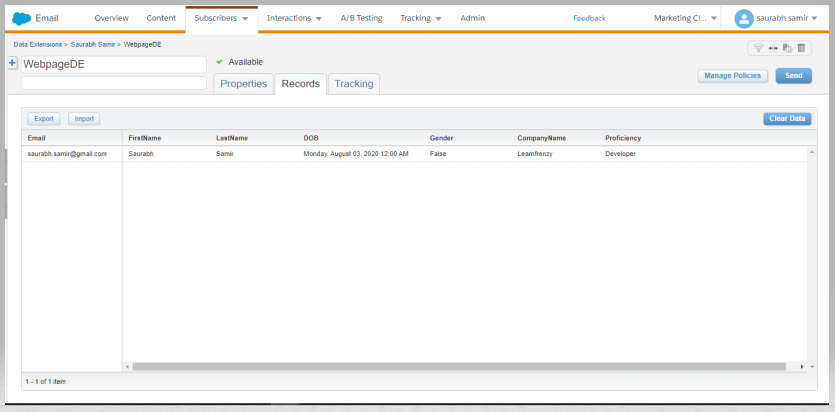
After Submitted the registration form, we can see the one record is added in Data Extension (WebpagE).
Go on and try it in your account.






Comments (11)
What others are saying about this article
Priyanka
ReaderAbraham Bravo
ReaderPrash
ReaderChai
Reader"4. Create form logic using AMPscript" - In step 4 line 2 "InsertData" it should be "InsertDE"
Thanks for the post, it was helpful in my learning.
Kumar
ReaderViku
ReaderERROR
An error occurred while previewing this content.
This can happen for many reasons, including incomplete or incorrect MC scripting (AMPscript, SSJS or GTL) or missing subscriber context.
Click Cancel to review your code or Publish to push the updated content live.
Vinod
ReaderIn my case, I am using the cloud Page URL in an email that is being sent from Salesforce CRM.
In this scenario, I would like to insert the a record into the DE when the cloud page loads. Could you please provide insights to me how could insert the data into the appropriate BU.
Thanks,
Abhi Ajit
ReaderI wanted to ask, is there a way to get the form to redirect to a different landing page (confirmation page) or a website after a user hits submit?
If I'm not mistaken, in the example shown, the form just reloads after submission correct?
Ankita
ReaderAmit
ReaderRuchita
ReaderLeave a Comment
Share your thoughts and join the discussion